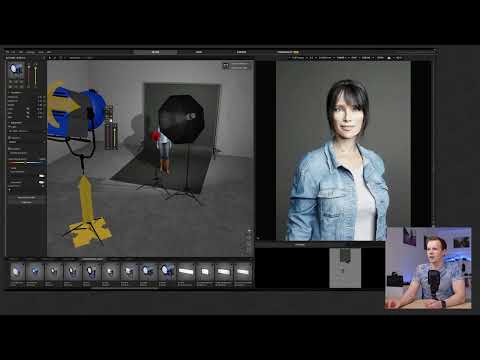
Before you build an expensive studio or lug around flashes, you can play through your lighting on the computer. Whether a lamp works better from the left or right, how a ring light illuminates the eyes, or where the shadow falls: all of this can be tried out in a 3D simulation without you having to set up a single piece of equipment. In this tutorial, I'll show you exactly this possibility using the software Satellite 3D as an example.
The video is only loaded from YouTube when you play it – data (including your IP address) is then transmitted to YouTube/Google. More in the privacy policy
I use the program myself to plan my film setups. It is powerful and offers more settings than you need at the beginning. Over time, though, you'll notice that you really only need a few functions. Above all, it's important that you get a feeling for how light affects your subject.
Key Takeaways
You can build lighting setups virtually and immediately see how they affect the subject. The simulation is live: as soon as you move or rotate a lamp, you see the result.
You can replicate real light sources, light modifiers and camera settings. Power, aperture and shutter speed influence the image, just like in reality.
The simulation has limits. Not every camera setting can be implemented in practice, for example when a flash cannot sync with a shutter speed of 1/4000 second.
You can use the simulation as preparation. Once you have found a result you like, you can then recreate it photographically with real equipment.
Step 1: The Software and the Trial Version
Before you start, you should download Satellite 3D. There is a trial version with which you can try out the basics. The full version is significantly more expensive. To get started, the trial version is usually sufficient, so you can get a feel for how it works.

Step 2: Navigating in 3D Space
On the left side of the program there is a three-dimensional space. This is where you build your setup. You can rotate the space to view your arrangement from different angles. Take a few minutes to familiarize yourself with the navigation. Only once you can move around confidently is it worth adjusting details.
Step 3: Putting the Setup Together
Now you place your subject and the light sources. Base it on a situation you actually want to photograph. Pay attention to which half of the face should be bright and which dark. You don't have to be perfect, because you can put together any constellations and check how they look. Then interpret the results with common sense.

Step 4: Rotating and Positioning Lamps
Each lamp can be moved in height, placed on the other side of the subject, and rotated. Try out how the direction of the light changes when you place the lamp higher or lower. With the function for aiming at the model, you can point the lamp directly at your subject. This way you can quickly check what the light looks like from the left or right.

Step 5: Watching the Result Live
As soon as you release a change, the result is calculated. You see directly where the shadow falls and how strong the light distribution on the face is. This step is the core of the simulation, because you don't have to take multiple test shots to arrive at a result.

Step 6: Using Real Lamps and Camera Settings
The special advantage of the software is that you can use exact flashes and lamps from the real world. You can also add a very powerful lamp that you might not be able to afford in a real studio. In addition, you can set your camera's aperture and shutter speed. The software then shows you whether the image is correctly exposed.
In my example, the camera was set to aperture 8 and 1/125 second. I changed the shutter speed to 1/250 second so that the image wouldn't be too bright. This clearly shows how settings directly affect the result.


Step 7: Recognizing the Limits of the Simulation
The simulation is not reality. If you place lamps that are too powerful very close to the subject, the result may look impressive, but in practice it is often not feasible. The lamp would burn the subject, and the chosen camera settings would not be achievable with a flash. A shutter speed of 1/4000 of a second simply cannot be triggered with many flashes. Therefore, always check whether your settings match reality.

Step 8: Swapping Light Modifiers
You can change the light modifier at any time. In the example, I replaced a softbox with a ring light. The ring light is popular for portraits because it produces a distinctive light. The software immediately shows how the effect changes. Try out several shapes to see the difference.

Step 9: Positioning the Shadow in the Subject
For the ring light to work, it must be positioned in front of the camera. The model is then photographed through the light. If you set up the setup correctly, the model casts their shadow behind them, and the face stays free of distracting shadows. Be careful not to set the lamp too strong, as otherwise the image will look overexposed. Reduce the power step by step until the result is right.


Step 10: Incorporating Hot-Shoe Flashes
You can also include hot-shoe flashes in the simulation. You add the flash and adjust the power. The guide number helps you with this. In the example, a guide number of 56 was a good starting point. Some manufacturers are not included in the software, so you may have to choose a similar flash and adjust the power yourself.

Step 11: Re-Shooting the Result
If you like a setup, you can recreate it in reality. The simulation serves as a template that you implement step by step. This way you avoid failed attempts on set and save time. Over time, you will recognize many lighting situations and can use the simulation for new ideas.
Summary – Simulating Light with Satellite 3D: Planning and Testing Lighting Setups Virtually
With Satellite 3D, you can build lighting setups on the computer before planning a real shoot. You place lamps in 3D space, rotate and move them, and see the result live. You can use real light sources, light modifiers, and camera settings. Keep in mind that the simulation has limits and not every setting works in practice. Use the trial version to get to know the software, and try out different lighting scenarios before shooting with the real equipment.
FAQ
Do I have to buy the full version of Satellite 3D?To get started, the trial version is enough to learn the basics. The full version is significantly more expensive and is intended primarily for more intensive use.
Can I really recreate every lamp from the real world?Many lamps and flashes are included in the software. However, not every manufacturer is represented, so you sometimes have to choose a similar model and adjust the power yourself.
Does the result of the simulation match reality?The simulation provides a very good picture of how light behaves. However, it is not a real shoot, so you should critically review the results before photographing.
Why should I simulate a setup before I photograph?You save time and materials because you avoid failed attempts. In addition, you can visualize complex lighting concepts in advance and try them out risk-free.
Which camera settings can I test in the simulation?You can change the aperture and shutter speed and see whether the image is correctly exposed. Keep in mind that some values, such as a very short shutter speed, cannot be achieved with a flash.


