If your portraits look flat, harsh, or unnatural, the cause is often not the camera but the light. An on-camera flash can make a big difference here, but it requires you to match the camera and flash to each other. In this tutorial, I walk you through the process I demonstrate in my practical lesson: from the basic camera settings and the flash power to off-camera flash with a light modifier and bounce off walls.
The video is only loaded from YouTube when you play it – data (including your IP address) is then transmitted to YouTube/Google. More in the privacy policy
I deliberately work with manual settings. TTL works as well, but with manual every setting can be traced and repeated at any time. This is the foundation that allows you to concentrate on your subject on set rather than on the equipment.
Key Takeaways
Key Takeaways
- First decide how much ambient light should be visible in the image, and then set the camera accordingly.
- A basic setting such as ISO 100, aperture 4, and 1/100 second is a sensible starting point.
- The aperture opening directly affects how strongly the background shows. A smaller opening makes the ambient light recede.
- You adjust the flash power in small steps (half, quarter, eighth, 1/16) until the face is correctly exposed.
- Off-camera flash via walls, ceiling, or light modifiers creates significantly softer shadows than direct frontal light.
- Keep the distance between flash and subject constant, and the exposure will remain stable even with changing subjects.
Step-by-Step Guide
Step 1: Determine the Ambient Light
Before you touch the flash, decide whether the existing light should be recognizable in the image. You can check this live on the camera monitor. If you want to keep an interesting light effect in the background, you need to set the camera so that exactly this light is correctly exposed. The flash is then used only as a supplement.

Step 2: Choose the Basic Camera Setting
ISO 100, aperture 4, and a shutter speed of 1/100 second make a good starting point. With this combination you have a stable basis that is well suited to flash photography. If you want more dynamics in the background, you can shorten the shutter speed and raise the ISO value slightly, for example to 800. As a result, the flash has to deliver less power, and the background stays more vivid instead of looking completely blasted by the flash.

Step 3: Deliberately Suppress the Ambient Light
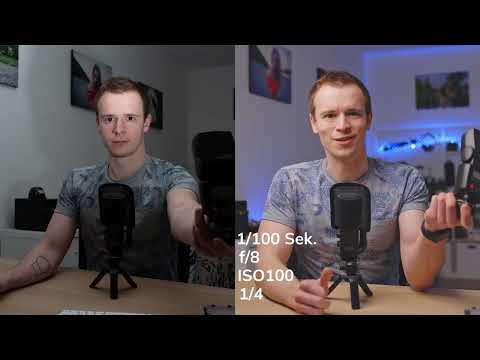
If the flash seems too weak or the ambient light is distracting, close the aperture further, for example to 8. This makes the continuous light in the background noticeably darker, while the flash remains the main light. The subject stands out more clearly from the background. Make sure that you then adjust the flash power again.

Step 4: Set the Flash Power Manually
Set the flash to manual mode and start with about half power. This is usually too much, so you reduce it in steps to a quarter, an eighth, or a sixteenth. It is worth experimenting here, because the right level depends on aperture, ISO, distance, and light modifier. The goal is a face that is well lit without looking overexposed.

Step 5: Determine the Distance to the Subject
The amount of light from the flash drops off sharply with distance. If, for example, you want to light a subject at a distance of three meters, you set the flash so that the combination of camera settings and flash power matches exactly this distance. You can then fine-tune the power. It is important to keep an eye on the distance between flash and subject, because even a one-meter difference can noticeably change the result.

Step 6: Test the Flash Direction
Before you finalize the light, try out different positions. A flash that is positioned too far to the right can cast unpleasant shadows. A position slightly to the left is often better, and your subject should occasionally look into the camera so that you can judge the effect on the face.

Step 7: Off-Camera Flash from the Front
Detach the flash from the camera and hold it to the side or in front at roughly the same angle you would have had on the camera. Make sure the flash is closer to the subject than the camera. This makes the light more intense, so the power usually needs to be set significantly lower. However, frontal flash often creates harsh shadows, so you should move on to indirect variations as soon as possible.

Step 8: Bouncing the Flash off the Ceiling
If you point the flash upward and let it reflect off the ceiling, the light comes from above and looks much more natural. However, the flash loses a lot of power in the process, so you need to increase the output, for example to one quarter. A greater distance from the ceiling and from your subject improves the result because the light is distributed more evenly.

Step 9: Reflecting off Walls
Bouncing the flash off a wall to the side of your subject is especially pleasant. Aim the flash so that the light is thrown back from the wall, and possibly stand at an angle so that the light doesn't fall behind you. The result is a large, soft light that produces particularly beautiful skin tones. Use full power for this or adjust it depending on the distance.

Step 10: Using a Light Modifier
A light modifier such as a softbox enlarges the light source and makes shadows softer. It does absorb some light, so you have to adjust the power, but the result is much more harmonious. Hold the box above the camera axis if possible, so that the light doesn't come from below and create an unnatural look.

Step 11: Flashing Behind You
You can also point the flash backward, for example at a window or a wall behind you. This is especially interesting at events when you are standing in front of a crowd. Keep in mind that windows reflect less light than walls, and plan for more power. Also make sure that the flash does not shine into the lens, otherwise stray light and reflections can occur.

Step 12: Keeping the Distance Constant
Once you have found a suitable setting, keep the distance between the flash and the subject as consistent as possible. If you move closer to your subject, the face quickly becomes too bright and the image is incorrectly exposed. This method is especially worthwhile at events such as weddings: You set the flash manually once and then shoot at a similar distance without having to constantly readjust.

Summary ??? Setting a Speedlight Manually: Off-Camera Flash Step by Step
Manual flash photography follows a clear process. You first decide how much ambient light you want in the image, then set a base of ISO, aperture, and shutter speed, and adjust the flash power step by step. Off-camera flash via walls, ceiling, or a light modifier delivers softer results than direct frontal light. If you keep the distance to the subject constant, the light remains reliable, so you can fully concentrate on your image composition.
FAQ
Why should I set the flash manually instead of using TTL?With manual settings, you know every variable and can repeat the result exactly. This is especially advantageous with changing subjects or at events.
Which basic setting is suitable as a starting point?A good starting point is ISO 100, aperture 4, and 1/100 second. From there, you adjust aperture, ISO, and flash power step by step.
How do I achieve more background dynamics?Shorten the shutter speed, for example to 1/60 second, and increase the ISO value slightly, for example to 800. This way the flash has to do less work, and the background remains visible.
Why does the light look so harsh with direct frontal flash?The flash is a small light source that hits the subject directly and creates harsh shadows. Indirect light via walls or ceiling, on the other hand, covers a larger area and looks softer.
Is a light modifier like a softbox worth it?Yes, a softbox enlarges the light source and makes shadows much softer. It absorbs some light, so you have to adjust the power accordingly.
What happens if I move closer to my subject?The subject becomes brighter because the flash delivers more light at a shorter distance. That's why you should keep the distance as constant as possible or readjust the power.


