You only have one flash and still want to photograph a portrait with a main light and a fill light? That's no problem. With a reflector, you can imitate the effect of a second light source quite well. The flash provides the main light, the reflector catches part of it and throws it back into the face, where the shadows would otherwise be too dark. The method is quick to set up and requires no additional flash unit.
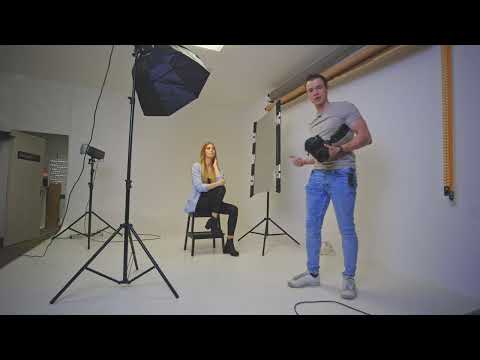
The video is only loaded from YouTube when you play it – data (including your IP address) is then transmitted to YouTube/Google. More in the privacy policy
In this tutorial, I'll show you step by step how to set up the arrangement, what to pay attention to when positioning, and how to improve your results with simple means. You don't need expensive equipment for this, but above all some patience when experimenting.
Key Takeaways
A reflector can replace a second flash: It picks up the light from your flash and directs it into the face as soft fill light.
The position determines the effect: Even small changes in the reflector's angle change how much light reaches the face.
Holding and photographing at the same time is difficult: A tripod or a second helper makes the setup significantly more stable.
The honeycomb grid on the flash can be removed: Without the grid, the flash spreads more widely and hits more of the reflector's surface.
Step-by-Step Guide
Step 1: Set up the flash as the main light
Your flash takes on the role of the main light and therefore remains the starting point of the entire setup. So you don't need to set up a second light source, but only position a reflector so that it picks up the light from the flash. In the video, I first switched the flash off so that it has no influence at that moment, and placed the reflector directly next to it. Make sure the reflector is roughly on the side where your subject is supposed to receive the fill light.

Step 2: Place the reflector next to the flash
Set up the reflector so that it can catch the cone of light from the flash. Ideally, you'd have an assistant who holds the reflector steady, or a tripod with which you can fix it in place. Both ensure a constant position and are helpful for such an important detail. If neither is available, you can also hold the reflector yourself. That works, but it is more difficult because you have to photograph and keep an eye on the angle at the same time.

Step 3: Hold the reflector yourself or fix it on a tripod
If you hold the reflector in your hand yourself, you'll notice that you have to hold it, aim it, and trigger the shutter at the same time. That is exactly what makes the setup impractical, and the results often turn out differently. In the video, I therefore at some point clamped the reflector onto a tripod and simply positioned it next to the setup. This allows you to adjust the angle calmly, and you can compare the shots directly. As soon as the reflector stands stable, experimenting becomes much easier.

Step 4: Fine-tune the angle of the reflector
Now it's about directing the light exactly where you need it. The reflector must catch the light from the flash in such a way that it is thrown back into the face. In practice, this means that you repeatedly change the angle slightly and take a test photo each time. Often a small turn is enough for the light to hit the half of the face. Feel free to plan for a few rounds, because the first attempt rarely fits perfectly. Keep in mind that a reflector only ever returns part of the light. So you get more light mainly through a better position, not by pushing the reflector.

Step 5: Evaluate the result
Look closely at the test shots. In the video, it's clearly visible that the lit half of the face becomes brighter than before. The effect is not as strong as with a real second light source, but it noticeably lifts the shadows and provides more detail in the face. If you're not yet satisfied with the result, it's usually due to the position or the distance between the reflector and the subject. So you don't necessarily have to buy additional equipment, but can first improve the existing arrangement.

Step 6: Removing the Grid from the Flash
A simple way to get more light onto the reflector is to remove the grid. The grid concentrates the light from the flash and makes it exit in a directed beam. If you take it off, the flash scatters the light more widely, and more of it hits the reflector. The result is a slightly softer and more even fill light. However, keep in mind that the light source also becomes more diffuse as a result, and the shadows appear softer overall.

Step 7: Outlook on More Elaborate Setups
With this setup, the reflector's potential is not yet exhausted. In the video, I announce that the next setup will work even more with the reflector. So the basics you learn here will also help you with more complex lighting situations. Try out the setup with different distances, angles, and reflector sides so that you get a feel for how the light behaves.

Summary – Faking a Second Light Source: Fill Light with Flash and Reflector
With a single flash and a reflector, you can imitate the effect of a second light source quite convincingly. The flash provides the main light, and the reflector bounces part of it back onto the face, thereby brightening the shadows. A tripod or an assistant ensures a more stable setup, and removing the grid from the flash distributes the light more widely. Above all, the fine adjustment of the angle is crucial, because even small changes have a clear effect on the result.
FAQ
Do I absolutely need a second flash to create a fill light?No, with a reflector the light from the existing flash can be redirected so that it brightens the shadows on the face.
Why is a tripod useful for the reflector?A tripod holds the reflector steady in position, so you can concentrate on the angle and on taking the photo.
Can I also use the reflector without a tripod?Yes, you can hold it yourself. However, that is more difficult because you have to aim it and trigger the shutter at the same time.
What is the benefit of removing the grid from the flash?Without the grid, the flash scatters the light more widely, so more of it hits the reflector and the fill light becomes more even.
How do I find the right position for the reflector?Change the angle step by step and take a test photo after each change until the desired half of the face is sufficiently brightened.


