A portrait quickly looks flat when everything is lit evenly. Three-point lighting solves this problem by combining three light sources with clearly separated roles. The main light shapes the face, the fill light determines how dark the shadows become, and the hair light separates the subject from the background.
The video is only loaded from YouTube when you play it – data (including your IP address) is then transmitted to YouTube/Google. More in the privacy policy
You don't need an expensive studio for this. What matters is that you work your way up step by step. Don't switch on all the flashes at the same time and hope for the best. If a result isn't right, you won't know which lamp is causing the problem. The following guide shows you exactly this methodical approach.
Key Takeaways
- Build the setup one light at a time: first the main light, then the fill light, and finally the hair light.
- The main light comes from the side and slightly from above. The higher and more to the side it is positioned, the stronger the shadows appear.
- The fill light only lightly brightens the shadow side. It should soften the contrast, not eliminate it.
- The hair light comes from behind and above, should be directional and hard, and must not spill into the camera.
- Small changes in position have a big effect. Check every step with a test shot or the preview.
Step 1: Start the Setup Slowly
Begin with a clear sequence. Note which flash has which role, and switch them on one at a time. This does take time, but it saves you tedious guesswork later. The shaping of the light then happens piece by piece, so you can attribute every change directly.

Step 2: Set the Main Light as the Key Light
The key light is your most important light source. Place it to the side of your subject and slightly higher, so that it falls on the face from diagonally in front and above. In this example, it is only slightly to the side. Make sure the light source stays crisp, meaning it isn't diffused too softly, so that the face gains shape.
Then take a test shot. You will see that one half of the face is clearly brighter than the other. That is exactly what is intended, because the shadow gives the face depth.

Step 3: Raise the Main Light for the Right Shadow Effect
The shadow on the left side is very harsh in the first test shot. If you want to soften it somewhat, raise the light source. Move it only minimally, slightly higher and less frontal. Even a slight tilt from above noticeably changes the lighting and makes the shadows look more natural.
Check the result again with a test shot. Only when the effect is right do you move on.

Step 4: Assess the Contrast
After the adjustment, the image already looks much better and remains high in contrast. Now consciously pay attention to the shadows on the face. If they are too dark, you can counteract them with the fill light in the next step. If they are pleasant, you don't need to change anything at this point.

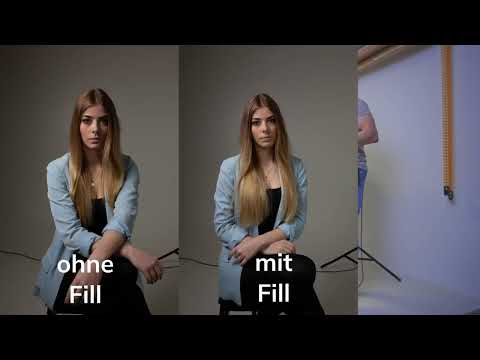
Step 5: Use the Fill Light as a Gentle Brightening
A fill light has the job of filling in the shadows without eliminating them completely. If you lit both sides equally strongly, the result would be a flat passport-photo look without character. That is why you place the fill light on the opposite side of the key light and set it significantly weaker.
Use a different light modifier for the fill light than for the main light, in the example a somewhat softer one. This way the light falls more evenly on the shadow side. Start with a very low power, because you can readjust at any time.

Step 6: Fine-Tune the Fill Light
Patience is required for this setting. Start with the lowest power and slowly work your way up. At a very low level, you often won't see any effect at all yet. Then increase the power in small steps, take a test shot each time, and compare the results side by side.
The goal is a touch more light in the shadows, not a completely lit face. Once the shadow side is pleasantly brightened, you stay with this setting.

Step 7: Prepare the hair light
With the hair light, you complete the setup. It makes the contours of the hair and shoulders glow slightly and makes the subject stand out from the dark or neutral background. Place it behind the model, ideally slightly elevated, so that it hits the head from behind and above.
Use a very small and strongly directional light modifier here. The light should not scatter, because otherwise it will fall into the camera, brighten the image overall, and destroy the contrast. A honeycomb grid on the reflector can help to focus the light even more.

Step 8: Determine the power of the hair light
You set the power over several passes. Start with a medium level and reduce it until the effect is right. Make sure that your flash does not fall below the desired minimum power, because some devices can only be turned down to a certain limit. If the power is too low, the hair light disappears completely in the image.
Feel free to test with a somewhat higher level until the hair contours stand out clearly. This fine-tuning is the moment when you notice how sensitively the setup reacts.

Step 9: Align the hair light precisely
The positioning is the real challenge. Even a few centimeters of movement by the model or the light change the result considerably. Therefore, turn the light modifier upward or downward in small steps until the strip of light hits exactly on the shoulder and hairline. A good aid is the preview, with which you can check the effect directly.
Plan time for this phase. Fine adjustment is completely normal with such setups. Also communicate with your model so that they hold the position as still as possible.

Step 10: Use the hair light from above
Many photographers achieve a better effect with a hair light from above. To do this, attach the flash to a boom stand or hang it from the ceiling so that it shines down from behind and above. This often looks more harmonious, and you don't have to hide anything, which makes positioning significantly more relaxed.
Be sure to make sure that the light does not come too far forward. If it falls on the head from the front, an unnatural halo quickly appears, which makes the portrait look wrong. The hair light must always come from behind the subject.

Step 11: Check the interplay of all three lights
When all light sources are set up, look at the overall picture critically. The main light shapes the face, the fill light keeps the shadows in check, and the hair light separates the subject from the background. Each source should fulfill its task without overpowering the others.
If you leave out the hair light, the portrait already looks decent. With the hair light, however, it gains depth and dimensionality. You should consciously perceive this difference and practice it with your own images.

Step 12: Make the final touches with feeling
In the end, your eye decides. A small shift of the hair light or a minimal change in the fill light power can make the difference. Take the time to try out these subtleties before you finalize the setup. The hair light may gladly act like a small highlight that adds spice to the image, but does not dominate.

Summary ??? Setting up three-point lighting correctly
You have now learned a clear way to build up three-point lighting step by step. Start with the main light, which determines the face and shape. Then add the fill light to gently brighten the shadows without losing contrast. Finish with the hair light, which separates the subject from the background. Check each step with test photos, then you keep an overview and quickly find the right balance.
FAQ
How do I know if my fill light is too strong?If the shadows on the face almost disappear and the portrait looks flat like a passport photo, the fill light is set too strong and should be reduced in smaller steps.
Why shouldn't the hair light come from the front?If the light hits the head from the front, an unnatural halo quickly appears and the image looks wrong, which is why the hair light should always come from behind and above.
Can I also use the hair light on its own?Yes, you can use a single flash from the front and supplement it with a hair light, but the most harmonious effect is achieved in combination with the key light and fill light.
Why should I turn on the lights one after another?If you turn on all the lights at the same time, you cannot tell which light source is causing the problem if the result is unsuitable, which is why building up step by step saves a lot of time.
Why does the hair light sometimes have to be hidden?A visible flash in the image disrupts the visual effect, so the hair light should be positioned so that the camera does not capture the light source.


