
Setting a portrait on fire sounds like elaborate work, but it can be achieved with just a few layers and clean masking. You start with a photo of a red-haired woman and add fire overlays and sparks until the hair looks as if it were burning. Step by step, I'll show you how to place, distort, and mask fire images correctly, how to work with blend modes, and how to finish the result with color, vignette, and noise.
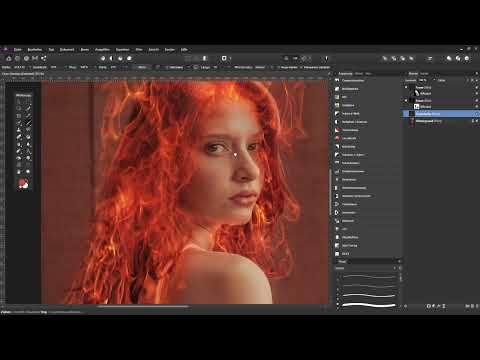
The video is only loaded from YouTube when you play it – data (including your IP address) is then transmitted to YouTube/Google. More in the privacy policy
The guide follows the flow of the video tutorial. A time jump in the video means that I have combined some working steps at certain points. Feel free to take more time than in the video when recreating this, because especially with masking, carefulness determines the effect.
Key Takeaways
- Fire overlays work best in the "Screen" blend mode, because dark areas disappear and only the bright flames remain.
- You should darken the black backgrounds of the fire images beforehand with a Levels adjustment.
- With white layer masks, you remove flames specifically where they are disruptive, for example on the face. You paint out with black and bring back with white.
- A layer with the color of the flames, applied in "Color" mode and with low opacity, creates a soft transition on the skin.
- A merged layer lets you transfer parts of the fire into the eyes, which makes the gaze more lively.
- Color balance, vignette, and noise round off the image and combine all elements into a coherent overall picture.
Step-by-Step Guide
Step 1: Open the Source Image and Insert the Fire Overlay
First, open your portrait. The original image is present as a background layer, and that is exactly your starting basis. A red-haired person is particularly suitable because the warm hair color later merges seamlessly into the flames.
Then you drag a fire image directly from Windows Explorer into Affinity Photo. The file lands as a new layer above the portrait.


Step 2: Darken the Fire's Background
The fire image should have a background that is as black as possible so that it later blends cleanly with the portrait. If the background is still gray, you can darken it with a Levels adjustment. To do this, drag the black point to the right until the background looks deep black, without the flames losing brightness. If necessary, you can also touch up individual areas with a black brush.
Step 3: Roughly Position and Distort the Fire
Before you rotate or distort the fire, you need to rasterize the layer. Affinity Photo notifies you of this when you switch to the Mesh Warp tool. Simply confirm it. With the anchor points at the edge, you can then freely deform the image, for example so that the flames follow the flow of the hair.
Then switch to the Move tool to rotate, shrink, or enlarge the image. The transformation frame at the edge helps you with this. Make sure that the flames rise upward from the hairline.

Step 4: Set the Right Blend Mode
Now comes the decisive trick. Change the layer blend mode from "Normal" to "Screen". This transfers the bright areas of the fire onto the layers below, while the dark areas become invisible. The fire immediately looks like real flames glowing on the hair.
Now you can place the layer at your leisure. Use the hair in the original image as a guide and adjust size and position until the flames seem to grow naturally out of the strands of hair.

Step 5: Fine-Tuning with the Mesh Warp
Select the Mesh Warp tool again. Coarse distortions are achieved via the anchor points, finer ones via the handles. In the video, I adjust the width at the bottom and make the flames narrower in individual places. Give yourself enough time for this work, because the shape determines whether the fire looks believable.

Step 6: Shape the Flames with a Layer Mask
Not every flame should be visible. With a layer mask, you can selectively hide parts of the fire. To do this, click the mask icon while the fire layer is active. Affinity Photo may display the new mask as black even though it should be white. According to the trainer, this is a software bug that you can ignore.
Select the brush tool and paint with black over the areas that should disappear. You can reduce the brush opacity so that the transitions stay soft. If you have removed too much, switch to white and paint the flame back in. Holding down the Shift key lets you draw straight lines. At the edges, make sure that no flame suddenly breaks off, because that looks unnatural.

Step 7: Mirror the second fire and fit it in
For a balanced effect, you need a second flame layer on the other side of the head. Duplicate the fire layer or drag the fire image into Affinity Photo again. Mirror the copy via "Arrange" and select "Flip Horizontal". Set this layer to the "Screen" mode as well and distort it with the Mesh Warp tool until the right side of the hair is burning too.
You mask the second layer like the first one. In the video, the right flame hides the face so that the facial features remain clearly recognizable. You can set the opacity to 90 percent so that the fire blends in more naturally.


Step 8: Transfer the fire color to the skin
So far, the fire does not yet glow on the skin. To do this, create a new empty layer and name it, for example, "Fire Color". Hold down the Alt key while clicking with the brush on an orange spot in the fire. This picks up the color from the image. Set the brush hardness to 0 percent so that the application stays soft.
Set the layer's blend mode to "Color" and carefully paint over the edge of the flames, for example on the forehead, chin, lips, and nose. You should leave out the color on the shoulder, since it is in the foreground. If the coloring looks too strong, simply reduce the layer's opacity, for example to 80 percent.
Step 9: Add sparks and mask them
For embers and flying sparks, drag a spark overlay into the document. Set this layer to "Screen" as well and place it so that the sparks fly above the head. The fire at the bottom and in the face area is disruptive here, so you create a white mask and completely paint the lower area with black. Then you reduce the brush opacity and remove individual sparks that disturb the face. Make sure that the remaining sparks are distributed harmoniously.


Step 10: Create glowing eyes with a merged layer
So that the fire is reflected in the eyes, you need a copy of all the changes made so far. Select the top layer and press Ctrl, Shift, and Alt plus E. Affinity Photo then creates a merged layer that combines all visible changes. You can delete this layer again at any time later.
With the Rectangular Marquee tool, you select a bright area of fire and lift it onto a new layer with Ctrl and J. Deselect with Ctrl and D, switch to the Move tool, and place the cutout in the eye. Flip it horizontally via "Arrange", set the mode to "Screen", and add a Levels adjustment as a clipping mask. Set its blend mode to "Luminosity" so that the colors are not distorted. With a mask, you then remove everything that should not appear in the pupil and soften the edges.


Step 11: Adjust color balance and vignette
Now it is about the overall effect. A "Color Balance" adjustment layer helps you with this. In the video, you shift the shadows toward red so that the dark areas become somewhat warmer and match the fire. Magenta and green stay at 0 percent, and you can add a little yellow. For the highlights, for example on the forehead, you drag the slider toward cyan and blue so that a cool accent is created. You should check the result each time with a before-and-after comparison.
For the vignette, you create a live filter layer "Vignette". Drag it to the very top of the layers panel so that it is not tied to the color balance. Set the exposure to about -4 and the hardness to around 50 to 56 percent. Scale the vignette to about 140 percent so that only the edges are darkened, and choose the shape that looks elliptical rather than round. The gaze then automatically moves toward the face.


Step 12: Add noise and unify the image
The original photo has slight noise, while the fire image partly does not. To make both parts match, you create a live filter layer "Add Noise" and drag it to the top so that it does not act as a clipping mask. An intensity of about 35 percent looks coherent in the video. Reduce the layer's opacity to around 80 percent so that the noise blends with the background. Whether you set the noise stronger or weaker is a matter of taste.
When zooming in to 100 percent, it becomes apparent that the noise is very fine despite its strong effect in the overview. Don't let that unsettle you.


Summary ??? Girl on Fire: Creating Burning Hair with Affinity Photo
You have seen how a simple portrait becomes an image with burning hair. Fire images in the "Negative Multiply" mode provide the flames, distortions and masks ensure the natural shape, and a separate fire color layer brings glow to the skin. Sparks, eye reflections, color balance, vignette and noise round off the result. With a bit of patience and lots of before-and-after comparisons, you create an image that looks as if the woman had just caught a spark.
FAQ
Do I need expensive fire images for this tutorial?No, you only need a fire overlay with a background that is as black as possible. If necessary, you can darken the background afterwards with a levels adjustment.
Why is my layer mask displayed as black?According to the trainer, this is a bug in Affinity Photo. The mask is still white, and you can work with the brush as normal.
What do I do if the fire glows too strongly on the skin?Simply reduce the opacity of the fire color layer, for example to 80 percent, or paint with a lower brush opacity only at the edge.
How can I undo changes to masks?Switch to white within the mask and paint the areas back into the image. The mask remains correctable at any time.


