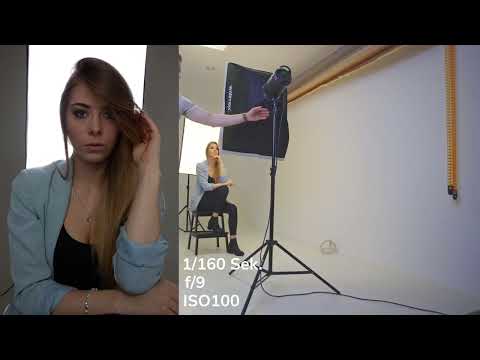
Stell dir vor, you are photographing a portrait and the face almost completely disappears into shadow, while the facial contours look as if they were carved out with a knife. With just two light sources, you can create exactly this look. This tutorial shows you three variations: side rim light, a combination of backlight and front light, and a brightly blown-out white background. For all setups you only need two lamps or softboxes.
The video is only loaded from YouTube when you play it – data (including your IP address) is then transmitted to YouTube/Google. More in the privacy policy
Key Takeaways
Side lighting emphasizes the contours and leaves the center dark. If you position both light sources at the sides and distribute them on opposite sides, you get a high-contrast look with dramatic shadows.
The nose needs special attention. When the head is facing straight forward, the nose can look strange because of the single edge of light. A slight turn of the head to the side usually solves the problem.
Two lamps are enough for a white background. Place one lamp behind the subject and aim it at the background, while the second lamp illuminates the face from the front or slightly from the side.
The power of the light sources determines the effect. The front lamp should often be stronger than the rear one so that the face does not get lost in the backlight.
Step-by-Step Guide
Step 1: Position both light sources at the sides
Begin with the setup you already know: both lamps stand at the sides of the subject. Move the first light source a bit outward and repeat the process on the other side. Make sure both lamps are about the same distance from the subject. Depending on the space, you can place the lamps on the left and right. A slight difference in height is not a problem, but it should not be too large.

Step 2: Check symmetry and fine-tune
Check whether both light sources are roughly symmetrical to the face. A lamp that is positioned slightly too high shifts the shadow edge on the face. Move the lamps until the shadows look balanced and you see the desired facial contour. With this method, you achieve a dramatic look in which the center of the face lies almost completely in darkness.

Step 3: Evaluate the result and check the nose
After adjusting, the face should be almost completely dark, while the contours stand out clearly. This look appears interesting and high-contrast, but it is not entirely realistic. Pay particular attention to the nose: if you hold the head exactly straight, the nose can look unnatural because of the one-sided edge of light and the shadow in front of it. Ask your model to turn the head slightly to the side. This distributes light and shadow better.

Step 4: Combine backlight and front light
Now you change direction. Instead of placing both lamps at the sides, you place one light source behind the subject and the other in front. The lamp behind the model illuminates the background and creates rim light on the shoulders and hair. The lamp in front provides the base brightness on the face. This setup creates a similar contrast to the side light, only in the opposite direction.

Step 5: Choose the position in the room
Position yourself and your model in the light so that the front lamp hits the face evenly. Since the softbox is large, smaller deviations are hardly noticeable. Still, check that the model does not cast a distracting shadow on the face. If the light source is too close, it looks harsh and the position needs to be adjusted.

Step 6: Adjust power and distance
The front light source is often too weak at first and stands too close to the subject. Move it back a bit so you have more room, and increase the power. The rear light source should usually run at about half the power, or even a quarter, so that it does not brighten the background too much. For a white background, the rear softbox must be brought as close as necessary. You can also use a larger softbox so that the background is evenly blown out.

Step 7: Building the White Background
After the adjustment, the background should look bright and almost white. The face remains well lit thanks to the front lamp. You can also see the effect on the shoulders and hair, which look slightly overexposed from the backlight. This setup is not the first choice for every portrait, but it is a good option if you don't have a white background available.

Step 8: Making the Background Fill the Frame
To make the white background fill the entire image, move the softbox even closer. Keep an eye on whether the lamp protrudes into the frame. Proceed in small steps and check the result after every change. Often even a minimal difference is enough to completely fill the background area. If the image looks too bright in the end, reduce the lamp's power by one small step.

Step 9: Adding a Side Light as a Complement
So that the front light doesn't look too flat, you can additionally light from the side. A light from the right, roughly in the direction of the photographer, adds depth to the image. The result looks more varied than purely frontal lighting. Here too: check the results and adjust distance and power until you like the balance.

Step 10: Outlook on Further Setups
Many variations can be achieved with two light sources. For more complex lighting, such as three-point lighting, however, you need a third lamp. If you master the two basic setups, the transition to more lights will be easier for you.

Summary – Two Light Sources for Portraits: Side Light, Backlight and White Background
With two light sources you can already create very different portrait looks. Side lighting emphasizes the facial contours and leaves the center dark. Backlight and front light create separation from the background and can produce a white look. Pay attention to distance, power, and your model's head position, because exactly these details decide the result. Try out the variations and photograph each setup once with and once without adjustment, then you will see the difference immediately.
FAQ
How can I tell if my light sources are positioned symmetrically?Make sure both lamps are roughly the same distance from the subject and the shadows on the face look balanced.
Why does the nose sometimes look strange with side lighting?With an exactly frontal head position, only one edge of light appears on the nose, while a shadow lies in front of it. Turning the head slightly to the side improves the result.
Which lamp should be set stronger?The front light source should usually have more power, while the rear light source often needs only a quarter to half of the power.
How do I achieve a white background with only two lamps?Place one lamp behind the subject, aim it at the background, and move it closer until the background is overexposed and fills the frame.
Can I also create the background without a white wall?Yes, with a softbox placed behind, a bright background can be created even if you don't have a white surface available.


