
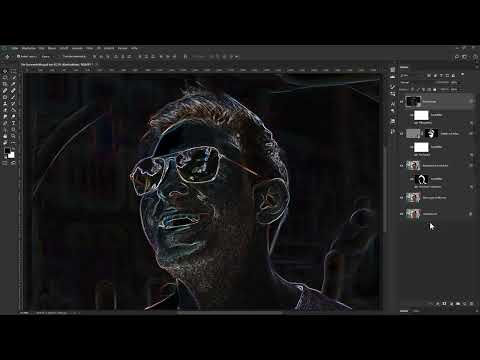
Imagine your portrait looks as if someone had drawn on it with chalk and a black pen. This is exactly the effect you build up step by step in this tutorial. You combine a sharpening layer, a filter for glowing edges, the Difference blend mode, adjustment layers, and layer styles. Finally, you lay a stone texture over it, which gives structure to the soft background.
The video is only loaded from YouTube when you play it – data (including your IP address) is then transmitted to YouTube/Google. More in the privacy policy
Key Takeaways
The sharpening layer is first hidden with a black mask. You bring the details into the image only where they should be visible, such as the beard, mouth, and glasses frame. Smooth areas like the nose remain calm.
The "Glowing Edges" filter creates the line drawing. With a very small edge width and a high edge brightness, fine, strong lines are created.
The Difference layer mode blends the contours with the image. Afterwards, you desaturate the lines so that they look black and white.
Clipping masks limit adjustment layers to a single layer. This way, saturation and levels adjustment affect only the contours and not the entire image.
Layer styles control which tonal values of the contour layer are visible. With split sliders, soft transitions are created instead of hard edges.
The stone texture is used in Overlay mode. With reduced opacity and a mask, you remove the structure where it is distracting.
Step 1: Prepare and hide the sharpening layer
You start with the contours in the image, because they form the basis of the effect. Since the sharpening layer affects the entire image, it also acts on areas that should actually remain soft, and even amplifies noise in the process. That is why you first hide the layer completely. Activate the sharpening layer, hold down the Alt key, and click the mask icon. This directly creates a black mask that hides everything.

Step 2: Bring back the details with the white brush
Now you paint with white foreground color on the black mask. A little trick helps you here: with the D key, you reset the foreground to white and the background to black. With the X key, you swap both colors. Paint only where you want to see the sharpness, such as in the beard and around the mouth. On the nose, however, no contours should appear. The glasses and the frame, on the other hand, may deliberately be sharp. For fine areas, keep switching to a smaller brush.
Step 3: Check the result of the mask
Before you continue, it is worth taking a look at the before-and-after comparison. Wherever the mask is white or gray, the sharpening layer becomes fully or partially visible. Black areas, on the other hand, remain unchanged. Pay particular attention to the transitions so that the effect does not look busy later on.

Step 4: Create a merged layer
So that you can continue using the results of all previous steps, you create a new layer above the sharpening layer. To do this, press Ctrl, Shift, Alt, and E. Photoshop then copies the visible image into a new layer. Convert this layer into a Smart Object and name it, for example, "Contour lines". This step is important because you can adjust the filter at any time later.

Step 5: Apply the "Glowing Edges" filter
For the contour lines layer, choose the filter from the Filter Gallery. In the large dialog box, the preview initially shows only a section. Therefore, click the arrow icon at the bottom and choose "Fit in View" so that you see the entire image. With Plus and Minus, you zoom in or out. In the right area, open the "Stylize" folder and choose "Glowing Edges". There you will find three sliders: Edge Width, Edge Brightness, and Smoothness. You always adjust these values to your own photo.

Step 6: Set the filter values for strong lines
A low edge width provides fine lines. The author of the tutorial chooses the value 1 here when you are working with a photo with a clear structure. You increase the edge brightness until the lines stand out clearly, in the example to 20. You set the smoothness to 10 so that the lines do not look too harsh. Then confirm with OK. The filter is now applied, and you see the result directly in the image.

Step 7: Switch the layer mode to Difference
The lines should not stand on their own, but be blended with the image underneath. To do this, change the layer mode of the contour lines layer from Normal to Difference. This creates the typical drawing look, because light and dark areas are blended with each other. However, the contours are still colored afterwards.

Step 8: Remove the color with a clipping mask
To remove the color from the contours, you create a Hue/Saturation adjustment layer. So that it affects only the contour lines, you create a clipping mask. To do this, hold down the Alt key and click between the two layers. Then drag the saturation slider all the way to the left. The colors of the lines disappear completely, while the rest of the image remains untouched.

Step 9: Strengthen the contour with a Levels adjustment
To make the lines look a bit stronger, you create another adjustment layer, this time Levels. Increase the light tones slightly and make sure that this layer also acts as a clipping mask on the contour lines. Name the layer "Kontrast" and the saturation layer "Entsättigen". Clear naming helps you quickly understand the structure later.

Step 10: Convert the image with a Black & White layer
Above the sharpening layer, you now add a Black & White adjustment layer. The image immediately becomes monochrome. With the sliders you can lighten or darken individual color ranges, such as the reds. In the tutorial, the values are specified exactly: reds -41, yellows 44, greens 42 and cyans 60. The magentas remain unchanged. However, you can also use the selection tool, click on a spot in the image and change the brightness of that area directly.

Step 11: Refine the contours with layer styles
In the background the contours still look too strong, and on the nose everything is too textured as well. Layer styles help you here. To do this, double-click on an empty area of the contour lines layer. You will find two sliders with which you determine which tonal values become transparent. The left slider controls the layer itself, the right one the layers underneath. For example, drag the dark slider to the right to remove very dark areas.

Step 12: Smooth hard transitions with split sliders
Hard edges occur when you do not split the sliders. While dragging, hold down the Alt key and click on the slider's half. This splits it, and you drag one half to the left and the other to the right. A soft transition is created. You apply the same procedure to the white slider to bring back light areas from the layers underneath. Compare the views again and again by turning the preview on and off.

Step 13: Insert the stone texture into the image
Now you add structure to the soft background. To do this, drag a stone texture from the file folder directly into your Photoshop document and make sure it is at the very top of the layers panel. While holding the Alt key, drag the texture's handle to enlarge it proportionally. With the Shift key and the double-arrow icon, you rotate the texture in 15-degree steps until the alignment fits. Confirm with Enter. The texture should look like chalk on concrete, not hyperrealistic.

Step 14: Desaturate the texture and blend it in
The texture has a slight color tint that is distracting. Therefore, place a Hue/Saturation adjustment layer directly on the texture layer as a clipping mask. Drag the saturation slider all the way to the left and name the layer "Entsättigen". Then you change the layer mode of the texture from Normal to Overlay and reduce the opacity to 70 percent. This way the structure is retained without dominating the image.

Step 15: Increase the Contrast of the Texture
Finally, you strengthen the structure with a Levels adjustment as a clipping mask on the texture. Name this layer "Contrast". Raise the bright areas slightly and darken the dark areas significantly. This makes the effect stronger, and the structure stands out clearly against the soft background.

Step 16: Remove the Texture with a Mask in Unsuitable Places
Not every structure suits every spot. In the neck area, for example, the texture looks distracting. Add a layer mask to the texture and choose a texture brush, such as a blob brush from the internet. With black as the foreground color, you can remove the texture in these places. Alternatively, you can paint with the normal brush and a lower opacity so that you only reduce the texture slightly.

Summary – Drawn Portrait Look in Photoshop: Contours, Difference, and Stone Texture
You have given a portrait a drawn look. You masked the sharpening layer so that only important details remain visible. You created the contours with the "Glowing Edges" filter and blended them using the Difference layer mode. With adjustment layers in clipping masks, you controlled color and contrast in a targeted way. Layer styles softened hard transitions. The stone texture in Overlay mode gives the background additional structure. With this workflow, you can achieve similar results with other portraits as well, by adapting the filter values and slider positions to your photo.
FAQ
Question: Why do I hide the sharpening layer completely at first?Answer: The sharpening layer affects the entire image and also amplifies noise in the background. With the black mask, only the areas where you really need the details remain visible.
Question: How do I quickly switch between white and black on the mask?Answer: With the D key, you set white as the foreground color and black as the background color. With the X key, you swap both colors.
Question: What does the Difference layer mode do?Answer: Difference blends the contour lines with the layers beneath. This creates the typical drawing look with light and dark lines.
Question: Why do I use clipping masks with the adjustment layers?Answer: A clipping mask limits the effect of an adjustment layer to the layer directly beneath it. This way, saturation and contrast change only the contours or only the texture.
Question: Can I still change the filter values later?Answer: Yes, because the contour line layer is a Smart Object. You can reopen the filter at any time by double-clicking and adjust the values.
Question: What are the split sliders in the layer styles for?Answer: If you hold down the Alt key while dragging, you split the slider. This creates soft transitions instead of hard, abrupt edges.
Question: What do I do if the stone texture is distracting in individual places?Answer: Add a layer mask to the texture and paint the structure back in these places with black or with a brush at low opacity.


