Imagine you have spent hours editing a photo, changing the exposure and adjusting the colors. The next day you notice that the image looks too dark overall, but the changes have already been permanently burned into the image. You avoid exactly this problem with adjustment layers. They are among the most important tools of professional image editing. In this tutorial, I will show you in Affinity Pixel how to place corrections on their own layers, change them at any time, and leave your original image completely untouched in the process.
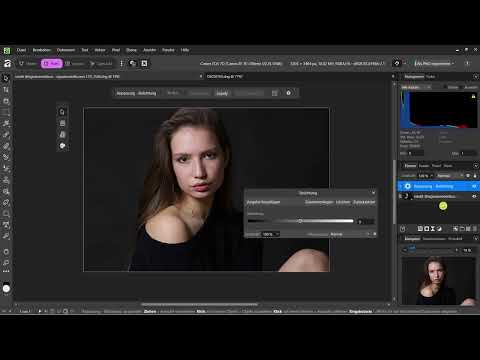
The video is only loaded from YouTube when you play it – data (including your IP address) is then transmitted to YouTube/Google. More in the privacy policy
Key Takeaways
Key Takeaways
- Adjustment layers place corrections over your image like a transparent film, without changing the pixels of the original.
- You can adjust settings such as exposure at any time afterwards.
- With the visibility eye, the opacity, and deleting, you control the effect flexibly.
- Non-destructive editing gives you security because you can correct mistakes without any loss.
Step-by-Step Guide
Step 1: Understand the Principle of Non-Destructive Editing
Before you get started, you should keep the basic principle in mind: You do not change the original image directly. Instead, you work with layers that lie above the image and influence its appearance. Your source image is always preserved. The image in this example has already been developed, so it is no longer available as a RAW file. Even in this state, however, the same principle applies.

Step 2: Find the Adjustment Icon and Open the Menu
At the bottom of the Layers panel, on the right side, you will find an icon made of a half-filled circle. Click on it to open the menu with all available adjustments. There you can choose from Exposure, White Balance, Curves, HSL, and Black & White, among others. White Balance, HSL, and Black & White are particularly important for many projects. For getting started, Exposure and Curves are excellent, because with them you quickly understand the brightness and contrast of an image.
Step 3: Create an Exposure Layer
Now select Exposure. Affinity Pixel then creates a new adjustment layer directly above your image. In the Layers panel, you see the original image at the bottom and the new adjustment layer above it. This separation is the heart of the method, because all changes now end up in this separate layer.

Step 4: Change the Exposure and Keep the Original in View
Drag the exposure slider down and back up again until you like the result. The image changes with immediately visible effect. The original image in the lower layer, however, remains completely untouched. So you can correct your settings at any time without losing quality. Once you are satisfied with the result, simply close the settings window with the X.

Step 5: Show and Hide the Layer
Next to each layer there is an eye icon. One click on it hides the adjustment layer, another click shows it again. This way you can directly compare how your image looks with and without the correction. Since the adjustment is only a layer above the image, the original is not changed in the process. This comparison helps you especially when you are unsure about a change.

Step 6: Move or Delete Layers
If you find you don't need an adjustment after all, you can delete the layer at any time. This is risk-free, because your original image remains unaffected. You can also drag a layer to a different position in the Layers panel. The order determines which adjustment takes effect first and how it interacts with other corrections.
Step 7: Reduce the Effect with Opacity
Often a correction at 100 percent is too strong. To adjust this, open the settings of the adjustment layer again by double-clicking the layer's adjustment icon. There you can reduce the opacity. The adjustment then affects the image only partially. This step is especially useful when you want to make a correction softer without completely resetting the exposure values.

Step 8: Fine-tuning with the histogram
You can fine-tune the exposure afterwards, for example to 1.5. The histogram shows you whether the brightness distribution is still balanced. If the effect in the result seems too strong to you, reduce the opacity, in the example shown to 50 percent. You can change these values as often as you like without affecting the actual image. You get this flexibility exclusively by working with layers.

Step 9: Experimenting with the adjustments
Now it's your turn to discover the possibilities yourself. Affinity Pixel offers numerous adjustments that can be combined. Try out different effects, observe how they work together, and use the eye and the opacity for comparison. Over time, you will develop a feel for which corrections suit your subject.

Summary – Using Adjustment Layers in Affinity Pixel Non-Destructively
Adjustment layers are the key to flexible and safe image editing. You place corrections over your original image, change them at any time, show and hide them, reduce their opacity, or delete them completely. Your original image always remains intact. If you internalize this way of working early on, you will save yourself a lot of frustration later and keep full control over your result.
FAQ
What is an adjustment layer?An adjustment layer is a layer that sits above the image and applies a correction such as exposure or color without changing the pixels of the original.
Why should I work non-destructively?Because you can undo or readjust any change at any time without losing image quality.
How do I hide an adjustment layer?Click the eye icon next to the layer in the layers palette. Another click shows it again.
How do I reduce the effect of an adjustment?Open the settings of the adjustment layer and reduce the opacity. The lower the value, the weaker the correction's effect.
Can I change an adjustment layer afterwards?Yes, you can reopen and change the values at any time via the layer's adjustment icon.
What happens if I delete an adjustment layer?The correction is removed, and the original image remains unchanged.


