Sometimes an edit fails not because of the effect itself, but because it acts everywhere at the same time. An exposure that is too bright across the entire image blows out the sky, the background, and the face alike. This is exactly where layer masks come in. With them, you determine where an adjustment is visible and where it is not, down to the individual pixel. In this tutorial, you will learn the basic principle, how to work with the paint brush, and fine control via hardness, flow, and opacity.
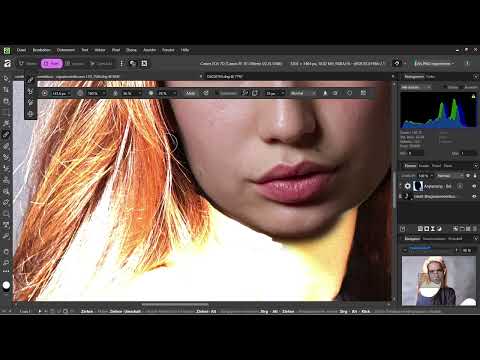
The video is only loaded from YouTube when you play it – data (including your IP address) is then transmitted to YouTube/Google. More in the privacy policy
Key Takeaways
- On a layer mask, the rule is: black hides the effect, white shows it.
- You create a mask directly via the layer mask icon in the Layers panel while the adjustment layer is selected.
- With the paint brush (shortcut B), you paint on the mask and thereby determine where the effect applies.
- The X key swaps black and white in a flash and saves you from constantly switching back and forth via the color swatches.
- Low hardness and low flow ensure soft transitions without visible edges.
- With "Invert mask," you reverse the entire effect without having to repaint.
Step-by-Step Guide
Step 1: Create an Effect as an Adjustment Layer
Start with an effect that you initially apply to the whole image. In the example, you open the "Adjust" section and choose "Exposure." The image becomes very bright, which is intentional for the demonstration. However, you quickly notice that you don't want the brightness everywhere. Exactly at this moment, you need a mask.

Step 2: Prepare the Paint Brush
Before you paint anything, select the paint brush. You'll find it in the toolbar or quickly via the shortcut B. This tool is entirely sufficient for mask work. So you don't have to look for additional tools, but can work directly with the brush on the mask.

Step 3: Create the Layer Mask
Make sure the adjustment layer is selected in the Layers panel. Then click the layer mask icon at the bottom right. It shows a rectangle with a black circle inside. A white rectangle immediately appears next to the layer. This thumbnail is your mask. White here means that the effect is fully visible. Because the mask is completely white, the exposure initially continues to affect the entire image.

Step 4: Hide the Effect with Black
Now we come to the core principle. Since you don't want the effect on the face, you paint there with black. Switch the color at the bottom left to black. Then run the brush over the face. The exposure disappears there, while the rest of the image remains brightened. Moving the brush over the image without clicking, by the way, already shows you in the preview what the effect will look like.

Step 5: Adjust the Brush Settings
In the options bar above the image, you set the properties of the brush. In the example, the size is about 100 pixels. You can also adjust hardness, flow, and opacity. In addition, there is a stabilizer that smooths your strokes, and a rope mode with which you steer the brush path more precisely. Especially for fine details, it's worth choosing the brush to suit the area. You paint large areas roughly, but contours and transitions with a smaller brush.

Step 6: Correct Mistakes with White
If the effect should return in a spot after all, simply switch to white and paint over it on the mask. This way, you restore the effect where you need it. The mask thus stays flexible, because every stroke can be corrected with the opposite color. You don't have to delete anything, you simply paint against it.

Step 7: Creating Soft Transitions with Hardness and Flow
A common mistake is using hard brush edges. They create white or dark lines that stand out clearly from the image. To achieve a smooth gradient, you reduce the hardness of the brush. A lower flow is equally helpful, because it builds up each stroke gradually instead of taking full effect immediately. Especially with skin tones or soft gradients, this setting determines whether the transition looks natural.

Step 8: Checking the Mask
To see exactly where you have painted, right-click on the mask and select "Edit Mask". The mask now appears in black and white. Black areas are the part you have hidden. White areas show the effect. This way, you can quickly spot gaps. In the example, a black area is missing in the middle, which you can paint over afterwards with the black brush. Such mistakes often only become noticeable in this view.

Step 9: Inverting the Mask
Sometimes it is easier to paint the opposite. If you want the effect everywhere except on the face, open the context menu via the mask and select "Invert Mask". This turns black into white and vice versa. The effect now lies exclusively on the face, although you have essentially only flipped the selection.

Step 10: Working Faster with the X Key
When painting on masks, you constantly switch between black and white. If you set the color via the color swatch every time, you lose a lot of time. The X key swaps the two colors directly. With a few key presses, you jump between modes without taking your eyes off the image. This habit noticeably speeds up your work.

Step 11: Using Opacity for Fine Details
Finally, you can fine-tune the effect even further. The opacity of the brush or the opacity of the layer itself lets the effect show through partially. This lets you make transitions even smoother and avoid an adjustment that is too strong. The interplay of hardness, flow, and opacity ultimately produces the result you had in mind.

Summary – Layer Masks in Affinity Pixel: Black Hides, White Reveals
Layer masks give you full control over where an effect is visible. You first apply an adjustment to the image, then create a mask and paint with black the areas that should remain untouched. White restores the effect. With the X key, you quickly switch between the two colors, with "Edit Mask" you check the result, and "Invert Mask" reverses the effect at the push of a button. Soft brush edges also ensure natural transitions. Once you have internalized this black-and-white principle, you have mastered a large part of precise image editing.
FAQ
Question: Why is the mask displayed as white when it is created?Answer: A new layer mask is white by default so that the effect is initially fully visible. Only by painting with black do you hide it in specific places.
Question: How do I tell which areas of the mask are active?Answer: Right-click on the mask and select "Edit Mask". White areas show the effect, black areas hide it.
Question: What does a hard brush edge do?Answer: A hard edge creates visible lines at the transition between the effect and the original image. Therefore, reduce the hardness to get softer gradients.
Question: How do I quickly swap black and white?Answer: With the X key, you switch the foreground color between black and white without having to open the color swatch every time.
Question: When is "Invert Mask" worthwhile?Answer: If the effect should be everywhere except a specific area, it is often faster to invert the mask instead of painting over most of the image.


