
Do you know this? The photo of a person is perfect, but the background doesn't fit your subject. With the Quick Mask in Affinity Photo, you can cleanly separate a figure from the background without having to erase every pixel by hand. In this tutorial, I'll show you how to cut out a dancer step by step. In the end, you'll have a mask that you can refine at any time.
The video is only loaded from YouTube when you play it – data (including your IP address) is then transmitted to YouTube/Google. More in the privacy policy
Key Takeaways
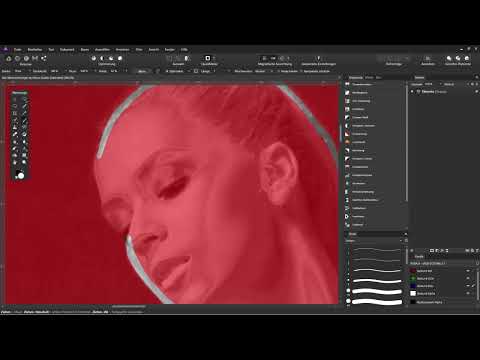
- The Quick Mask makes your selection visible: red stands for hidden areas, the original color for the later selection.
- With the Brush Tool, you paint in white the areas you want to keep, and with black you remove them again.
- The stabilizer on the brush ensures smooth strokes, especially if your hand isn't entirely steady.
- The Fill Tool with a suitable tolerance closes the interior areas of a figure so that they are fully selected.
- The finished selection is applied as a mask to the group, so that all layers within it behave correctly.
Prepare and group layers
Before you start with the selection, you should organize your layers. Hold down the Shift key and click the topmost active layer and then the bottommost layer. All layers in between are automatically selected as well. Then you combine them into a group with the keyboard shortcut Ctrl + G. Alternatively, you can find the function under Arrange and Group. Give the group a meaningful name by double-clicking, for example "Dancer," and collapse it again.

Activate the Quick Mask
Select the "Dancer" group and activate the Quick Mask in the toolbar at the top. Your image will then appear completely tinted red. This is not an error, but exactly the state you want to work in. Everything that stays red will be hidden later, and everything that keeps its original color becomes the selection.

Enlarge the view
To work precisely, you should zoom into the image. The easiest way is with your mouse's scroll wheel. If that doesn't work for you, open the Preferences under Edit, switch to the Tools section, and activate the option "Use mouse wheel to zoom" there.

Set up the Brush Tool
Now switch to the Brush Tool. You can reach it via the toolbar or with the keyboard shortcut B. If you use a graphics tablet with a stylus, activate pressure sensitivity in the brush options. This way, the stroke width becomes larger or smaller depending on pressure. A width of about 25 pixels has proven effective for this subject. Also reduce the hardness so that the edge of the brush doesn't become too sharp. By double-clicking the brush, you can additionally reduce the spacing, which makes the strokes look smoother. Don't forget to adjust the width again afterwards.

Activate the stabilizer
A small tip that makes a big difference: In the brush settings, activate the stabilizer and set the length to a low value like 1. Without the stabilizer, strokes quickly look shaky if your hand trembles. With the stabilizer active, the contour stays smooth. I recommend leaving this option switched on permanently.

Working with white and black
For the selection, you paint in white. To do this, set the foreground color to white by double-clicking the color swatch. If you've painted beyond the target, press the X key. This switches between white and black. With black, you remove areas from the selection again. This way, you can correct at any time without starting over.
Navigating in the image
While you paint, you often need to move the image. To do this, hold down the spacebar. The mouse pointer turns into a hand, and you can navigate through the image by clicking and dragging. Then release the spacebar to continue painting.

Tracing the Outline of the Model
Now it's time to get down to the nitty-gritty. With a white brush, trace along the outer outline of the dancer. Since the end result is meant to be a statue, you don't have to capture every fine hair. So leave out details like individual strands of hair or eyelashes. If you still include too much, press X, paint over it with black, and then switch back to white. For the hair at the neck, you can take the liberty of leaving this area out. Work calmly and in small sections, because it's fine if it takes some time.

Selecting the Interior Areas with the Fill Tool
So far, only the outline is selected. To capture the inside of the figure as well, use the Fill tool, which you call up with G. Set the foreground color to white and click into the interior areas. However, this only works if the outline is closed. If there is a gap somewhere, the color flows into the background. In that case, simply undo the step, close the gap with the brush, and try again.
The tolerance determines how far the fill extends. At 20 percent, some edge areas remained unselected in the example. A tolerance of about 90 percent closed all the small gaps. However, make sure the fill does not run uncontrollably into the background.

Softening the Edges
After filling, the edges often look hard and pixelated. You can soften these edges by selecting the selection and choosing the Gaussian Blur entry under Filter. First drag the radius all the way to the left so that nothing is blurred. Then slowly slide it to the right and watch the preview. You should avoid stair-step effects in the process. In the example, about 0.1 pixels was a good value. Then confirm with Apply.

Leaving the Quick Mask and Creating a Mask
Double-click the hand icon so that you see the entire image again. Then leave the Quick Mask via the icon in the toolbar. The areas you painted with white are now loaded as a selection. In the Layers panel, select the "Tänzerin" group and click the mask icon. The selection thus becomes a mask. If the selection is still active, deselect it with Ctrl + D.

Assigning the Mask to the Group
When you create a mask, it ends up at the very top by default and thus affects all layers below it. To make the mask belong only to the group, open the group and drag the mask's thumbnail to the position between the group thumbnail and the name. A blue bar appears there. If you release the mouse at this spot, the mask is permanently assigned to the group.

Refining the Mask
Now zoom into the image again and check the cutout. Select the Brush tool, reduce the width, and click on the mask, not the image layer. With a soft brush, you can correct dark remnants or messy edges. With X, you switch to white when needed and restore areas that were removed by mistake. Take your time with this step, because this is where the quality of the cutout is decided.

Testing a Colored Background
If you want a solid color instead of the transparent background, create a new fill layer and drag it all the way to the bottom. Choose a color, for example a strong shade of blue. You can easily spot dark edges this way. If the edge is too dark, simply choose a lighter shade and correct the mask again. This way you immediately see whether the cutout fits cleanly.

Summary – Cutting Out a Dancer in Affinity Photo with the Quick Mask
With the Quick Mask, you can cut out figures precisely in Affinity Photo. You group the layers, trace the outline with the brush and the stabilizer, and fill in the interior areas. The selection is then softened and assigned to the group as a mask. Finally, you correct details directly in the mask. This produces a clean cutout that can be adjusted at any time and is ideal for composites.
FAQ
Do I need a graphics tablet to work with the brush?No, the method also works with a mouse. Pressure sensitivity only offers advantages if you use a stylus.
What do I do if the mouse wheel doesn't work for zooming?Under Edit, open the settings, switch to the Tools section and enable the option "Use mouse wheel to zoom".
Why does the entire background turn white when filling?The outline is not closed in one spot. The color then flows through the gap. Undo the step, close the gap with the brush and fill again.
When should I increase the tolerance of the fill tool?If small, unselected areas are still visible at the edge after filling, a higher tolerance helps, for example around 90 percent.
Can I still modify the mask later?Yes, click the mask in the layers palette and continue working with the brush. With X you switch between white and black.
Why should the mask be assigned to the group and not to the individual layer?If the mask is at the very top, it affects all layers beneath it. By moving it into the group, it only affects the dancer.


