
A Christmas angel without wings quickly looks incomplete, and this is exactly where this tutorial comes in. You will learn how to cleanly select an angel's wings in Affinity Photo with the Pen Tool using a path, create a mask from it, and then prepare the wing as a standalone layer for your compositing. The technique is suitable not only for angels, but also for glasses, technical devices, and other subjects with clear curves and edges.
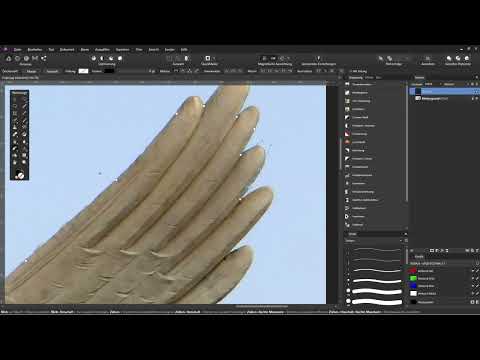
The video is only loaded from YouTube when you play it – data (including your IP address) is then transmitted to YouTube/Google. More in the privacy policy
Key Takeaways
- Especially with curves, the Pen Tool delivers much cleaner contours than the Brush Tool or the Quick Mask.
- While holding the Control key, you move individual anchor points and their handles; while holding the Alt key, you convert a curve into a corner.
- A closed path can be used directly as a path mask, which you can edit again at any time.
- With an additional pixel mask, you can deliberately add notches, softer transitions, and irregularities.
- With "Merge Visible," you get the wing as a cut-out single layer that can be placed easily in compositing.
Step 1: Load the image and prepare the layer
Simply drag and drop your wing image into Affinity Photo. It automatically lands as a background layer in the Layers panel. This layer is your foundation, to which you will later apply the path and mask. You could also select the wing using the Quick Mask and the Brush Tool, but for this subject the Pen Tool is worthwhile.

Step 2: Activate the Pen Tool and zoom into the image
Select the Pen Tool. It is hidden behind an icon in the toolbar, but it can also be conveniently accessed with the keyboard shortcut P. Then zoom in close to the wing so that you can place the contours precisely. The closer you work, the better you can see where the curve actually runs.

Step 3: Set the first anchor points and close the path
Click a first point in the image. A small rectangle appears at first, marking the anchor point. Then set a second point, and a line connects the two. A new path layer appears in the Layers panel. Set more points along the wing and close the path at the end by connecting it back to the starting point. This creates a closed path that initially consists only of angular anchor points.

Step 4: Create curves
So that the wing doesn't look like a polygon, you need curves. To do this, click on an anchor point and drag while keeping the mouse button pressed. Small handles, the so-called "arms," now protrude from the point, and the point is displayed as round. In this way, you create soft, flowing transitions without visible edges.
Step 5: Adjust anchor points and handles with the Control key
A path only becomes precise once you readjust it. Hold down the Control key, and the mouse pointer changes. Now click an anchor point and drag it to the desired position. The same works with the arms: if you drag a handle, the opposite handle moves automatically with it, and the curve stays smooth.
Step 6: Create corners with the Alt key
Not every transition on the wing should be round. Where you need a sharp point, hold down the Alt key, click on the round anchor point, and drag. This turns the point into a corner, and the two arms can be moved independently of each other. You can recognize this by the square symbol at the anchor point. With this combination of curves and corners, you recreate the structure of the wing.

Step 7: Readjust the path and trace the entire wing
The first attempt is rarely perfect, and that is completely normal. If necessary, delete the path layer and start over if you don't like the curve. Make sure that the path runs along the wing's contour and does not extend beyond the wing. If an arm is too long, correct it while holding the Control key. Set anchor points deliberately with some distance between them, because straight sections need fewer points than curved ones. If you let the path run slightly inside the wing, the result will look cleaner later.
Step 8: Applying the Path as a Mask
With the Pen Tool active and the path layer selected, the tool options show the "Mask" and "Selection" buttons. Choose "Mask", and Affinity Photo hides everything outside the path. The wing stays visible, and the rest becomes transparent. The advantage: the path mask remains editable, so you can adjust its course with the Pen Tool at any time.

Step 9: Adding a Pixel Mask and Fine-Tuning
A path mask is precise, but quite smooth. To add irregularities, you can also create a pixel mask. To do this, select the background layer, click the mask icon, and drag the new mask onto the layer until the blue bar appears. Then activate the Brush Tool with black as the foreground color and paint over areas that should become transparent. A graphics tablet helps here, because you can vary the brush size through pen pressure. Hold down the spacebar to move around in the image, and work your way through the wing piece by piece.

Step 10: Converting the Path into a Pure Pixel Mask
If you want to work exclusively with a pixel mask, first convert the path into a selection. To do this, choose the "Selection" option instead of "Mask" in the Pen Tool menu. Then activate the background layer and click the mask icon at the bottom of the Layers panel. The selection is now applied as a pixel mask. With Control and D you deselect the current selection again. You can then refine the mask with the brush at your leisure: soften edges a bit, add small notches, or reduce transitions that are too harsh. A brush width of about 11 pixels and a higher hardness are already sufficient for many areas.

Step 11: Exporting the Wing as a Separate Layer
In the compositing, the wing should later sit on its own layer so that you can place it freely. To do this, select the topmost relevant layer and choose the "Merge Visible" command in the "Layer" menu. Alternatively, you can do this with the keyboard shortcut Control, Alt, Shift and E. The wing is then available as a single transparent layer without a mask. Hide the background to check that only the wing remains. You can now insert this layer into your image behind the dancer or the angel.

Summary – Cutting Out Angel Wings with a Path in Affinity Photo
With the Pen Tool in Affinity Photo, angel wings can be cut out precisely and with clean curves. You set anchor points, shape curves by dragging handles, and create corners using the Alt key. The finished path becomes a path mask that you can correct at any time. With an additional pixel mask, you add notches and soft transitions, and by merging visible layers you get the wing as an independent layer for your compositing. Practice plays the biggest role here: the more often you work with paths, the more confidently you will place the points.
FAQ
Why should I use the Pen Tool instead of the brush for wings?The Pen Tool creates smooth, precise curves and edges that can be edited at any time. For wings with many curves, it is much more pleasant to use than the Brush Tool.
How do I create a corner instead of a curve?Hold down the Alt key while you click and drag on a round anchor point. The point then becomes a corner, and the handles can be moved separately.
How do I move individual anchor points afterwards?Hold down the Control key, click on the desired anchor point, and drag it to the new position. The same applies to the handles of the curves.
What is the difference between a path mask and a pixel mask?A path mask remains editable via the path layer. A pixel mask is modified with a brush and color and is suited for notches, soft transitions, and irregularities.
Can I combine a path and a pixel mask?Yes, that is actually the most flexible solution. You can continue to adjust the path mask with the Pen Tool and additionally add fine details with the brush on the pixel mask.
How do I get the wing as a cut-out single layer?Select the topmost relevant layer and use "Merge Visible" or the keyboard shortcut Control, Alt, Shift and E. Then hide the background to check the result.
What does the assistant do when creating masks?The assistant automatically applies a mask to the selected layer. This is practical, but it can sometimes trigger steps you did not plan. You can turn it on or off at any time in the assistant settings at the top.


