
Imagine a snow globe in which the flakes are just beginning to dance. In this tutorial, you build exactly this effect into a composite with the Christmas angel. You learn how to create two snow layers, design your own snow brush with random dynamics, and give the flakes a sense of space with motion blur and depth blur. You carry out all steps in Affinity Photo.
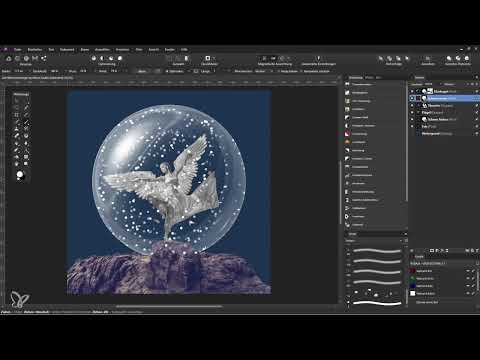
The video is only loaded from YouTube when you play it – data (including your IP address) is then transmitted to YouTube/Google. More in the privacy policy
Key Takeaways
The snow consists of two separate pixel layers, one in front of and one behind the angel. Both receive a mask that follows the snow globe so that no flake extends beyond the edge. The core of the effect is a custom brush whose size, spacing, and opacity vary randomly through the dynamics. With live filters such as Ripple, Motion Blur, and Depth of Field Blur, you give the flakes shape, movement, and depth.
Step 1: Creating the two snow layers
First, create a new pixel layer and name it, for example, "Snow front". Drag this layer in the Layers panel in front of the dancer so that the flakes later lie directly in front of the angel. Make sure that the blue bar of the globe remains visible across its entire width.

Then create a second pixel layer and name it "Snow back". Place it behind the wing, but still in front of the rock. This later creates the depth between the foreground and background snow.

Step 2: Aligning masks to the snow globe
So that the snow falls only inside the globe, you work with masks. Hold down the Control key and click on the mask of the snow globe. You then apply this selection to the "Snow front" layer by creating a mask there. Repeat the process for "Snow back". This way, you can paint freely later without flakes becoming visible beyond the edge of the glass.

Step 3: Creating a custom snow brush
The snowflakes should not look like perfect circles, but rather like irregular confetti. For that you need a custom brush. Open the Brushes panel and double-click an existing brush to see its properties. There you will find size, flow, spacing, and dynamics. The dynamics respond to the pen pressure of your graphics tablet and let you vary sizes as soon as you apply more or less pressure with the pen.

It is best not to change the existing brush, but to create a copy. To do this, select the brush and click "Duplicate" at the bottom of the panel. The new brush is yours and can be adjusted as you wish.

The settings that make up the snow are found under size, accumulation, hardness, spacing, flow shape, and rotation. What is decisive, however, is the dynamics. Here you specify that not only the size varies with pen pressure, but also that values such as opacity are adjusted randomly within a certain range. The preview at the top shows you immediately what the flakes look like.


The result is mostly round brush tips, some elliptical and randomly rotated. The spacing is quite large, and the opacity fluctuates. This already looks typical of snow in a snow globe. Close the dialog when you like the preview.
Step 4: Painting snow onto the layers
Activate the Paint Brush tool and, on the "Snow front" layer, choose white as the foreground color. A brush width of 13 pixels is too small for an image 8000 pixels wide. Therefore, increase it to about 110 pixels. Then simply paint over the desired area. Since the mask is already active, you can even paint beyond the edge of the globe without the snow spreading outward.

Place the flakes the way you like them. Make sure, if possible, that you don't paint over the angel's face. If it does happen, you can correct the area later with a mask.
Then switch to the "Schnee hinten" layer. Here you reduce the brush width a little and paint the flakes slightly smaller. In the lower area of the globe, the snow can fall a bit more densely, since the flakes fall downward. You lower the opacity of this layer slightly so that the snow looks like it is further back.

There should be no snow in the area of the front rock, because it is located inside the globe. Therefore, choose a brush with lower opacity, activate the mask of the "Schnee vorne" layer, and set the foreground color to black. With the black brush, you paint over the disruptive flakes so that they disappear again.

Step 5: Distorting the flakes with a Ripple filter
So that the flakes no longer look like exact circles or ellipses, you apply a live filter. Activate the "Schnee vorne" layer and, in the "Layer" menu, select the option "Live Filter Layer" and then "Ripple". Affinity Photo then automatically creates a filter layer. Reduce the effect significantly, for example to a value of around 10, so that the flakes appear only slightly uneven.

Pay attention to the selection when transferring the filter. If you hold down the Control key while the Ripple filter layer is active and click the layer, you may select several elements at the same time. Therefore, click on the layer's thumbnail, not on its name. Then copy the filter with Control and C and paste it onto the "Schnee hinten" layer with Control and V. The rear flakes thus get the same look.

Step 6: Motion blur for falling movement
Now the snow should look as if it is falling. Select the "Schnee vorne" layer, open a live filter layer again, and this time choose "Motion Blur". Set a rotation of about 55 degrees and increase the radius significantly, almost to the middle. Look at the effect directly in the image and adjust the value until you like the movement.
You repeat the process for the rear layer. Choose a different angle there, such as 135 degrees, and set the radius a bit weaker. This way the flakes move in different directions, which emphasizes depth.

Step 7: Depth of field blur for a spatial impression
Finally, the outer areas should appear blurred while the center stays sharp. The transition in between should be smooth. You achieve this with a live filter layer for depth of field blur. To do this, click on the background layer, select "Layer" and then "New Live Filter Layer". There, select "Depth of Field Blur".
The filter initially sits within the background layer. Drag its thumbnail all the way to the top in the Layers panel so that it affects all the layers beneath it. A dialog box with sliders and a circle directly in the image appear.

Position the center of the circle so that it encloses the snow globe. With the anchor points at the edges, you adjust the ellipse proportionally. At the top, left, and right, you may adjust the circle individually until it fits the globe.

Then you drag the radius until the outer areas are nicely blurred and the center stays clear. A gentle sharpness gradient then forms between the two rings. Don't overdo it, because in the preview the effect quickly looks too strong. A medium value is usually the better choice.

Close the dialog when you like the result. A before-and-after comparison finally shows you how much the flakes, the movement, and the depth have changed the image.

Summary ??? Creating Snowfall in the Snow Globe with Your Own Brush
In this tutorial, you created two snow layers in front of and behind the angel and bound them to the snow globe with masks. You painted the snow with a brush you duplicated yourself, whose dynamics produce random sizes and opacities. Wave, motion, and depth blur filters give the snow shape, direction, and depth. With these basics, you can apply the effect to other subjects and change the values as you like.
FAQ
How do I create my own snow brush in Affinity Photo?Open the Brushes panel, select an existing brush, click "Duplicate," and adjust the dynamics as well as the other settings.
Why should I duplicate the brush instead of modifying it directly?This way the original brush remains unchanged, and you can return to the default values at any time.
How do I prevent the snow from extending beyond the snow globe?Create a mask for the snow layers and use the snow globe's mask as a guide. To do this, hold down the Control key and click on the globe mask.
Which brush width is suitable for a large image?For an image 8000 pixels wide, a brush width of about 110 pixels was appropriate, since 13 pixels would be too small.
How do I transfer a live filter to another layer?Click on the thumbnail of the filter layer, not on its name, copy it with Control and C, and paste it onto the target layer with Control and V.
How do I create a soft transition between sharp and blurred areas?Use the Depth of Field live filter, drag it all the way to the top in the Layers panel, and adjust the center point and radius of the circle.


