
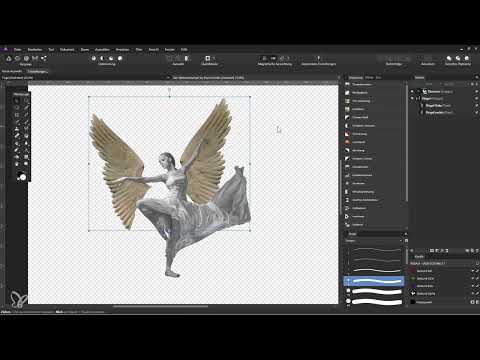
Cut-out angel wings only look convincing when they sit behind the dancer and blend into the scene. That is exactly what I'll show you in this tutorial in Affinity Photo. You'll learn how to transfer a wing from another file into your document, enlarge the canvas, mirror, rotate, and texture both wings, and then give them a metallic look with a gradient map. Finally, you'll add shadows with a pixel layer that make the wings look three-dimensional.
The video is only loaded from YouTube when you play it – data (including your IP address) is then transmitted to YouTube/Google. More in the privacy policy
Key Takeaways
- In Affinity Photo, pixel layers cannot be moved between documents via drag & drop. Copy and paste gets the job done.
- Content is always pasted above the active layer or group. So make sure to select the right layer beforehand.
- The "Resize Canvas" option creates space without recalculating the pixels of the image. "Resize Document," on the other hand, would scale the image content.
- A grayscale gradient map creates a metallic look if you distribute the tonal values deliberately.
- Soft shadows are created when you paint with the edge of the brush and then apply a Gaussian blur.
Step-by-Step Guide
1. Preparing the two files
First, open the file with the already cut-out wing and also the file with the Christmas angel. The wing is on a pixel layer in the Layers panel. If you simply drag the layer into the other document, nothing happens. That is exactly why you need the detour via the clipboard.

2. Copying the wing and switching to the target document
Select the wing layer and press Ctrl + C. Then switch to the file with the Christmas angel. You will paste the wing there later. At this point the copy is not yet visible in the document, but it is ready on the clipboard.

3. Activating the right layer and pasting
Before you press Ctrl + V, make sure in the Layers panel that the desired group or layer is active. Pasting without an active selection places the wing at an unexpected spot within the structure. If the right layer is selected, the content lands directly above it. If that didn't work, simply delete the layer again and repeat the process with the selection active.

4. Enlarging the canvas instead of the document
Now there is not enough room to position the wing beneath the dancer. In the Document menu, choose "Resize Canvas" and not "Resize Document." The difference is important: Document size recalculates all pixels, while canvas size only extends the workspace. Choose the center as the anchor point so the image expands evenly in all directions. For this example, I entered 8000 x 8000 pixels. Using the lock icon, you can set width and height independently of each other.

You may notice a vertical line in the new area. This is a display glitch. It disappears when you zoom in and out and is not saved when you save the file.
5. Naming the layer and organizing it in a group
Give the new layer a clear name, for example "Wing right." Then create a group, for instance via the folder icon at the bottom of the Layers panel, and name it "Wings." Drag the group all the way to the bottom so that it sits beneath the dancer. After that, you can position the wing freely without it covering the figure.

6. Duplicating and mirroring the wing
An angel needs two wings. Select the "Wing right" layer and press Ctrl + J to create a copy. Rename the copy "Wing left" and move it to the left. With a right-click on the layer and the "Transform" command, the wing can be flipped horizontally. After that, it points in the right direction.

7. Positioning the right wing
Select the "right" wing and move it on the canvas. To rotate it, move the mouse pointer slightly outside a corner until a double arrow appears. Then you can drag and rotate. If you drag a corner point, the wing scales proportionally. Hold down the Shift key while dragging if you want to scale non-proportionally. Make sure the wing doesn't start at the neck, but in the area between the shoulders. In addition, no transparent gaps may be visible at the bottom.

8. Adjusting the left wing
The left wing may be rotated more so that it follows the arm movements. Place the base behind the shoulder and again watch out for transparent areas at the edge. A slightly smaller wing often looks more natural because it sits further back. Here too: drag the shape until the posture looks coherent.

9. Matching the proportions of the wing
Viewed from a distance, the right wing often appears larger than the left. If you deliberately compress or stretch the wing, its effect changes. A slightly longer wing looks further away and thus fits better with a wing that goes toward the back. This takes patience, because you have to switch between close-up and distant views several times.

10. Desaturating the wings with an HSL adjustment
Create a new adjustment layer above the wing layers. To do this, select the "HSL Adjustment" entry under "Adjustment". Drag the saturation slider all the way to the left. The wings then appear in black and white. This is the basis for the metallic look, which you will develop further in the next step.

11. Creating the metallic look with a gradient map
Add a "Gradient Map" adjustment layer above the HSL layer. In the dialog you see a gradient that maps the tonal values of your layer: the dark areas are on the left, the light ones on the right. To stay with grayscale, set the color of each anchor point to 0% saturation using the HSL slider. Dark areas receive a medium gray, light areas become white. In addition, add a third anchor point in a dark gray tone so that the wing gets contrast. Reduce the layer's opacity to about 90%, and move the anchor points until the metallic effect is convincing.

12. Creating an empty pixel layer for shadows
Create a new empty pixel layer above the gradient map. Here you paint the shadows without altering the wings themselves. Zoom into the area where hands, body and wings are visible together. Then select the paint tool with the B key.

13. Setting up brush size, hardness and pen
Size and hardness can be adjusted with the mouse by holding down the Alt key as well as the left and right mouse buttons and dragging the mouse left or right (size) or up or down (hardness). With a graphics tablet this is less convenient, because the pen counts as a left mouse click when it touches the surface. Therefore, turn on pressure sensitivity in the pen menu. The harder you press, the wider the brush tip becomes. You can change the opacity at any time later.

14. Painting shadows with the edge of the brush
Choose black as the paint color. In this example the light comes from the left, so the shadow falls on the wing to the right of the model. Paint only with the edge of the brush so that the transition stays soft. In areas such as the arm, reduce the width so that you don't paint beyond the contour. Under the bent arm and in the armpit area, the shadow can be softer and somewhat stronger. At the base of the left wing you can also add subtle shadows so that the wing looks bent backward. A mask will help you with corrections later.

15. Refining the Shadows with the Gaussian Blur
Apply the "Blur" filter with the type "Gaussian Blur" to the shadow layer. Increase the radius until the edges blend softly, and confirm with "Apply". Then reduce the layer's opacity until the shadow looks natural. If the shadow is missing in some places afterwards, paint a bit more before blurring. The filter should always be the last step, otherwise the shape is difficult to correct later.

Summary ??? Affinity Photo Compositing: Combining Angel Wings Behind the Dancer
You have learned how to transfer a cut-out wing into another document via copy and paste. With the canvas size you create space without altering image pixels. You mirrored, rotated, and proportionally adjusted the wings, and created a metallic look with an HSL adjustment and a gradient map. Shadows with a soft brush edge and a targeted Gaussian blur round off the scene. With these steps you combine cut-outs from different files into a coherent image.
FAQ
Why can't I simply drag the layer into the other document?In Affinity Photo, moving pixel layers between two documents via drag & drop doesn't work, so you copy the layer with Ctrl + C and paste it with Ctrl + V.
Where does the pasted content end up?It is always placed above the currently selected layer or group, so you should make the right selection before pasting.
What is the difference between changing the document size and changing the canvas size?With the document size, the image's pixels are recalculated; with the canvas size, only the workspace is expanded without scaling the image content.
What does the vertical line after enlarging the canvas mean?It is a display error in Affinity Photo that disappears when zooming and is not exported when saving.
How does the wing stay proportional when scaling?If you drag a corner point of the selection frame, the aspect ratio is preserved. By holding down the Shift key, you can scale non-proportionally.
How do I achieve grayscale in the gradient map?Set the saturation in the HSL slider to 0% for each anchor point, then all tonal values remain gray.
How do I adjust brush size and hardness with a graphics tablet?With a pen this is more cumbersome, since touching the tablet acts like a left mouse click. The pen's pressure sensitivity helps with painting, but for adjusting the size you still have to take the detour via the mouse.
Why should the Gaussian blur be applied as the last step?After blurring, shadows are hard to correct precisely, so you paint everything first and apply the filter at the end.


