Hardly any subject demands as much patience from you as flyaway hair against a busy background. Thousands of fine strands cannot be selected with a hard edge, and that is exactly where many beginners fail. In this tutorial, I will show you how to build a clean cutout step by step using the Selection Brush, the Refine dialog, and background masking in Affinity Pixel. To be honest up front: a perfect result rarely succeeds on the first try. Some subjects are so detailed that you have to invest a lot of time. With the right approach, though, you will get significantly closer to the goal.
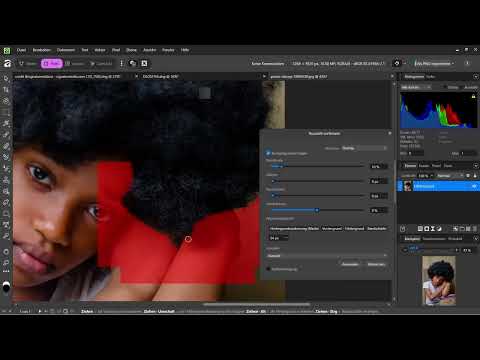
The video is only loaded from YouTube when you play it – data (including your IP address) is then transmitted to YouTube/Google. More in the privacy policy
Key Takeaways
- Hair cannot be selected with hard edges. Work roughly first and refine afterwards.
- The Refine dialog offers tools such as Border Width, Smoothing, and Edge Sharpness, which you can use to improve contours.
- A white overlay background makes areas that are selected too much or too little visible.
- Background masking with pixel precision is the most important lever for fine hair.
- With difficult subjects, you need to plan for multiple passes.
Step-by-Step Guide
1. Rough Selection with the Selection Brush
First, choose the Selection Brush and set a brush size of about 200 pixels. Sweep generously over the hair without keeping every single strand in view. In this phase, the goal is only to capture the area roughly. The fine work follows later, and too much precision at this point only costs time.

2. Adding and Subtracting
Make sure the brush is in Add mode. If you notice that you have also captured areas that do not belong to the hair, such as the forehead, hold down the Alt key. This switches you to Subtract mode and lets you remove the unwanted areas again. In doing so, you should not accidentally remove the area you want to keep.

3. Opening the Refine Dialog
Once the rough selection is in place, open the Refine dialog. Here you will find the sliders for Border Width, Smoothing, and Edge Sharpness. With Border Width, you determine how far the refinement extends into the edge area. Smoothing tames unruly edges, and you can use Edge Sharpness to make hard transitions softer or sharper in a targeted way. Do not set the sliders too extreme, otherwise you will lose the fine strands you are trying to preserve.

4. Using an Overlay Background for Control
In the Refine dialog, you can also choose an overlay. Set a white background here to see the results much more clearly. Otherwise, dark hair on a dark background quickly looks complete even though remnants of the original background are still in it. On white, such errors become visible immediately. This is especially helpful if you have selected too much. But if you have captured too little, the overlay also shows you where hair sections are still missing.

5. Understanding the Adjustment Brush Correctly
The Adjustment Brush often causes confusion in this workflow. It is actually not a real brush, but a mask. Afterwards, you continue working with the actual brush, but there is no separate brush icon for it. So remember that the mask forms the basis for your corrections. With it, you determine which areas you edit afterwards.

6. Correcting Foreground and Background
Now the actual refinement begins. Choose the Foreground area and use it to bring back all the hair that is still missing. This works just like painting with a brush. If you have caught too much in the process, switch to the Background area and remove the unwanted areas again. This back and forth is part of the process, and you will repeat it several times with almost every subject.

7. Using Edge Sharpness and Background Masking with Pixel Precision
Now comes the most important part. Background masking works in pixels, and that is exactly what makes you more sensitive. You can determine very precisely what should be kept and what should disappear. Pay special attention to areas where there is still background between the strands of hair. You will often sit there for a long time until the result fits. Edge sharpness helps you with hard edges, but it should be used sparingly. For very detailed hair, an additional edge width is usually unnecessary because it blurs the fine details.

8. Checking the result and refining it
Check the intermediate result again and again in the overlay. Often a spot only looks distracting against the light background. With background masking, you can specifically improve such details without having to rework the entire subject. An example from the video shows that part of the hair section can be preserved cleanly while the background behind it is removed. Smoothing also helps in most cases because it softens the grainy transitions. The result is then already noticeably better than at the beginning, even if corrections are still needed.

9. Applying the selection and masking
Once you are satisfied with the result, confirm the refinement by clicking Apply. You get a selection that you can then turn into a mask. This mask is the basis for the cutout. When you later place it on a new background, you will immediately see whether the hair has been transferred completely and cleanly. If not, simply return to the selection and keep working.

Outlook: Removing distracting objects
For image areas that are not part of the cutout, such as dust, spots or distracting elements in the background, you use the Healing Brush and the Blemish Removal tool. These tools are the next logical step after the cutout is done. Working with them is significantly less time-consuming than hair masking.

Summary – Cutting out hair in Affinity: Mastering the Refine dialog
Cutting out hair is one of the most demanding tasks in image editing. You begin with a rough selection, clean it up with Add and Subtract, and then open the Refine dialog. With edge width, smoothing and edge sharpness as well as the white overlay, you control the result. The actual fine work is done with pixel-precise background masking. For difficult subjects, expect to spend a lot of time and go through several rounds of corrections. A perfect result is often an ideal that you work toward step by step.
FAQ
Why is hair so hard to cut out?Hair consists of countless fine strands that cannot be selected with hard edges. In addition, there is often background between the strands.
Does the selection have to be perfect on the first attempt?No. A perfect selection is rarely achieved on the first attempt. Work in several passes and correct bit by bit.
Why should I use a white overlay?On a light background, remnants of the old background and missing hair sections become much more visible than on a dark or similarly colored background.
When do I use the Alt key with the selection brush?While holding the Alt key, you switch to Subtract mode. This lets you remove areas from the selection that do not belong to the subject, such as the forehead.
Should I increase the edge width for fine hair?Rather not. With very detailed hair, a larger edge width blurs the fine structures. Use it only sparingly.


