Your image is edited, but not yet saved. Right now you decide whether it will look razor-sharp on Instagram, whether the transparency will be preserved, or whether the print will later deliver the desired colors. The format mainly determines quality and file size. In this tutorial, you will learn how to choose the right option during export and which pitfalls you can avoid.
The video is only loaded from YouTube when you play it – data (including your IP address) is then transmitted to YouTube/Google. More in the privacy policy

Key Takeaways
- Save your project with all layers separately. Always use the export function for sharing.
- JPEG is suitable for social media and websites. Quality level 85 is usually sufficient.
- PNG is the only format shown here with true transparency, but it is significantly larger.
- For print, you need CMYK, 300 dpi, and ideally TIFF or PDF.
- An exported JPEG can no longer be edited. Layers and development settings are no longer accessible afterward.
Step-by-Step Guide
Step 1: Export Instead of Save
The most important difference lies in the File menu. Save stores your project with all layers, masks, and settings. This is the working file that you can continue editing later. For other programs, Instagram, or the printer, however, you need a finished image file. You choose this via File and then Export.

Step 2: Select JPEG for Social Media
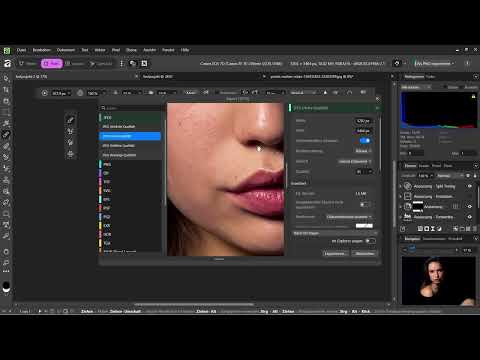
For social media, JPEG is the right choice in most cases. In the export dialog, you switch the format to JPEG. Afterward, you will see several quality levels. In this example, the highest quality produces about 12 MB, while the high quality is only around 1.6 MB. The difference is visible, but unnecessarily large for many applications.

Step 3: Compare and Check the Quality Levels
It is best to look at the levels directly in the preview. To do this, zoom into the image and switch to low quality. There, the image quickly looks pixelated, but the file is only about 150 KB. This level is more suitable for websites with many images or very fast loading times. For high-quality publications, you should steer clear of it.

Step 4: Use PNG for Transparency
As soon as your subject should appear without a background, you need PNG. You can, for example, cut out a person and remove the background. PNG is currently the only one of these formats that stores transparency. The price for this is a large file, around 45 MB in the example.

Step 5: Know the Pitfall of the JPEG Background
If you export a cut-out subject as a JPEG, the program automatically fills the transparent areas with white. This quickly looks messy on colored backgrounds. Therefore, check before exporting whether your subject needs to be transparent. If that is the case, PNG is your only option.
Step 6: Optimize File Size with Quality 85
If you want to reduce the file size further, you can lower the quality somewhat in the JPEG dialog. For most photos, a value around 85 is enough. You will see that the file becomes noticeably smaller while the image quality remains almost the same. Highest and high quality usually barely differ for photos. The highest level is only worthwhile if the file will not be processed further later and file size does not matter.
Step 7: Distinguish RGB for Online and CMYK for Print
Color profiles are the next important point. RGB is intended for everything displayed on a screen, that is, for social media, websites, and presentations. CMYK is the color model for printed products. The reason: some colors that look very vivid in RGB cannot be reproduced one-to-one in CMYK printing. If you submit an RGB image for printing, the colors may therefore look different there than on the screen.

Step 8: Set 300 dpi and CMYK for print
For a print file, you set a resolution of 300 dpi. This is the usual guideline for sharp printouts. In addition, you switch the color profile to CMYK. If you later place the image in a layout program like Affinity Publisher, it should therefore already be in the correct color model.

Step 9: Use TIFF as a lossless print format
TIFF is also well suited for print because it saves losslessly. Here, too, you set 300 dpi. In addition, you can switch the color profile from RGB to CMYK if the file is going to print. Exporting an image as RGB first and converting it later is therefore also possible. The only important thing is that you choose the right profile for the intended use before exporting.

Step 10: Choosing the right format
Essentially, you need four formats for everyday use: JPEG, PNG, TIFF, and PDF. The other formats play a minor role in practice. Remember the rule of thumb: JPEG for online, PNG for transparency, TIFF or PDF for print.
Step 11: Export and name the JPEG
Now you export the image. Choose JPEG, give the file a descriptive name, and save it. In the example, the file is simply called "Portrait" and is saved as a test project. If you have several variants for different purposes, a suffix like "_web" or "_druck" helps.

Step 12: Keep the limitations of the exported image in mind
You can no longer edit the exported JPEG the way you can your project. The layers are gone, so you can no longer move or hide individual elements. The development settings you made at the beginning also cannot be reset in the JPEG. The image is then no longer a RAW and starts with a different base state. If you want to keep working on it, always open the project and export only at the end.


Summary – Choosing the file format when exporting: JPEG, PNG, or TIFF
You have seen that exporting is not about choosing just any format, but about the intended use. For social media and websites, JPEG with a quality of around 85 is the best choice, as it balances quality and file size well. You only need PNG if you require transparency, and you have to accept a larger file for it. For print, you export in CMYK at 300 dpi, ideally as TIFF or PDF. Also keep in mind that an exported image is no longer fully editable. Your project with all its layers therefore always remains the main file.
FAQ
Why shouldn't I just save instead of exporting?Saving secures your project with all layers and settings. An export, on the other hand, creates a finished image file for other programs, platforms, or print.
What JPEG quality is sufficient for Instagram?As a rule, a quality of around 85 is enough. The highest level usually brings hardly any visible benefits for photos, but increases the file size significantly.
Can I export a cut-out subject as a JPEG?You can, but the transparent areas will then be filled with white. For true transparency, you need PNG.
Why is my PNG file so large?PNG stores transparency and lossless image information. As a result, the files turn out larger than with JPEG.
Do I always have to use CMYK for print?CMYK is the better choice for print, as colors can be represented more realistically that way. For screen display and social media, RGB remains the right option.
Why should the resolution for print be 300 dpi?300 dpi is the usual guideline for sharp print results. Lower values can look pixelated in the printout.
Can I still edit an exported JPEG later?Only to a limited extent. Layers, masks, and development settings are no longer available in the exported image. Therefore, keep editing the project and export only at the end.


