Generative AI is changing how you edit images. Instead of laboriously retouching, you describe to the AI what should change, and it generates new image content. In Affinity Pixel, three tools are available for this: Generative Fill, Generative Expand, and Generative Edit. This guide shows you step by step how to use them, where their strengths lie, and where you need to make improvements. You need Canva Premium for all three functions.
The video is only loaded from YouTube when you play it – data (including your IP address) is then transmitted to YouTube/Google. More in the privacy policy
Key Takeaways
- Generative Fill removes or adds objects in a selected area.
- Generative Expand enlarges the canvas, for example for a landscape format, and adds matching content at the edges.
- Generative Edit changes entire moods, lighting, and scenes without you having to touch individual pixels.
- Precise prompts are crucial. Short inputs such as three words are usually not enough.
- The results are not always perfect. Several attempts and post-processing with the regular Pixel tools are part of the process.
Step-by-Step Guide
Step 1: Finding Generative Fill
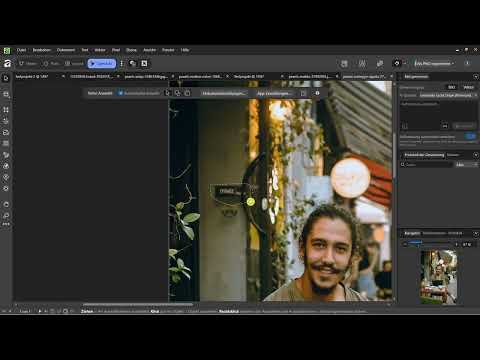
You can find Generative Fill in the top toolbar. You can recognize it by the pen with small stars above it. With this tool, you remove distracting objects or add new ones without manually redrawing the image.

Step 2: Marking the Distracting Area
In the example, a lettering that you don't like visually should disappear. To do this, take the brush and paint over the area covering the object. It's better to mark a bit generously rather than too tightly, so the AI has enough area to recalculate the background appropriately.

Step 3: Formulating a Prompt
After marking, the tool asks you for a description. Here you can also use ChatGPT or a similar language model. Briefly describe to it what you want to achieve, and adopt the resulting prompt. In the video, the prompt was written in English, since the AI usually implements English instructions more precisely: "Please delete this black tag and use the wall next to it." The reference to the wall helps the AI reconstruct the background sensibly.
Step 4: Evaluating the First Result
After processing, you see the result. In the example, the lettering was replaced, but not cleanly removed. Instead, the AI placed the text again because the instruction was too general. This happens often: the input was not clear enough. So, in your next attempt, formulate your prompt more specifically, for example with details about the desired surface or texture. You can repeat the process as often as you like, and it's completely normal that it takes a few attempts.

Step 5: Enlarging the Image with Generative Expand
Generative Expand is probably the most impressive of the three tools. You use it when you need more canvas, for example to turn a portrait format into a landscape format. In the example, the photo is to be supplemented with sky and meadow. To do this, drag the image apart at the edges as far as you need. The empty area will later be filled by the AI.

Step 6: Adjusting the Frame and Starting the Expansion
Drag the image into the desired shape, in the example, that is landscape. Make sure that you don't just enlarge the area, but also choose the proportions deliberately. Then click on "Expand". The calculation takes a moment, after which the missing area is filled with matching content.

Step 7: Checking the Result of the Expansion
With this tool, too, the result is not always flawless. The AI sometimes adds unwanted people, birds, or other objects. In addition, transitions may remain visible or look slightly blurry. In the example, the sky had already turned out very well, but the lines at the top edge were distracting. On the left, top, and bottom, however, the addition fit convincingly. If you find such spots, you can rework them with another generative tool or the classic Pixel tools.

Step 8: Looking at the difference from the original
To assess the effect, it's worth comparing it with the original image. You will notice that the AI also added details you hadn't planned, for example an additional section of trousers. Therefore, check every area of the image carefully before accepting the result.

Step 9: Enlarging an image that is too small
Expanding is also suitable if you want to enlarge an image overall, for instance because a main subject fills the frame too much. You can enlarge the area a bit in any direction. Feel free to try out several variations or fall back on a different image if the result doesn't fit. These AI tools are not perfect, but they are constantly being improved.

Step 10: Using Generative Editing for mood and light
The third tool, Generative Editing, creates a modified version of your entire image. It is suitable for larger creative changes such as a different mood, altered lighting conditions, or a new scene. So you describe the desired change instead of marking individual areas. For fine touch-ups, you then go back to the regular Pixel tools.

Step 11: Writing a meaningful prompt for the atmosphere
A prompt like "Make it wintry" is too brief. Instead, describe specifically what should change: in the example, it was supposed to become a winter day, with a different atmosphere and altered light. Here too, it's worth asking an AI assistant for a precise wording. Then you click on "Edit" and wait until the calculation is complete. For larger changes, this usually takes longer.

Step 12: Evaluating the result and switching the AI model
The first result was disappointing, because in the example hardly any change was visible. One alternative is to choose a different AI model. In the video, Nano Banana was used for this, followed by a new attempt with a specific instruction. The tools are currently still strongly oriented toward Canva and not yet fully tailored to Affinity. Therefore, try out different models and compare the results.

Step 13: Getting the desired result with specific instructions
Experience shows: the more specific your instruction, the better the result. In the example, the instruction to make the light darker led to a visible success. You would otherwise be more likely to handle such precise adjustments with the Pixel tools. So the AI takes over the task here that you would otherwise have to solve manually.

Summary ??? Canva AI in Affinity Pixel: Generative Fill, Expand and Edit
The three generative tools in Affinity Pixel cover different tasks. Generative Fill removes or adds objects in a marked area. Generative Expand enlarges the image area and fills it with suitable content. Generative Edit changes mood, light, and scenes. The following applies to all three: write precise prompts, plan for several attempts, and critically check the results. You finish fine-tuning at the end with the classic Pixel tools. If you already work with Affinity and use Canva Premium, using these functions is particularly worthwhile.
FAQ
Do I need Canva Premium to use the generative tools?Yes, all three generative functions in Affinity Pixel require Canva Premium.
Why was my object not removed properly after Generative Fill?The instruction was probably too imprecise. In the prompt, describe exactly what the AI should show instead, for example the wall in the background.
Do I have to write my prompt in English?It's not mandatory, but in the video, English prompts were often implemented more precisely. Try out both variants.
Can I use ChatGPT for better prompts?Yes, you can have ChatGPT or a similar language model describe what you want to achieve, and then use the resulting prompt.
Why does Generative Expand sometimes add people or birds?The AI fills the empty area with content it considers suitable. This can result in unwanted elements, which you should remove afterwards or correct with another generative tool.
What do I do if Generative Edit shows hardly any change?Make the prompt more specific, for example with details about light, atmosphere, and season, or choose a different AI model.
When should I use Generative Edit instead of Generative Fill?Generative Fill is suitable for targeted adjustments. Generative Edit is intended for larger changes to the overall look of the image.
Can I refine the results afterwards?Yes, for fine corrections you can use the regular Pixel tools in Affinity Pixel.


