A gray, featureless sky can really hold back an otherwise successful photo. In this tutorial, I'll show you how to replace the sky in Affinity without permanently altering the original image. The real key lies not in the replacement itself, but in working with masks and in a clean transition at the horizon line. I'll proceed step by step and explain why I make each particular decision.
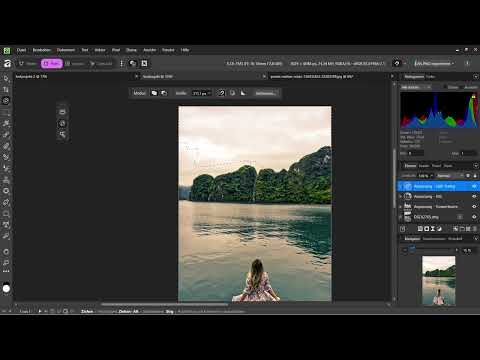
The video is only loaded from YouTube when you play it – data (including your IP address) is then transmitted to YouTube/Google. More in the privacy policy
Key Takeaways
- A sky is easiest to replace when it is clearly separated from the rest of the subject.
- Erasing permanently destroys the original image. Masks, on the other hand, stay flexible and can be corrected at any time.
- The transition at the horizon line determines whether the composite looks believable.
- The new sky should match the mood, the direction of light, and the perspective of the subject.
- The selection is built up in several passes. A first mask is rarely perfect, but it is a solid starting point.
Step-by-Step Guide
Step 1: Assessing the Starting Point
Before you select anything, look at your image critically. A flat, gray sky rarely suits an atmospheric landscape, and that is exactly why replacing it is worthwhile. First, think about what mood the subject calls for. A sky with cloud formations and a sun near the horizon usually looks more convincing than a generic image that looks more like a desktop wallpaper. Also make sure the new sky doesn't contradict the surroundings, for example if there is water or buildings in the foreground that don't fit the scene at all.

Step 2: Marking the Sky with the Selection Brush
If the sky is clearly separated from the rest of the image, the Selection Brush is the right tool. You activate it with the W key and paint over the sky area while holding down the left mouse button. Nothing is deleted in the process, only marked. This selection forms the basis for everything that follows, so take your time with it. You can fix small inaccuracies at the horizon later.

Step 3: Placing the New Sky via the Menu
Open the File menu and choose the Place option. The new image then lands as its own layer above your photo. Move and scale it so that it covers exactly the area you want to replace. It is especially in this phase that you see whether the sky suits the subject. A sun that sits slightly below the horizon can make the scene noticeably more coherent, provided it matches the direction of light in the rest of the image.

Step 4: Creating a Masking Layer
Now create a mask, that is, a masking layer, above the newly placed sky. This automatically reveals the previously selected area, and you don't have to cut anything out by hand. Then you deselect the selection with Ctrl+D. At this stage the result still looks rough, and that is perfectly normal. The edges show you where you need to refine. Light and shadow are still completely missing at this point, which you will adjust later.

Step 5: Why You Shouldn't Erase
The obvious way would be to use the eraser directly on the sky. However, that is destructive. If you erase on the original image, you lose image information that you can't get back. Even if you place the new sky underneath and erase the old one, the background image is permanently changed. If you hide the new sky later, the meadow or buildings are suddenly missing. So always work with masks, because they can be adjusted at any time without losing any pixels.

Step 6: Refining the Selection with the Selection Tool
A first selection is rarely perfect, especially when branches or fine structures border the sky. Use the Selection Tool to define the sky more precisely. For difficult transitions, you can use the Refine function, which lets you edit edges more precisely. Here you quickly notice that patience is required. A good feel for transitions is more important here than any individual tool.

Step 7: Selectively remove distracting areas
With refinement, you can, for example, push treetops into the background or remove parts of the image that should not be part of the selection. Work roughly at first. Details such as fine branches can be improved in a later pass. If you are unsure about the procedure, AI assistants can provide helpful tips. However, always check their suggestions against your own image. Also keep in mind that uploading your photo to online services is not always unproblematic.

Step 8: Improve the selection
If too much is selected, you remove it selectively until the sky is cleanly delineated. Save in between, because errors or display problems can occur with complex masks. In the video, the selection visibly improved after saving again. The mask doesn't have to be perfect in the end, but it should look convincing at the horizon.

Step 9: Place the new sky and adjust the horizon
Place the final sky again and insert it using a mask. Pay particular attention to the horizon edge, because that is where it is decided whether the composite looks believable. A sun that sits slightly behind the landscape connects the sky and the subject in a natural way. If, on the other hand, the sky stands out too harshly from the horizon, the image quickly looks artificial.

Step 10: Light and shadow as the final finishing touch
The composite is not finished after the replacement. For the sky and the subject to truly belong together, you need light and shadow that match the new sky. This includes brightness, color temperature, and the direction of the incoming light. This step is time-consuming, but it is worth it because it makes the difference between an obvious collage and a coherent image composition.

Summary – Replacing the sky in Affinity: masks instead of erasers
You have learned how to replace a sky in Affinity without destroying the original image. The selection brush marks the area, a masking layer blends in the new sky, and refining ensures clean edges. The horizon is the decisive point here, because this is where a composite gives itself away fastest. With light and shadow adjustments, you round off the result at the end.
FAQ
Why shouldn't I use an eraser?The eraser permanently alters the original image, whereas masks can be adjusted or removed at any time.
When is the selection brush particularly suitable?It works best when the sky is clearly distinct from the rest of the subject.
What should I do with difficult edges, such as branches?Use the selection tool and refinement, work in several passes, and accept that fine details take some time.
Why is the transition at the horizon edge so important?That is where it is decided whether the image looks natural. A transition that is too harsh gives away the composite immediately.
Does the sky have to be perfect right after inserting it?No. At first, it is about the rough replacement. Light, shadows, and colors are matched in a later step.


