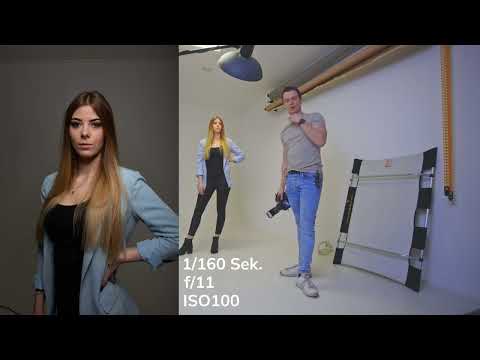
A beauty dish produces a soft yet high-contrast key light that gives portraits a sculpted look. The downside quickly becomes apparent: when the light source is placed high, dark shadows fall under the chin, nose, and eyes. This tutorial closes exactly this gap. You will learn how to use a reflector to bounce light back from below and thus simulate a second light, without setting up an additional flash source. At the end, you will also learn a practical alternative for situations where holding the reflector becomes too cumbersome.
The video is only loaded from YouTube when you play it – data (including your IP address) is then transmitted to YouTube/Google. More in the privacy policy
Key Takeaways
A single flash with a reflector replaces a second light source in many cases. The reflector catches light from the main flash and directs it specifically onto the shadow areas of the face. The effect depends heavily on position and distance, and a lamp from below can be dosed more precisely.
Step-by-Step Guide
Step 1: Set up the beauty dish as the key light
Start with the beauty dish as the key light. It should be placed to the side of the subject so that the face gets a clear direction of light. Keep in mind that your model won't immediately position themselves ideally, because the direction of light only emerges from the combination of light modifier and position. A beauty dish provides soft light, but if you place it too far to the side or too low, the result quickly looks unnatural.

Step 2: Find the position above the subject
Now it's about fine-tuning. Ask your model to move a bit further forward, and move the beauty dish gradually upward. The light source then comes from a relatively steep angle above, which looks somewhat drastic, but casts a striking shadow across the face. It is precisely this shadow play that makes the look exciting. You just need to know that in return you accept shadows in other places.

Step 3: Take a test shot and check the exposure
Take a first test photo before making further adjustments. Often it becomes apparent here that the image is too bright or too dark. A trick from practice: hold a hand in front of the face to see how the light is distributed across the skin surface, and then check whether the flash power needs to be adjusted. Too much light can be turned down on the flash unit. Also remember that a grid (honeycomb) on the beauty dish can focus the cone of light and increase contrast. Without a grid, the light looks softer; with a grid, more targeted. Decide based on the test image which variant suits the subject better.

Step 4: Identify the shadows on the subject
Before you use the reflector, analyze the image closely. Typical problem areas are the area under the chin, the spot under the nose, and the eye sockets. The higher the light source is placed, the darker these shadows become. It is important that you don't try to eliminate them completely. The goal is a fill light that preserves the look but makes it softer. A completely lit shadow would take the depth away from the portrait.

Step 5: Use the reflector from below
Take the reflector and hold it so that it catches the light from the beauty dish and bounces it back up into the face. A smaller, handier reflector is often more practical here because it is easier to position. If holding it becomes too complicated, you can ask the model to hold the reflector themselves. This works just as well. Make sure the reflection hits the shadow areas evenly without dazzling the eyes.

Step 6: Compare the result
Now compare your image without and with the reflector. With the reflector, the shadows under the chin become significantly weaker, and the light looks softer and more pleasant overall. However, the shadows do not disappear completely, because the reflector can never bounce back more light than arrives from the key light. This loss of light is completely normal and part of the technique. The contrast is nevertheless retained, so the image still has the typical beauty dish character. When comparing, pay attention to whether the skin looks natural and whether the eyes look too bright or too flat.

Step 7: The Alternative with a Light from Below
If constantly holding the reflector is too much effort for you or you are photographing many people, you can use a second light from below instead. The effect is similar, but the strength of the light can be controlled more precisely. Especially for portraits with several people or longer shoots, this saves you time and nerves. One advantage of the reflector remains, however: it is inexpensive, flexible, and needs no power source. So decide depending on the situation which tool fits better.

Summary – Beauty Dish and Reflector: Brightening Shadows in Portraits
With a beauty dish as the main light, you achieve soft, high-contrast portraits, which can, however, cast harsh shadows under the chin and in the eyes. A reflector that bounces the light from below back onto the face noticeably softens these shadows without destroying the character of the image. The position of the light, a sensible test shot, and the conscious decision between a reflector or a light from below ultimately determine the result. It's best to try the technique out yourself right away, because only in a direct comparison will you see how much fill light suits your subject.
FAQ
Can I also have another model hold the reflector?Yes, if holding it becomes too complicated for you, the model can hold the reflector themselves. The result is just as good.
Why don't the shadows disappear completely with the reflector?The reflector can only bounce back light that arrives from the main light. There is always a certain loss of light in the process, which is why shadows become weaker but do not disappear entirely.
Do I need a grid on the beauty dish?A grid is not strictly necessary, but it focuses the light and increases the contrast. Test both variants with a test shot and then decide what suits the subject.
When is a light from below the better choice?A light from below makes sense if you are photographing many people or want to control the strength of the light more precisely. The effect is similar to the reflector, but it can be dosed better.


