
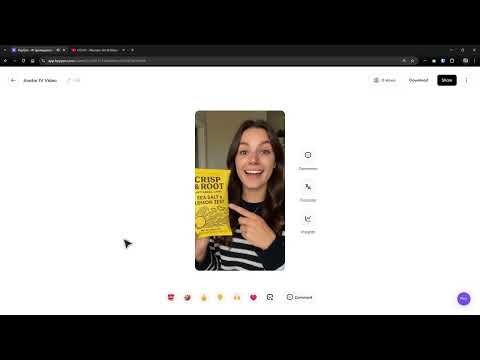
Imagine you need a promotional video for a new product, but you have no studio, no camera crew, and no desire for an elaborate shoot. That's exactly what HeyGen offers the "Product Placement" feature for. You upload a photo of your product, choose an avatar, write a script for it, and let it present your brand.
The video is only loaded from YouTube when you play it – data (including your IP address) is then transmitted to YouTube/Google. More in the privacy policy
In this guide, I walk you through the process step by step. First, I'll show you an example with a bag of chips, then an experiment with my own motif, a rabbit from Midjourney, combined with a photo of a real person. Along the way, you'll also learn where the feature still has weaknesses.
Key Takeaways
- A product photo can be incorporated into an AI-generated image with an avatar. Lettering and packaging details are preserved and not invented.
- Before generating, you can listen to voices and select the right one.
- Movement instructions in the prompt don't always work reliably in the beta. The more precisely you phrase them, the better.
- With your own photos of people, the result doesn't exactly match the original. For an exact likeness, you need to create your own avatar beforehand.
- A combined image is created in about a minute. In the test, the entire project with script, voice, and video was finished after around five minutes.
- You can download the finished video in 1080p.
Step-by-Step Guide
Step 1: Open the "Product Placement" feature
Open your HeyGen dashboard and select the "Product Placement" section. There you can integrate a photo of your product directly into a video scenario. Pay attention to the quality of your source material right now, because it largely determines the final result.

Step 2: Upload the product photo
Upload your product photo. In the example, I used a bag of chips. A cut-out motif with even lighting and few shadows delivers clean results. An important advantage showed up in the test: The text on the packaging remained unchanged in the generated image. So the AI did not hallucinate it, which is crucial for branded products.
Step 3: Choose an avatar and start the combination
Now select a person as the influencer. You can either have new motifs generated or use an existing avatar. I chose an existing motif that seemed likeable. Then you click on "Generate combined image" to merge the product and avatar.

Step 4: Select the position in the combined image
The calculation took about 60 seconds in the test. Afterwards, you receive the result with different positions of the product and avatar. Check which variant showcases the product best. The product should be clearly visible and not covered by hands or the face.

Step 5: Write the script for the avatar
Write a text that describes your product in a few sentences and ends with a clear call to action. In the example, the script was: "These chips are super tasty and insanely healthy. Buy now at Lidl." Short sentences feel more natural in avatar videos than long monologues. Also check claims like "healthy" from a legal standpoint, because health-related advertising is subject to strict regulations that also apply to AI videos.

Step 6: Choose a suitable voice
In the catalog, you'll find many voices with a preview. Listen to several before you decide. The first voice tested seemed rather unsuitable in the example. The second, a female voice, fit the avatar and the brand better. So try out two to three options and pay attention to emphasis and sound.

Step 7: Formulate a movement instruction and generate
Optionally, you can describe an action in the prompt, such as tearing open the bag of chips. However, this isn't always reliable in the beta. In the test, I entered the instruction "wave once with the eye." The avatar then winked once, which wasn't quite what was intended. More precise wording like "Wink once with one eye" helps achieve the desired result. Then click on "Generate".
Step 8: Critically Review the Result
The test video, at four seconds long, was ready quickly. Take a close look at it. Pay attention to the synchronization of lip movements and audio, the lighting conditions, and how the product is presented. In the example, the avatar looked almost real, and the packaging was easy to recognize. For ads with longer passages, a second run with an adjusted script is worthwhile.

Step 9: Combine Your Own Motif with a Real Person
For the second attempt, I used an image I had previously created in Midjourney: an angular, polygonal rabbit. I also uploaded a photo of my brother so that he would appear as the avatar. Upload your motif and confirm the selection.

Step 10: Define the Script and Voice for Your Own Motif
For the rabbit, a longer ad text was created: "Looking for a new home. This rabbit is not for the faint of heart. It is angular, polygonal, and a real eye-catcher." I chose a male option for the voice. The preview helps here too in making the right choice.

Step 11: Generate the Video and Assess the Result
The generation again took about a minute. The result showed a person who resembled my brother but was not identical. This is typical for the current version: the function creates a figure from a photo that only comes close to the original. Therefore, assess whether this deviation is acceptable for your purpose.

Step 12: Download the Video
If you are satisfied with the result, click "Download". Choose the 1080p resolution so that the video looks sharp on larger screens as well. After that, you have the finished video file for your channels.

Step 13: Know the Limits and Create Your Own Avatar
The function shows its limits with real people. If a face is to be reproduced exactly, you must create your own avatar beforehand. This is an additional work step, but it gives you a significantly better match. For your brand, it is worth planning this early on.

Summary – Product Placement in AI Video with HeyGen: Advertise Products Smartly
With HeyGen's Product Placement function, you can integrate a product photo into a video with an avatar in just a few minutes. The steps are clear: upload the photo, choose an avatar, select the combined image, write a script, define the voice, and generate the video. The test shows that product details are reliably carried over, while movement instructions and photos of people still have weaknesses. For reliable results, you should work with precise prompts, legally check advertising claims, and create an avatar beforehand when using your own faces.
FAQ
Question: How long does it take to create a product placement video?Answer: The combined image is created in about a minute. In the test, the entire project including script, voice, and video was finished after around five minutes.
Question: Is text on my product carried over correctly in the video?Answer: Yes, in the test the lettering on the chip package remained unchanged and was not hallucinated.
Question: Can I give the avatar actions such as opening a package?Answer: This is possible, but it does not always work reliably in the beta. Phrase the instruction as precisely as possible.
Question: Does the avatar from my photo look exactly like the person in the picture?Answer: Not necessarily. The result resembles the original but is not exactly identical. For an exact match, you should create your own avatar beforehand.
Question: In what resolution can I download the finished video?Answer: You can download it in 1080p, which offers good quality for most channels.

