A RAW photo often looks unfamiliar when you open it, and the interface suddenly seems different than usual. This is exactly what happens in Affinity Pixel when you open a RAW file: the program automatically switches to the Develop Studio. This guide walks you step by step through this environment, shows you the most important areas, and explains how to tell RAW files apart from normal JPEG images.
The video is only loaded from YouTube when you play it – data (including your IP address) is then transmitted to YouTube/Google. More in the privacy policy
All you need is Affinity Pixel and a RAW or JPEG image. The example images come from freely usable platforms, so you can follow every step directly. The video shows the operation on a Windows computer; the procedure on a Mac is identical, only the keyboard shortcuts differ.
Key Takeaways
- When you open a RAW file, Affinity Pixel automatically switches to the Develop Studio. There, exposure, white balance, and tonal values are edited before the actual image is created.
- RAW files contain the maximum image information from a camera. That is why they offer significantly more latitude in post-processing than JPEGs.
- The Develop Studio is only available for RAW files. With JPEG images it is missing, and you work directly in the normal Pixel mode.
- Using the modes at the top left, you can switch between the different workspaces. With RAW files, you first have to leave the Develop Studio to do so.
Step-by-Step Guide
Step 1: Open the RAW File
Start by opening the file. In Affinity, go to the menu, click "File" and select "Open". A faster way is the key combination Ctrl+O, or Command+O on a Mac. Then select the desired image from your folder and confirm with "Open". Make sure you choose a file in RAW format, because only this will trigger the Develop Studio.

Step 2: Recognize the Automatic Develop Studio
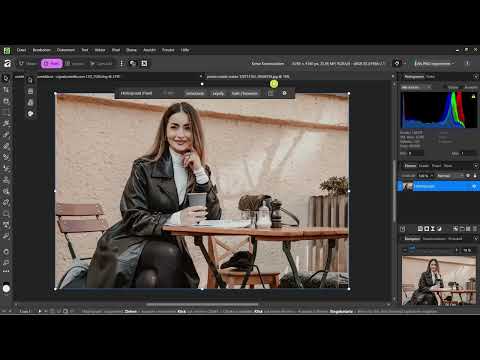
As soon as the RAW file is loaded, the Develop Studio interface appears. You don't have to change anything; Affinity Pixel recognizes the format itself and opens the appropriate workspace. Especially if you have previously worked only with JPEGs, this moment is confusing, but the environment is exactly right for developing a RAW photo.

Step 3: Check the Camera and RAW Layer
In the Develop Studio you see information about the camera used. This information helps you assess which device the photo was taken with. You will also find the "RAW" indication as well as the note that the output is present as a RAW layer. This means that the camera's original material is preserved unchanged and your settings initially sit on top of it as an editing layer.
Step 4: Use the Histogram, Settings, and Toolbar
To the right of the image you see the histogram. It shows you the distribution of brightness values from dark tones on the left to light tones on the right. A glance at it quickly tells you whether an image is overexposed or underexposed. Below it are the sliders for the further settings, which you will get to know in more detail as the series progresses. On the left side is the toolbar, which provides many functions for later editing.

Step 5: Understand the Limits of the Develop Studio
The Develop Studio is intended exclusively for RAW photos. The view is therefore not a standard area that you can use at any time, but a special mode for raw data editing. When you work with a RAW photo, you will therefore not immediately see all the possibilities of the other areas. This is not a bug, but part of the concept of this environment.

Step 6: Use the Modes at the Top Left and Leave the Develop Studio
At the top left you will find the switches for the different modes, including Vector, Layout, and the Canva AI integration. With a RAW file, these modes are initially not directly accessible. To switch to the normal working mode, click "Develop". This takes you out of the developer mode and lets you use the other views. You should remember this step well, because it is the key if you ever feel stuck with RAW files.
Step 7: Open a JPEG Image for Comparison
For comparison, now open an ordinary JPEG file. The procedure remains the same: open file, select image, confirm. This time, however, the Develop Studio is missing. The image opens directly in the normal mode, and the mode switching at the top left is immediately available. The difference is therefore clearly visible as soon as you look at both file types side by side.

Step 8: Switching Modes with JPEG Files
With a JPEG file, you can switch the modes at the top left directly. So there is no restriction and no Develop mode that you would have to leave first. Feel free to try it out yourself by switching back and forth between the views. This gives you a feel for how flexibly the normal Pixel mode works.

Step 9: Getting to Know the Develop Sliders
In the Develop Studio, the row of sliders forms the heart. In the video, the focus is on exposure, white balance, and tonal values, with which editing begins. Exposure controls the overall brightness, white balance corrects color casts, and tonal values change the distribution of shadows, midtones, and highlights. These basics are the starting point for all further editing steps in the row.

Step 10: Finding Suitable Practice Images
Free platforms are well suited for practice. For RAW files, you can use Signature Edits, for example, where RAW files are offered for download. For JPEG images, Pexels is a good option. For each image, pay attention to the respective terms of use. The images may generally be used for social media and image editing, but the raw image material may not be resold.

Summary – Affinity Pixel: Understanding RAW Files in the Develop Studio
You have seen how Affinity Pixel automatically switches to the Develop Studio when opening a RAW file. There you will find camera information, the histogram, the toolbar, and the sliders for exposure, white balance, and tonal values. The Develop Studio is intended solely for RAW photos, and via the "Develop" button you return to the normal mode. JPEG files, on the other hand, are opened directly in the standard mode, in which you can freely switch all modes. With this basic understanding, you are well prepared for the next editing steps.
FAQ
Do I always have to use the Develop Studio?No, the Develop Studio appears automatically only with RAW files. With JPEG images, you work in the normal mode.
How can I tell if I have opened a RAW file?You can tell by the file name and format. In addition, the Develop Studio displays indications such as "RAW" and a RAW layer.
How do I get out of the Develop Studio again?Click on "Develop" at the top left. After that, you can use the other modes such as Vector or Layout.
What does the histogram mean?The histogram shows the distribution of brightness values. It helps you recognize whether an image is too dark or too bright.
Why are RAW files so valuable for editing?RAW files contain the maximum image information from the camera. This makes it possible to correct exposure and colors much better.
Can I practice with free images?Yes, platforms such as Pexels and Signature Edits offer suitable practice images. However, pay attention to the respective terms of use.


