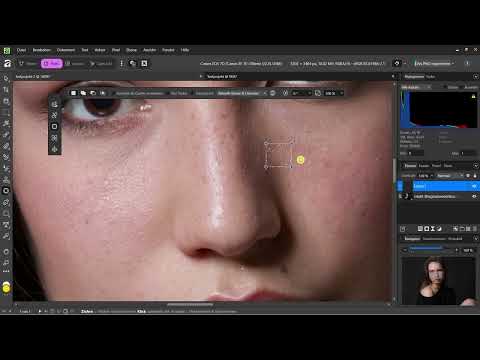
A piece of lint on the lens, a blemish on the face, or a passerby who has no business being in the background: almost every photo contains small distractions. In this tutorial, you will learn how to remove them cleanly and invisibly with the "Spot Healing" tool and the Healing Brush. You will always work on a separate layer, so your original image remains untouched. You will also see that good retouching does not mean erasing everything, but improving the image in a targeted way.
The video is only loaded from YouTube when you play it – data (including your IP address) is then transmitted to YouTube/Google. More in the privacy policy
Key Takeaways
- Always work on a separate pixel layer so the original stays protected and you can go back at any time.
- The "Spot Healing" tool is suitable for small distractions when the surrounding area looks similar to the affected area.
- The Healing Brush copies a source while holding down the Alt key and is intended for larger or trickier spots.
- Retouch subtly: remove clear distractions, but preserve skin texture and pores so the image looks natural.
Step 1: Finding the "Spot Healing" tool
The tool is hidden in the "Restore" section of the toolbar. There you will find several retouching tools. Hold down the left mouse button on the corresponding icon, and a submenu opens. There you select "Spot Healing". You should memorize this procedure right at the start, because you will use it often in this tutorial.

Step 2: Creating a separate pixel layer
Before you change even a single pixel, create a new layer. To do this, go to the Layers tab on the right side and choose the option for a new pixel layer using the layer buttons. Once it has been created, it appears in the Layers panel above the original image. This separation is the most important principle of this lesson: the retouching is done on the new layer, the photo itself remains preserved in its original state, and you can hide or delete the changes at any time.
Step 3: Switching the sampling to "Current Layer and Below"
After creating the new layer, nothing visible happens at first, and that is not an error. The empty layer does not yet contain any image information that the tool could draw from. Look at the tool's settings and switch the sampling to "Current Layer and Below". This way you still work on your new layer, but the tool also takes the image underneath into account. Only then do the results you will see below come about.
Step 4: Marking the distraction with a loop
Now select the "Spot Healing" tool and click on the spot that bothers you. For larger areas, a different approach is recommended: hold down the left mouse button and draw a small loop around the spot. Then release the mouse button. The marking should completely enclose the distraction, but not capture too much healthy skin or other details.

Step 5: Determining and applying the replacement
Now move the mouse over a nearby area that looks similar to the spot. Affinity shows you which area serves as the replacement. Once the area fits, click once, and the spot is replaced. This works particularly well on even surfaces such as skin or sky. Make sure the replacement area has similar brightness and texture, then the result will hardly be noticeable. If you zoom in strongly on the image, you may still be able to see the spot, but at normal viewing size it has disappeared.

Step 6: Deselecting the selection
Sometimes you mark the wrong area or want to discard the selection. Deselect it with the keyboard shortcut Command plus D on a Mac or Ctrl plus D on Windows. This prevents unwanted changes from occurring, and you can start over without losing your progress so far.

Step 7: Working on stubborn spots multiple times
A single pass is not always enough. Simply go over the same spot with the tool several times until it is hardly noticeable anymore. With larger or more complex distractions, the tool reaches its limits, for example with shadows or structures with clear lines. In that case, it is worth switching to the "Clone" or "Retouch" tools, which work similarly but allow more precise control. So with difficult spots, feel free to proceed in several small steps.

Step 8: Applying the Healing Brush with the Alt key
For larger or trickier areas, the Healing Brush is the better choice. You will find it in the same tool group; its icon is a paper clip with small stars. Painting over directly doesn't work well here. Instead, hold down the Alt key until the mouse pointer turns into a crosshair. Then click on a source that is as similar as possible to the area, such as a patch of skin right next to the blemish. Release Alt and the mouse button. You have now copied the texture of this spot.

Step 9: Painting over the blemish
Next, move the brush to the area you want to correct and click with the left mouse button. The copied texture now settles over the blemish. Make sure the source is not too close to an edge, because otherwise unsightly borders will appear. For larger areas, you can hold down the mouse button and drag the brush across the spot. Switch the source repeatedly with Alt in between so that no repetitions become visible.

Step 10: Removing a prominent detail
In the tutorial's example, an eyebrow is removed. This serves to practice the technique, because in practice facial features should generally be preserved. Work with short brush strokes and repeat the source change with Alt. This creates believable skin that blends into its surroundings. Shadows are the biggest challenge here. They are difficult to copy, so you should smooth the transitions afterwards with the "Blemish Removal" tool.

Step 11: Retouching subtly and preserving the skin
For portraits, a clear principle applies: remove obvious distractions, but don't overdo it. If you retouch away every pore, the face quickly looks artificial and like plastic. The goal is a polished but authentic result. For client jobs, you should also clarify in advance which alterations are desired. Especially for changes such as removing an eyebrow, this should be explicitly agreed upon.

Step 12: Undoing individual steps with Ctrl+Z
Not every change convinces in retrospect. With the key combination Ctrl+Z (Command key plus Z on the Mac), you undo individual steps. Go back until the desired result is achieved. The original lies untouched underneath anyway, so you can experiment without worry.
Step 13: Practicing the tools on your own project
The best way to learn the tools is by trying them out on your own photos. Take a test project and try, for example, to remove a distracting mountain or an object in the background. This takes some patience and several passes, but works reliably. Other brushes such as "Retouch" and "Clone" fulfill similar tasks and will be covered in later lessons.

Summary – Removing distracting objects in Affinity Photo
You remove distractions in Affinity Pixel best on a separate pixel layer that lies above the original image. With the sampling option "Current Layer & Below," the tool accesses the image information without altering the photo. For small blemishes, the "Blemish Removal" tool is sufficient, while the Healing Brush with the Alt key held down corrects larger or prominent areas. The right measure is always important here: remove clear distractions, but preserve the structure and character of the subject.
FAQ
Why should I always work on a separate layer?The retouching remains separate from the original, so you can restore the photo unchanged at any time or adjust individual changes.
What does the "Current Layer & Below" setting mean?It ensures that the tool works on the empty layer but takes the image information from the layer below into account.
When do I use "Blemish Removal" and when the Healing Brush?For small, clearly defined distractions, "Blemish Removal" is ideal; for larger or trickier areas, the Healing Brush is better suited.
How do I choose the right source with the Healing Brush?Hold down the Alt key and click on a similar texture nearby, for example on a healthy patch of skin.
How do I deselect a selection?Press Command plus D on the Mac or Ctrl plus D on Windows.
Why does my retouching sometimes look unnatural around shadows?Shadows are hard to copy because they fall differently depending on the light source, so you should specifically refine the transitions.
How much retouching makes sense for portraits?Remove clear distractions such as blemishes, but keep pores and natural skin texture so that the face looks lively.


