A photo often looks flat or off simply because a single color is getting out of hand. The sky is too gray, the water too greenish, the skin too pale. That's exactly what the HSL tool is for. It allows you to change only a specific color range while all other colors remain untouched.
The video is only loaded from YouTube when you play it – data (including your IP address) is then transmitted to YouTube/Google. More in the privacy policy
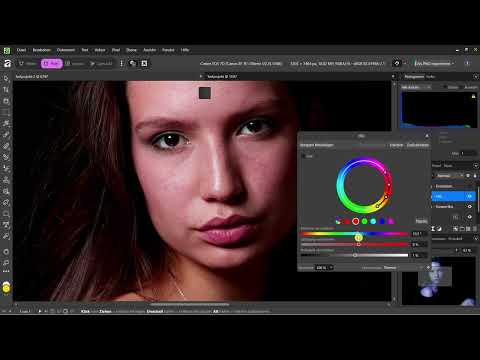
In this tutorial, you will learn how to use an HSL adjustment layer in Affinity Pixel, select skin tones with the eyedropper, and control hue, saturation, and lightness in a targeted way. Finally, I will show you how to use a mask to define where the change may take effect and where it may not.
Key Takeaways
- HSL stands for Hue, Saturation, and Lightness.
- The change is made via an adjustment layer, which can be readjusted at any time.
- The eyedropper selects the color range directly in the image. It is only active if you have selected a specific color range rather than the rainbow.
- Small corrections often look the most natural. Even a few percent of saturation can noticeably improve a skin tone.
- With a mask, you can limit the effect to individual areas of the image, for example to the face and not to the skin on the knee.
Step-by-Step Guide
Step 1: Create an HSL Adjustment Layer
Open your photo and click the adjustment layer icon in the Layers panel. It looks like a half circle. Select the HSL entry there. This creates a layer that sits above the image and bundles all changes. The advantage: you can go back at any time, adjust the values afterwards, or hide the layer.

Step 2: Understand the Color Wheel
In the HSL dialog, you see a color wheel divided into individual ranges: red, orange, yellow, green, and so on. Each of these ranges represents a group of similar hues. If you change only green, for example, red tones remain untouched. This division is the heart of the tool, because it decides which parts of the image your settings affect.

Step 3: Select Skin Tones with the Eyedropper
Skin tones usually lie in the range between orange and red. So select one of these color ranges. Note that in rainbow mode the eyedropper is grayed out. Only once you have a specific color range active can you use it.
Then activate the eyedropper and click on a spot with skin tone in the image. The layer then adjusts the selection automatically. Depending on where you click, the range shifts a bit toward yellow or orange. Feel free to try two or three spots until the selection best matches your subject.

Step 4: Carefully Increase or Decrease Saturation
The middle slider controls saturation. To the right, the color becomes more intense; to the left, paler. For skin tones, less is usually more. An increase of about 8 percent can already make a tired complexion look fresher. If you overdo it, the skin quickly looks blotchy or artificial. So move the slider in small steps and keep checking the result in the image.

Step 5: Adjust the Lightness
The third slider determines the lightness of the selected color range. With it, you make the skin lighter or darker. Strong darkening usually doesn't look good, because the skin quickly looks dirty. An exception is overexposed shots. There, a targeted darkening of the skin tone can make sense without the rest of the sky or background becoming darker.

Step 6: Shift the Hue
With the hue slider, you shift the skin tone slightly toward warmer or cooler. To the left, the image becomes cooler; to the right, warmer. In my example, a strong shift to the left would make the complexion look distinctly bluish. Especially with skin tones, the line between natural and unnatural is very thin. That's why I often don't use hue at all for portraits and set the slider back to zero.

Step 7: Fine-tuning for natural results
In the example, I only wanted to bring a bit more life into the skin. A minimal brightness adjustment and a slight saturation increase were enough. Nothing more was necessary. The art lies in keeping the change barely visible. It's best to compare regularly with the original state by toggling the layer on and off.

Step 8: Adjusting a different color, such as water
HSL doesn't only work on skin tones. You can edit any color range in the same way. In a second example, I created a new HSL layer and selected the water. There I increased the brightness so that the color looks lighter. Afterwards, the hue can be shifted, for example toward blue. The color can quickly tip toward white, green, or red in the process. Whether that is desired depends on your image concept.

Step 9: Testing limits with exaggeration
With the water, I deliberately overshot the goal. The hue looked intense, and the saturation was far too high. That is not a mistake, but a good exercise. When you see how far you can go, you get a better feeling for where the limit of tolerance lies. Afterwards, set the values back to a reasonable level.

Step 10: Excluding areas with the mask
The mask is the most important helper when the change should not apply everywhere. Select the mask of the adjustment layer. It is the rectangle with the black circle. Then take the paint brush and paint over the areas that should remain untouched by the adjustment. A large brush speeds up the work, but it shouldn't be too coarse.

Step 11: Applying the mask to the face
In the second example, I wanted to allow the change only in the face. So I covered the area outside the face with the mask. The change now shows up specifically in the face, while other areas of skin remain unchanged. In the comparison, you can see that the complexion looks slightly redder with the layer active. The differences are subtle, but that is exactly the goal.

Step 12: Controlling partial changes selectively
The mask is always worthwhile when you only want to edit part of the subject. One example would be improving the skin on the face while changing nothing on the knee or shoulder. With this separation, you keep control over every correction and avoid unwanted side effects. If you need to correct something later, you simply repaint the mask.

Summary – HSL in Affinity Pixel: Adjusting colors selectively
With the HSL adjustment layer in Affinity Pixel, you selectively change individual color ranges without affecting the rest of the image. The eyedropper helps you select skin tones or other colors directly in the image. You control the result via hue, saturation, and brightness, and with a mask you limit the effect to the areas you really want to edit. Work carefully, because subtle corrections usually look the most natural.
FAQ
How do I tell which color range belongs to my subject?In the HSL dialog, click on a color range in the color wheel, such as orange or red, and then activate the eyedropper. Then click on the desired spot in the image.
Why is the eyedropper grayed out?In rainbow mode, that is, when no specific color range is selected, the eyedropper is not available. First select a color range such as orange or red.
Which saturation is suitable for skin tones?For skin tones, small values are often enough, around 8 percent. Strong increases quickly look unnatural.
Can I shift the hue in portraits without worry?That is risky, because the skin quickly looks too cool or too warm. Shift the hue only minimally and check the result by comparing it with the original.
What does the mask do for HSL adjustments?The mask limits the effect to specific areas of the image. This way you change only the face, for example, and leave the knee or shoulder untouched.
Can I still change my settings later?Yes, since the HSL changes are on an adjustment layer, you can adjust values at any time, hide the layer, or rework the mask.


