
A photo quickly looks flat when the light comes evenly from the front. With just a few steps, you can transform it into a scene with a low evening sun, warm colors, and sparkling points of light. You don't need complex editing for this, just overlays from image packs that you place over your photo. In this tutorial, I'll show you how to use sun rays, light leaks, and bokeh particles so that they support your subject and don't look overloaded.
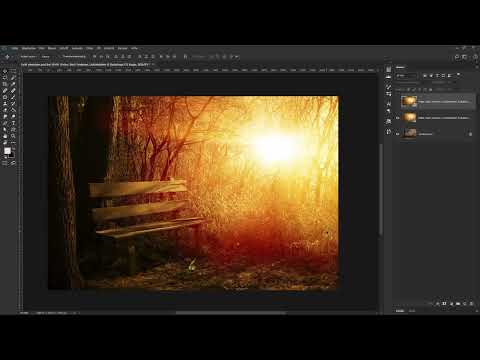
The video is only loaded from YouTube when you play it – data (including your IP address) is then transmitted to YouTube/Google. More in the privacy policy
Key Takeaways
- Overlays can be blended directly with the photo using layer modes such as Hard Light, Color Dodge, or Overlay.
- If you place overlays as a Smart Object, you can change size, position, and rotation at any time without loss of quality.
- Clipping masks limit color corrections and overlays to exactly one layer, so the rest of the image remains unchanged.
- Opacity and hue determine the effect. A before-and-after comparison using the eye icon helps you find the right balance.
Step-by-Step Guide
Step 1: Select suitable overlays and open the photo
Before you get started, you need the right material. In the video, several image packs are used: a pack with bokehs, lens flares, and light leaks, as well as packs with rust textures, light rays, and backdrops. Open your source photo in Photoshop. In the example, it is a landscape that should gain an evening mood. Make sure your subject leaves room for light. The sun should generally appear where it also makes physical sense, for example at the edge of the image.

Step 2: Drag sun rays into the photo
Drag the chosen sun rays image into your open document via drag and drop. Photoshop automatically places it above the background layer. Release the mouse button as soon as the image appears. The overlay now exists as its own layer and can be edited independently of the photo. You can see the layer in the Layers panel on the right, where you can rename or move it at any time.

Step 3: Scale, rotate, and confirm as a Smart Object
Grab a corner of the frame while holding down the Shift key. This way you scale the overlay proportionally without distorting it. The same applies to the other handles. Then drag the image to the spot where the sun rays should appear on your subject. Confirm the transformation with the Enter key.
The overlay is placed as a Smart Object. You can recognize this by a small icon in the Layers panel. This step is important because you can adjust the layer non-destructively at any time later without losing details.

Step 4: Set the layer mode to Hard Light
Right now the overlay completely covers your photo because the layer is set to Normal. Open the dropdown menu for the layer mode above the Layers panel and choose Hard Light. The bright rays immediately blend with the photo, and the scene looks as if it were in evening light. The subject remains visible because the dark areas of the overlay become practically invisible.
Step 5: Correct the position without losing quality
With Ctrl+T (Cmd+T on a Mac), you call up the transformation again. Zoom into the image if needed and drag the overlay to the desired spot. You can shrink, enlarge, or rotate the layer until the rays fit harmoniously with the subject. Then confirm again with the Enter key. Because it is a Smart Object, the image quality does not suffer.

Step 6: Check the effect and assess the opacity
Click the eye icon of the overlay layer to show and hide it. This way you immediately see the difference between the original and the edit. In this example image, a reduced opacity would cause the branches in the area of the sun to disappear. Therefore, in this case you leave the layer at full opacity. So don't decide by feel, but check every change in a direct comparison.

Step 7: Duplicate the layer and create a darker look
Hold down the Alt key and drag the overlay layer onto itself in the Layers panel. This creates a copy. Then hide the first layer so you can clearly see the changes made to the copy. Set the blend mode of the copy to Color Burn. The image now looks much gloomier and more dramatic. Then reduce the opacity to about 70 to 80 percent until the mood feels right to you.

Step 8: Control color precisely with a clipping mask
The color effect of the sun rays can be adjusted with an adjustment layer. To do this, open the Hue/Saturation option via the adjustment layer icon. So that the correction affects only the sun rays, hold down the Alt key and click between the adjustment layer and the overlay layer. Photoshop creates a clipping mask this way. Afterwards, you can shift the hue, for example toward blue, or increase or decrease the saturation. Compare several variations and show them one after another to choose the right one.

Step 9: Add bokeh particles for the foreground
For more depth, you can place additional particles in the foreground that reflect the sunlight. To do this, drag a bokeh image from the pack into your document and scale it so that it aligns flush with the bottom edge. Holding the Shift key, you rotate the overlay in 15-degree steps. Confirm with the Enter key and set the blend mode to Screen. This hides the dark areas while the bright bokehs remain visible. An opacity of around 90 percent ensures a subtle effect.

Step 10: Insert light leaks and adjust the color
Place a light leak overlay from the pack above the existing layers. Rotate and enlarge it until it roughly reaches the size of the image, and confirm with the Enter key. The overlay initially looks very turquoise. To adapt it to the evening mood, add a solid color fill layer via the adjustment layer menu. Choose a color with the values Red 225, Green 116, and Blue 0, so a warm orange tone. For better organization, name the layer "Color" and set its mode to Color.

Step 11: Limit the color with a clipping mask
The color fill should affect only the light leak overlay and not the entire image. Therefore, hold down the Alt key and click between the color fill and the light leak layer to create a clipping mask. Then you set the mode of the light leak layer to Overlay. As a result, the overall image looks noticeably warmer without individual areas becoming excessively discolored.

Step 12: Fine-tune and compare the overall result
Finally, you check the result in comparison to the original. Hold down the Alt key and click on the eye icon of the original image. This shows the layer only for comparison. Afterwards, you can reduce the opacity of the bokeh layer, for example to 85 percent. Make sure the particles in the foreground do not look artificial, but appear like pollen or dust catching the sunlight. When you are satisfied, your editing is complete.

Summary ??? Light Leaks and Bokehs in Photoshop: Creating an Evening Mood in a Photo
With sun rays, light leaks, and bokeh particles, you give a photo an atmospheric evening ambiance in a short time. What matters are the blend modes that combine the overlays with the subject, as well as Smart Objects and clipping masks, which give you maximum control. Work with comparisons via the eye icon to always keep an eye on opacity and hue. This way your photo stays natural and still looks exciting.
FAQ
Do I absolutely have to place the overlays as a Smart Object?No, that is not strictly necessary. However, it is recommended because you can adjust size, position, and rotation later without loss of quality.
Which blend mode is suitable for sun rays?Hard Light is a good choice in the example because the bright rays remain visible and the dark areas disappear. However, you can also try other modes.
Why do I need a clipping mask?A clipping mask ensures that color corrections only affect the layer beneath and not the entire image.
How do I find the right opacity for an overlay?Show and hide the layer via the eye icon and compare the result with the original. Pay attention to whether important details such as branches or contours are lost.
Can I change the color of an overlay afterwards?Yes, via an adjustment layer such as Hue/Saturation or a color fill, the color can be adjusted at any time without changing the overlay itself.


