
A horse made only of fine threads looks like an apparition that is just growing out of the image. This is exactly the effect you create in this tutorial for the composing "Der Sportsgeist". You paint the contours of the horse not as closed areas, but as loose threads that wind around a basketball player. The result thrives on irregularity: On one side the threads dissolve, on the other side they condense into a clear edge.
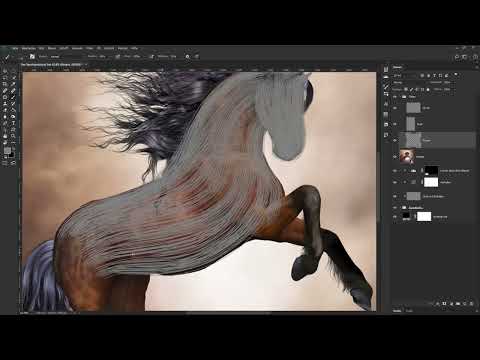
The video is only loaded from YouTube when you play it – data (including your IP address) is then transmitted to YouTube/Google. More in the privacy policy
For this, you work with a template, your own thread brushes, and graphics tablet pressure dynamics. You learn how to work with multiple layers and masks almost incidentally along the way.
Key Takeaways
- Create a separate empty layer for each body part, for example for the head, ears, body, legs, and hooves. This way you can edit each part separately later.
- Paint with a medium gray (brightness 50%). Brightness and contrast can still be freely adjusted afterwards, whereas pure white can no longer be lightened.
- Use the thread brush at about 136 pixels and vary the pen pressure: Applied gently, it creates thin threads; pressed harder, denser areas.
- Keep the threads frayed on the left and dense on the right, because this creates the direction of movement toward the player.
- Refine the results with layer masks. By selecting a mask with Ctrl-click, player contours can be reused.
Step 1: Place and align the template
The starting point is a horse template that you simply drag and drop into your document. It lands as its own layer in the image. Then you bring it into the desired position with the Move tool. With Ctrl+T, the horse can be scaled until it fits your image composition. The template serves only as orientation later on; it will be hidden at the end.

Step 2: Create folders and empty layers
Before you get started, create a new folder above the template. To do this, click the folder icon at the bottom and name it, for example, "Fäden". Inside this folder, you then create several empty layers, one for each area of the horse. This has a clear advantage: You can hide, mask, or rework the head, the leg, or the body independently of each other later.

Step 3: Set up the thread brush
Select the Brush tool and open the brush selection by right-clicking in the image. Pick the thread brush you created earlier and set the size to about 136 pixels. This size is suitable for most of the horse. For finer details like the ears, you may reduce it later, but make sure the main part stays consistent.
Also activate the option for pen pressure control of the brush size if you are working with a graphics tablet. Then your pen pressure determines how wide or narrow the thread becomes.

Step 4: Paint with medium gray instead of white
Set the foreground color to a medium gray with 50% brightness. This seems unspectacular at first, but it has a decisive advantage: A medium gray lies exactly between black and white. If you want to lighten or darken the threads later, you can do so at any time. A stroke that is already completely white, on the other hand, can no longer be made lighter. Confirm the color value with OK and get started.

Step 5: Draw the head as a thread structure
Begin with the head and follow its shape. Place the brush at the bottom, pull the stroke upward, and release a little more loosely at the top so that the thread tapers off thinner. On the left side, the threads should clearly separate from one another. On the right side, by contrast, they lie closer together and form the contour. The threads do not have to lie exactly on the edge. Through masking, you later correct anything that protrudes too far.

Step 6: Model the ears on a separate layer
Create a new layer for the ears and name it accordingly. Place it above the head layer so that the ear strokes lie over the head. Draw the ears from bottom to top, pressing harder at the start and tapering off more gently at the top. For the finer ears, you may reduce the brush size slightly so they look more delicate. Afterwards, set the size back to about 136 pixels.

Step 7: Create the body below the head
Create another layer named "Body" and drag it beneath the head layer. This way, the body strokes appear behind the head. Start at the neck and draw downward to the left, following the shape of the torso. Avoid unnecessary flourishes. The legs and details will follow later on their own layers.
Pay special attention to pressure dynamics on the body. Press somewhat harder at the top of the neck and more gently on the left side so the threads dissolve. On the right side, it may become denser again. If you don't like the result, simply undo the steps with Ctrl+Z.

Step 8: Vary the pressure deliberately
With every single stroke, you have to pay attention to two things at once: the shape you are tracing and the pressure with which you guide the pen. Start, press gently, increase the pressure on the desired side, and release again. Especially on the body, this may feel unfamiliar at first. Take your time and repeat individual areas until the thread structure looks coherent. Messy fraying on the left side is explicitly desired and can be masked later.

Step 9: Check the interim result
Now hide the template to see what you have painted so far. You can often already recognize the outlines of a horse, even if the threads still look gray and uneven. Add density where necessary on the upper neck or the right contour. This look at the result without the template helps you spot mistakes early.

Step 10: Paint legs on their own layer and lock layers
For the front leg, create a new layer named "Front Leg." The back leg lies in the background and stays on the lower layers. So that you don't accidentally draw on the wrong layer, you can select the other layers and lock them using the lock icon in the Layers panel. This is especially helpful when you have many layers stacked on top of each other.
Draw the leg following the same principles: loose on the left, denser on the right. The edge areas should look somewhat more opaque, because later you can trace and reinforce them with fine strokes.

Step 11: Design hooves and fringes
You can draw the hooves either directly on the leg layer or on their own layer. The hoof should look denser than the rest of the thread so that it remains recognizable as such. On the left side, you may let individual threads extend beyond the contour. This looks ghostly and alive. You will remove the protruding fringes later with a mask so that the right edge appears clear and defined.

Step 12: Look at the overall result
Now show all thread layers again and look at the horse as a whole. Head, ears, body, legs, and hooves should come together into a recognizable horse. Feel free to zoom out a bit, because from a distance you can see whether the composition holds up.

Step 13: Refine with layer masks
Now the horse is integrated into the image. If individual threads should lie in front of or behind the basketball player, you work with masks. If you have already created a player mask, load it as a selection by clicking on the layer mask while holding the Ctrl key. Then you can apply this selection to a horse layer and thus cut off the threads around the player.

Step 14: Fill Selection on Masks
Once you have created a selection, fill it on the mask. With black as the foreground color, press Alt+Backspace to hide the selection. With Ctrl+Backspace, you fill with the background color. On a white mask this does nothing, so in this case you use Alt+Backspace to place the player's contour precisely. This lets you remove or thin out individual threads in a targeted way.
Step 15: Compare the Result With and Without the Mask
Hide the mask by holding down the Shift key to compare the result without and with the mask. You can then see how the threads wind around the player. Some areas are in front of him, others behind. This exact alternation between foreground and background creates the effect of the sports spirit. Adjust the mask again if needed until the transition is convincing.
Summary – Painting Ghostly Horses in Photoshop: Thread Compositing for the Sports Spirit
In this tutorial, you built a horse out of threads, layer by layer. First you place a template and arrange a folder with empty layers. Then you paint the head, ears, body, legs, and hooves with the thread brush and a medium gray. In doing so, you vary the pressure so that the threads fray out on the left and become denser on the right. Finally, you integrate the horse into the scene with masks behind and in front of the player.
FAQ
Why do you paint with medium gray and not with white?A medium gray can later be both lightened and darkened, whereas pure white leaves no room for corrections.
Which brush size is suitable for the threads?In the tutorial, a size of about 136 pixels is used; for finer details like the ears, you can reduce the size.
How do you know which layer you are currently working on?Lock the other layers using the lock icon so that you don't accidentally draw on the wrong layer.
What happens to threads that extend beyond the contour?They are not a problem, because you can later remove or hide them with a layer mask.
How do you load an existing mask as a selection?Hold down the Ctrl key and click on the mask, and you will get the selection.
How can you place individual threads in front of or behind the player?Use the player mask as a selection, fill it on the horse mask with Alt+Backspace, and compare the result by holding down the Shift key.


