
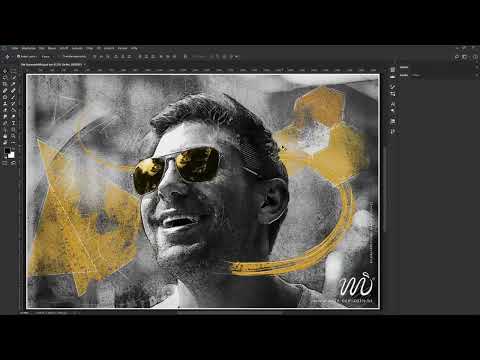
Imagine your portrait photo looks like a hand-drawn template and at the same time appears as if it had been applied directly onto a rough stone wall or a concrete surface. This is exactly the look Marco Kolditz is aiming for in his Photoshop training. However, the video is only a short introduction of about 26 seconds. It does not yet show the actual working steps. This guide therefore gives you a clear overview of the project's goal and the structure of the workflow, so you know what to expect when watching the entire training.
The video is only loaded from YouTube when you play it – data (including your IP address) is then transmitted to YouTube/Google. More in the privacy policy
Key Takeaways
- The project combines two styles: a drawn look and a graphic appearance.
- The effect should also give the impression that the subject has been applied onto stone or concrete.
- The starting point is an ordinary portrait photo that you transform step by step in Photoshop.
- A deliberately chosen material impression determines whether the result looks artistic and credible.

Step 1: Keep the goal clearly in mind
Before you reach for the software, it's worth taking a moment to think. Marco Kolditz describes his goal precisely: a portrait photo should take on a drawn and at the same time graphic character. This guideline is your compass for all the decisions that follow. So ask yourself how strong the drawing character should be and how much graphic quality you want to allow. A hard, high-contrast style looks different from a fine, sketch-like execution. Write down your desired result in one sentence, and you'll keep track of things while you experiment.

Step 2: Build up the portrait as a foundation
The second section of the training revolves around building the image composition in Photoshop. Clean source material makes all further working steps easier. Make sure your portrait is well exposed and the face remains clearly recognizable, because drawing effects emphasize details and rarely forgive blurriness or flaws in the subject. If possible, work with a copy of your original so that you can return to the starting image at any time. This basic rule applies to almost every editing project and will save you a lot of time later.

Step 3: Work out the drawn character
At the core of the project is the transition from photo to drawing. This is where Marco Kolditz gives the image its handmade expression. Contours are emphasized, areas simplified, and tonal values changed so that the subject looks like a line drawing or charcoal image. Your eye should always remain on the face, because that is where it is decided whether the effect appears lively or artificial. Try out intermediate stages and compare them regularly with the original so as not to stray too far from the goal.

Step 4: Create the stone or concrete look
The last content focus announced by the introduction is the material effect. The image should look as if it had been applied onto stone or concrete. For this you need a surface structure that lies over the subject and conveys the impression of a physical substrate. Take care not to let the texture become too dominant. It should support, not distract from the portrait. A subtle grain and irregular brightness variations usually look more convincing than strong, uniform patterns.

Step 5: Check the result and fine-tune
Finally, you look at the overall image critically. Do the drawing character, graphic effect, and material impression match one another? Does the portrait still look recognizably like a person, or is it too heavily altered? Small adjustments to contrast, structure, and opacity often provide the last decisive finishing touch. Also save your file as a project file with all layers so that you can trace changes at any time. When you watch the entire training, you'll get the concrete working steps in Photoshop that implement these steps piece by piece.
Summary – Creating a portrait photo with a drawn look and stone-concrete appearance in Photoshop
You now have an overview of what to expect in the training. You start with a clear goal, work with a clean portrait as a foundation, create a drawn and graphic character, add a credible stone or concrete look, and finally check the result critically. With this roadmap in mind, following along with the main video will be much easier.
FAQ
What exactly does the video show?The video is a short introduction. Marco Kolditz introduces himself and describes the goal of the project, namely a portrait with a drawn and graphic look as well as the impression of a stone or concrete finish.
Which program is used?The training takes place in Adobe Photoshop.
Do I need prior knowledge of Photoshop?Basic knowledge of working with layers and tools is helpful, as the training builds up step by step.
Which starting image is best suited?A well-exposed portrait photo with a clearly recognizable face provides the best conditions for the desired drawing effect.
Why should the image look like it is on stone or concrete?The material impression gives the portrait a special surface and an artistic appeal that clearly sets it apart from a plain photo.

