
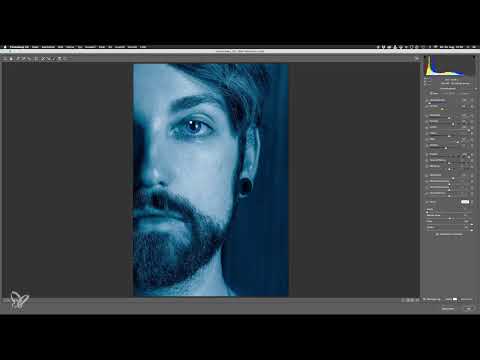
A movie poster look lives on its color mood. This look is not created by a single slider, but by a clear sequence: first you remove all colors, then you overlay a targeted blue tone, and afterwards you work in Camera Raw on contrast, eyes, background, and lips. In this tutorial, I will guide you through the first part of this process. You will set the rough color tone and edit the eye so that it can later serve as a basis for replacing the eye reflection.
The video is only loaded from YouTube when you play it – data (including your IP address) is then transmitted to YouTube/Google. More in the privacy policy
Key Takeaways
Key Takeaways
- The original is completely monochrome. The look is not created by a color overlay in which other colors are retained.
- The image is first converted to black and white, then the blue toning is added as a color fill in "Soft Light" mode.
- A Smart Object with a Camera Raw filter allows subsequent changes at any time without destroying the original image.
- The eye is specifically colored blue and brightened with the adjustment brush and the mask.
- Gradients with reduced exposure draw attention to the face and darken the background.
Step-by-Step Guide
Step 1: Reading the Original Correctly
Before you change anything, look at the original image closely. The color effect is not random: it is a purely monochrome image consisting exclusively of blue tones. Simply painting over it with blue, leaving other colors in place, would not achieve the look. Your path therefore always leads via the detour of desaturation.

Step 2: Converting the Image to Black and White
Lay the foundation by first completely removing the color from the image. This has an additional advantage: small color shifts, such as those caused by freckles or uneven skin tones, disappear immediately. You can find the adjustment via the "Layer" menu, then "New Fill Layer" and "Black & White". One click is enough, and the image is monochrome.

Step 3: Organizing the Layers in a Group
As soon as multiple layers are created, you quickly lose track. Therefore, click the folder icon in the Layers panel to create a new group. Name it, for example, "Color Look". This way you can later show or hide all related adjustments with one click and always keep an overview of what has already been done.

Step 4: Creating the Blue Toning as a Color Fill
Now comes the actual color tone. You have several options, such as a photo filter or white balance. In this tutorial, you use a color fill. Go to "Layer", then "New Fill Layer" and choose "Solid Color". Then set the blend mode to "Soft Light". Confirm with OK, and the image already takes on a visible tint.

Step 5: Finding the Right Blue Tone
The right blue tone is harder to hit than you might think. It should be relatively dark, but still remain clearly recognizable as blue. A slight shift toward turquoise can support the effect, but too much of it quickly looks unnatural. Try out different tones and choose the one you like best. You should not apply the eyedropper to the blue tone of the original. Later adjustments will change the tone once more anyway, so a tone that roughly fits is enough.

Step 6: Checking the Result Between Monochrome and Blue
After the color fill, the image is completely monochrome and has a continuous blue toning. This is your first color look. Take a good look at the result before continuing. Pay attention to which elements should be particularly emphasized later, such as eyes, beard, and lips. You will need these areas for the next contrast adjustments so that they do not lose too much detail.

Step 7: Creating a Layer with All Adjustments
For the next steps, you need a layer that contains all of the adjustments made so far. To do this on a Mac, press the key combination Command, Alt, Shift and E. On Windows, it is Ctrl, Alt, Shift and E. Name the new layer "Camera Raw", for example. Then convert it into a smart object via right-click. This is the prerequisite for being able to use the filter non-destructively later and adjust it at any time.

Step 8: Apply the Camera Raw Filter to the smart object
Open the filter via "Filter" and "Camera Raw Filter". In the new window, you will find the same sliders and tools as in Lightroom. This makes the filter especially powerful, because you get the full editing functionality for every individual layer. With the filter, you can now specifically change the basic settings of the image.

Step 9: Refine the color look with the white balance
The blue toning can be controlled further in the Camera Raw Filter. Play with the white balance to make the image a bit bluer and slightly greenish. This brings you closer to the color tone of the movie poster. Then you brighten the shadows a little and lower the highlights. This makes the highlights stand out more. You can also use vibrance to take the blue toning out of the highlights. This looks softer and more harmonious.

Step 10: Edit the eye with the Adjustment Brush
First, zoom to 100 percent by clicking into the image so that you can see the iris precisely. Select the Adjustment Brush and adjust its size so that you can work cleanly. If needed, activate automatic masking; it is very helpful for the iris. Reset all sliders to zero by double-clicking the respective slider. Then activate the mask display so that you can see exactly which area is selected. Mark the iris and reduce the size of the brush for the fine work.

Step 11: Intensify the eye color and brighten the eye
Once the mask is in place, turn off the display and work on the color. Because the color temperature has not been reset yet, a clear blue tone has already emerged. You can strengthen this tone by reducing the green component. Then increase the clarity to bring structure into the eye, and raise the contrast. Raise the highlights and the white, and lower the black. The effect is deliberately exaggerated, but it follows the style of movie posters. Finally, you can raise the sharpness slightly, for example to plus 20. With the Command key and zero, you jump back to the original size and assess the result in the overall image.

Step 12: Darken the background with a gradient filter
For the background, the linear gradient filter is better suited than the Adjustment Brush because the transition becomes smoother. Drag the filter across the image from left to right and move its rear area so that the transition does not become too soft. Reset the values here as well and lower the exposure significantly, in the example to minus four. Make sure that no halos appear. You can readjust the angle if needed. Then you add a second gradient filter on the left side, which you drag shorter. A shadow on the forehead must not become too harsh.


Step 13: Emphasize the lips with the Adjustment Brush
For the lips, you take the Adjustment Brush a bit larger and paint over the lip area. Show the mask to work cleanly, and then turn it off again. Reset all sliders and lower the exposure slightly, for example to minus one. Then increase white and highlights so that the highlights on the lip become visible. You can reduce the black on the lower lip so that the area looks darker. With clarity, you emphasize the structure, and this is often exactly where the biggest difference in the result lies.

Step 14: Confirm the adjustments and check the smart filter
When you are satisfied with the Lightroom adjustments, confirm the filter. It is then stored in the layer as a Smart Filter. You can show and hide it at any time to compare before and after. If you no longer like a setting, double-click the Camera Raw Filter in the layer. The window then opens with all previous settings and the edited elements, so you can adjust them again.


Step 15: Outlook on the next steps
With the Camera Raw Filter, the basic adjustments are complete. Next come contrast adjustments with Dodge and Burn. With these tools, you have the greatest control over contrast. Afterwards, you sculpt the face, place the highlights precisely, and touch up individual areas. After that, the eye can be replaced with the reflection of the Nightking, and the remaining fine details of the movie poster follow.

Summary ??? Creating a Photoshop color look: blue toning, eyes and contrast
The color look in the style of a movie poster is created in clear steps. First, you remove all colors so that a clean foundation is created. Then you place a blue tone over it as a color fill layer in "Soft Light" mode. With a Smart Object and the Camera Raw Filter, you can control white balance, contrast, and highlights non-destructively. The eye is selectively colored blue and brightened using a mask, while gradient filters darken the background. The lips receive additional structure via the Adjustment Brush. With this approach, you create a solid basis for the further contrast and reflection work.
FAQ
Do I really have to convert the image to black and white before the blue toning?Yes, because the original is purely monochrome. Only with complete desaturation do you get an even blue tone without remnants of the original colors.
Can I take the blue tone from the original image?This is not recommended. Later color adjustments will change the tone anyway, so a blue tone that roughly fits the look is sufficient.
Why should I organize the layers in a group?A group, such as "Farblook", provides an overview. You can show or hide all associated adjustments with one click.
Why do I convert the layer into a Smart Object?A Smart Object makes it possible to apply the Camera Raw Filter non-destructively. You can open, adjust, or disable the settings at any time.
How do I quickly reset a slider in the Camera Raw Filter?With a double-click on the respective slider, it jumps back to its original position.
Why do I work with a mask on the eye?The mask shows you exactly which area is being edited. This way you avoid the color change extending beyond the iris.
Why do I use a gradient filter for the background instead of the Adjustment Brush?The linear gradient filter creates a smoother transition and is easier to control for large-area darkening.
What is used for contrast control in the next steps?Dodge and Burn. This method offers the most control over the contrasts in the face.


