
A good newsletter only lands well if the technology works cleanly from the very first click. This is exactly where Mailchimp helps you, provided you know the individual building blocks. In this guide, I walk you through the entire process: from the new email through recipients, sender, and subject line to sending.
The video is only loaded from YouTube when you play it – data (including your IP address) is then transmitted to YouTube/Google. More in the privacy policy
Key Takeaways
- You start a new email via "Create" and then "Email".
- Mailchimp offers four campaign types: Regular, Plain Text, A/B Test, and Template.
- You define recipients via an audience (target group). With segments, you address specific subgroups.
- Merge tags personalize your email and help avoid spam filters.
- The subject line and preview text determine whether anyone clicks on your email at all.
- The unsubscribe link in the footer is mandatory and must not be missing.
Step-by-Step Guide
Step 1: Start a New Email
At the top left, you will find the "Create" button. As soon as you click it, a menu opens in which you can create a new email. Select the "Email" entry there. This starts your campaign, and you arrive at the campaign type selection.

Step 2: Choose the Right Campaign Type
Mailchimp now shows you four options. The "Regular" option allows you to design an email freely, without a predefined template. "Plain Text" sends a pure text message without graphics and layout. The "A/B Test" lets you test up to three variants of an email against each other, for example different subject lines, to find out which works better. With "Template" you create a reusable pattern that you can use later for further newsletters. For your first newsletter, "Regular" is usually the best choice, as it leaves you with full creative freedom.
Step 3: Assign a Campaign Name and Start
In the next window, you give your campaign a name. This is only visible internally and serves as orientation for you, especially if you manage several campaigns later. A campaign is the overarching term for what you want to achieve with the email. So give it a clear name, such as "First Newsletter". Then you click on "Begin", and your campaign is created.

Step 4: Define Recipients via the Audience
The first item in the campaign is "Recipients". Recipients are the people who should receive your newsletter. Click on "Add recipients" and select the appropriate audience, in this example the audience "Gesunde Ernährung". Then save your selection with "Save".

Step 5: Use Segments Strategically
On the right side, you will find the "Segment or Tag" area. Here you can specify whether you want to address all contacts or only a specific group. With "Active" you reach people who regularly open and click your emails. "Inactive" shows you contacts who do not. The "New" option refers to recently added contacts. There is no official definition for this; in practice, it usually means the contacts from the last few weeks. You can also create your own segments, for example for subscribers from a certain city or with a certain language. Make sure that your segment actually contains people, as otherwise no one will receive the email.

Step 6: Personalize the Email with Merge Tags
Under "Personalize the to field" you can insert merge tags. These are placeholders that Mailchimp replaces with the recipient's real data when sending. The placeholder |FNAME| stands for the first name, |LNAME| for the last name. Instead of "Hello bob@example.com", the recipient then reads, for example, "Hello Bob Smith". Personalized emails feel more personal and are less often classified as mass mail. You can select the merge tags directly in the field.

Step 7: Define Sender and Sender Address
In the "From" area, you enter who the email comes from. Enter your name or the name of your company as well as the appropriate email address. The sender is the first impression the recipient gets of you. Anyone who sees a familiar address is more likely to open the message.

Step 8: Write a meaningful subject line
In the "Subject" field, you set the subject line. It is the text the recipient sees first in their inbox, and it should get them to open the email. Phrase it concretely and in a way that arouses curiosity. An example would be "Five tips to stay healthy even in winter". Avoid exaggerations, capital letters, and multiple exclamation marks, as such phrasing seems unprofessional and increases the risk of ending up in the spam folder.

Step 9: Add the preview text
Directly below it is the preview text. It is displayed next to or below the subject line before the recipient opens the email. Use it to create additional incentive, for example with a started sentence like "You will hardly be able to believe the first tip …". The reader should wonder what is behind the email and why they should open it, whether through a practical benefit or a touch of exclusivity.
Step 10: Check the subject line using the rating
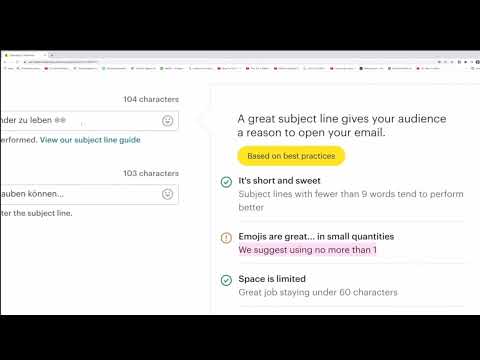
Mailchimp automatically rates your subject line. It checks length, emojis, and punctuation. You can insert emojis directly, but you should use them sparingly. In this example, Mailchimp recommends at most one emoji. Once the rating turns green, the subject line is fine. Then save with "Save".

Step 11: Design the content of the email
The next step is about the actual content. Click on "Design Email" to open the editor. Here you can design freely or fall back on pre-made templates and customize them. In the example, an empty template is used. You can add, move, or remove elements to build your layout step by step.

Step 12: Insert headline and text blocks
A headline that matches the subject line is definitely useful. The recipient should immediately recognize that they have opened the right email. Below it, you place a text block with your content, such as individual tips. With a recognizable element, that is, similar wording to the subject line, you avoid the reader feeling deceived.

Step 13: Add images and GIFs
You insert images via "Add your photo". You can upload your own photos from your computer, select images already used in your account, or connect content with Instagram. In addition, Mailchimp provides a library of GIFs that you can find via the search. For example, search for "Winter", choose a suitable GIF, and click "Insert". Make sure that images fit the theme of your newsletter.

Step 14: Add button, social links, and logo
With a button, you lead the reader to a landing page, for example to your blog or your website. Add the address and give the button a clear text such as "Click here". Below it, you can link your social media channels and place a logo. You can freely adjust size and position to your style.

Step 15: Check the footer with unsubscribe link
The footer contains information about the copyright, the sender, and an unsubscribe link. You should not remove this area. Every newsletter must contain an unsubscribe link, otherwise you violate legal requirements and risk problems with spam filters. You can customize the texts in the footer, but the unsubscribe link must be retained.

Step 16: Check and send
With "Continue", you get to the final view. Here you can tell by the green checkmarks whether all settings are correct. Beforehand, you can view and test the email via "Preview". If everything is fine, click "Send" in the upper right corner. The newsletter will then be sent to all recipients in your Audience.

Summary – Creating a Mailchimp Newsletter: Step-by-Step Guide for Beginners
You have now learned all the steps to create a newsletter in Mailchimp. You start with a new email, choose the right campaign type, and define the recipients and sender. Then you win people over with a subject line and preview text, design the content with a heading, images, and a button, and check the footer with the unsubscribe link. After a final review, you send your newsletter.
FAQ
What is the difference between Regular and Plain Text?Regular allows a designed layout with images, buttons, and colors. Plain Text sends a simple message without styling that looks like a personal email.
What does the A/B test in Mailchimp mean?With the A/B test, you can compare up to three variants of an email, such as different subject lines, and see which one performs better.
What does the "New" segment mean?This refers to contacts who were recently added to the audience. Mailchimp does not officially define an exact time span.
Why should I use merge tags?Merge tags replace placeholders with personal data such as the first name. This feels more personal and helps to avoid spam filters.
Why must the unsubscribe link not be missing?Every newsletter must offer the option to unsubscribe. If it is missing, you violate legal requirements and risk your emails being treated as spam.


