
Which subject line opens more emails? The answer doesn't come from a gut feeling, but from a split test. You send two variants to different parts of your recipient list and then compare the results. In this part of the series, you set up the second section of the test in Mailchimp: You define subject lines and preview texts, configure tracking, and build the newsletter. At the end, you can send the newsletter.
The video is only loaded from YouTube when you play it – data (including your IP address) is then transmitted to YouTube/Google. More in the privacy policy
Key Takeaways
- A split test needs an audience with several contacts. With only one person, Mailchimp usually won't let you proceed.
- Both subject lines should cover the same topic, but differ clearly in wording or tone.
- Mailchimp automatically divides the recipients in the test into equal parts, 50 percent per variant.
- Open and click rates ultimately show you which subject line worked better.
- The newsletter itself can be designed with layouts, themes, and drag-and-drop elements, without programming knowledge.
Step 1: Fill the Audience with Several Contacts
Before you begin the actual test, check your audience. A split test with a single recipient is not possible in most cases, because otherwise Mailchimp cannot divide the recipients in a meaningful way. So add a few more contacts. In the video's example, there were five in total. The larger your list is, the more meaningful the results become. Once the audience is sufficiently filled, click "Next" at the bottom.

Step 2: Define the Campaign Info
In the next window, you first assign an internal name for your campaign. This name only appears in your account, not to the recipients. So choose a name that lets you quickly find the campaign later, for example "Winter Newsletter".
Below that, you'll find the option "Use Inbox to manage replies". If you activate it, replies to your newsletter end up in a separate inbox. This way you can respond directly to a person's reply without using your regular email mailbox. You can create a separate inbox for each campaign or audience. You can find it later at any time in your account.

Step 3: Define Recipient and Sender
On the right side, you configure how the email arrives for the recipient. Under "Personalize the To field", you determine whether the person's name appears in the greeting. You can select only the first name (First Name) or combine first and last names. In the example, the first name is perfectly sufficient.
Then activate the option "Use Inbox to manage replies" again, so that replies reliably end up in your inbox here as well. After that, you still check the sender name and the sender address. Recipients should immediately recognize who the email is from.
Step 4: Formulate the Two Subject Lines
Now comes the actual core of the test. Mailchimp offers you two fields for the subject lines, "Email Subject 1" and "Email Subject 2". Both variants should cover the same topic, but differ visibly. Only then will you recognize in the end which wording works.
In the example, the first variant reads "5 Tips to Stay Healthy in Winter". The second addresses the reader more directly: "Attention: 5 Simple Tips for Better Health in Winter". The topic stays the same, while tone and word choice differ. Make sure both variants fit the content of your newsletter, because otherwise you will disappoint the recipients after they open it.

The preview text follows below. It appears in the inbox next to or below the subject line and reveals the content in one or two sentences. For the test, you can use two variants here as well. In the example, the preview text "Tip 1 will surprise you" was chosen to spark curiosity.
Step 5: Understand How the Split Test Works
Before you continue, you should know the logic behind it. Mailchimp divides your audience into two halves. One half receives subject line 1, the other half subject line 2. The distribution happens automatically and in equal parts, so 50 percent each.
After sending, Mailchimp evaluates which variant led to better results. That is exactly the point of a split test: You determine which wording motivates more people to open. You then use this knowledge for future newsletters.
Step 6: Set Up Sender and Tracking
Below the subject lines, you will find the sender information. Here you define the name and email address under which recipients will see the message. Check both carefully, because the sender details significantly influence whether an email gets opened.
Next comes tracking. In a split test, the options for opens and clicks are already enabled, and that should stay that way. After all, you want to measure how many recipients opened the email and how many clicked a link. This is the only way you can decide which subject line actually performs better.

Step 7: Convert Videos and Switch to the Template
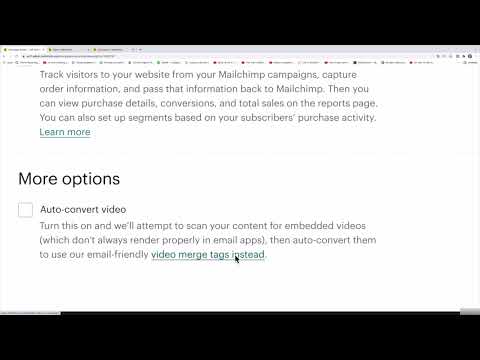
In the next section, you will find the option "Auto-convert Videos". It looks for embedded videos, which often aren't displayed correctly in email programs, and replaces them with an email-friendly preview image with a link. Leave the option enabled if you include videos. Then click "Next".

Now you create the actual newsletter. Mailchimp offers you various starting points: layouts, themes, saved templates, and existing campaigns. You can also include your own HTML code if you want more control over the design. A simple layout is suitable for getting started. Click on it to select it.

Step 8: Design the Newsletter
After making your selection, you can edit the layout. Clicking on an element opens its settings. The logo can be enlarged, reduced, or removed. You simply replace the heading with your own text, for example "5 Tips to Stay Healthy in Winter". The operation corresponds to the editor you already know from regular newsletters.


In the text area, you replace placeholders with real content. In the example, the first tip was described with "Eat citrus fruits, strengthen the immune system". Add as many elements as you need. You drag new content from the sidebar into the newsletter via drag-and-drop.
Step 9: Adjust Dividers and Spacing
To make your newsletter clearer, you can insert dividers. To do so, drag the "Divider" element to the desired spot. Then you adjust the appearance. You can change the color, for example to black, increase or decrease the line thickness, and choose the style, for example solid, dashed, or dotted.
The spacing above and below the divider can also be adjusted. A higher value creates more breathing room between the content. Try out a few variations until you like the result. By clicking "Save and Close", you apply the changes.


Step 10: Set Up Button and Linking
A button is often the most important element of a newsletter because it motivates readers to take action. Click on it and change the text, for example to "Click here". Then you define the link target. You can enter any web address, open an email address, set an anchor on the page, provide a file for download, or point to a landing page.
A landing page is a simple website on which you present, for example, a product or an offer. It is particularly useful because the recipients have already given you their email address. A button that leads to a survey or an offer fits the newsletter well in this case.

Step 11: Insert Images and GIFs
Finally, you can insert images. Click on the image element and select "Replace". You can upload your own file or choose a GIF from the Mailchimp library. Once you have decided on a motif, confirm with "Insert". The image appears immediately in the newsletter, and you can swap it out at any time later.

The editor works on the "Click and Change" principle or drag-and-drop. With HTML blocks, text boxes, photos, products, videos, or promo codes, you can further expand the newsletter. Via "Style" at the top of the editor, you can also adjust the global fonts and colors so that the entire newsletter looks consistent.
Step 12: Confirm the test and prepare for sending
Once the newsletter is finished, click "Confirm before sending" at the bottom. Mailchimp then takes you to the "Content" step, where you can check the content once more. If some content is not yet personalized, you can correct those spots via "Resolve". Only when everything is right can you send the newsletter. Save your changes in between with "Save and Exit" if you want to continue later.

Step 13: Evaluate the results
After sending, you receive the results. They show you which subject line worked better, that is, whether "5 Tipps, um im Winter gesund zu bleiben" or "Aufgepasst: 5 einfache Tipps für eine bessere Gesundheit im Winter" achieved more opens. This very comparison is the actual goal of the test. Make a note of the result, because it will help you write better subject lines for future newsletters.

Summary – Setting up a Mailchimp A/B test for subject lines: step by step
You have learned how to set up a split test for two subject lines in Mailchimp. You prepared a sufficiently large audience, defined the campaign info, sender, and preview texts, and activated the tracking options for opens and clicks. You also saw how to design a newsletter with layouts, dividers, buttons, and images. With the sending and the subsequent evaluation, you know in the end which subject line worked better.


