
Does your newsletter perform better on Monday morning or on Tuesday evening? This question can't be answered by gut feeling, only with a test. That's exactly what Mailchimp offers the A/B test for Send Time for. You set two send times, send the newsletter at different times, and then compare the results. In this guide, I walk you through the entire process step by step, from selecting the audience to scheduling both send times.
The video is only loaded from YouTube when you play it – data (including your IP address) is then transmitted to YouTube/Google. More in the privacy policy
Key Takeaways
- The Send Time test compares two send times, which you enter as Send Time 1 and Send Time 2.
- The percentage value is fixed at 100% because every recipient receives the newsletter. Only the time differs.
- If you want to compare times of day, choose the same weekday. If you want to compare weekdays, choose the same time of day.
- Tuesday and Wednesday can be compared well with each other, whereas Sunday and Monday can hardly be compared.
- If a time of day is already in the past on the same day, schedule the send for the following day.
Step-by-Step Guide
Step 1: Start the A/B Test
Log in to your Mailchimp account and open the Audience section. On the left side you'll find the Create button. Click it, then select Email and after that A/B Test. Nothing has changed in this process, so you probably already know it from other types of tests.

Step 2: Assign a Test Name and Begin Creation
Give your test a descriptive name, for example "Newsletter Send Time". That way you keep track even with multiple tests. Then click Begin to get to the next step.

Step 3: Select the Audience
Now you decide which recipients will receive the newsletter. In the example, I'm using the audience "Healthy Eating". Choose your own audience and confirm with Next.

Step 4: Set Send Time as the Test Variable
Now comes the crucial fourth point: choose Send Time as the test variable. You'll notice that the percentage value is set to 100% and can't be moved. That's not a mistake. Since the newsletter reaches all recipients anyway, only the time differs, not the reach. Then confirm with Next.

Step 5: Set Subject Line, Preview Text, and Sender
In the next step, you enter the content that recipients see first. A suitable subject line is, for example, "5 Tips for Living Healthy in Winter". The preview text complements the subject line and creates curiosity, for instance with a hint that the first tip will be surprising. Then you enter the sender name and the sender email address. You can also enable the option to manage replies via the inbox.
Step 6: Add Two Send Times
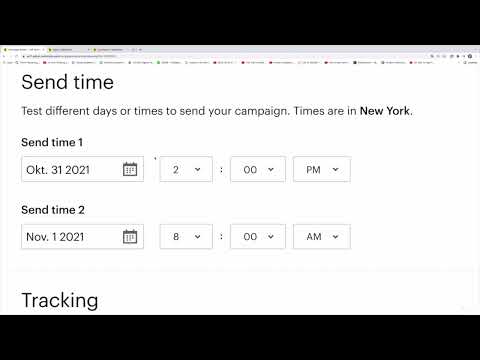
This is where the real difference from a regular newsletter lies. Mailchimp allows you to create two send times, namely Send Time 1 and Send Time 2. Each variant thus gets its own date, and Mailchimp later evaluates which time achieves the better response.

Step 7: Plan Specific Send Times
For Send Time 1, in the example I choose a time in the afternoon, around 2 p.m. For Send Time 2, I want to test a very early send, for example 6 a.m. However, when recording this guide it was already later in the day, which is why a time on the same morning could no longer be entered. Mailchimp only accepts times in the future. Therefore, schedule the send for the next day, for example for 8 a.m. This time is a good candidate because many people start work at 8:30 or 9 a.m. and then open their inbox.
Step 8: Compare Weekdays and Times of Day Sensibly
Before you save, it's worth a look at the calendar. A Sunday is in most cases not comparable to a Monday morning because usage behavior differs greatly. Tuesday and Wednesday, on the other hand, can be compared well. I would therefore set Send Time 1 to Tuesday, November 2, and Send Time 2 to Wednesday, November 3, each at the same time of day.
A simple rule of thumb applies here: If you want to compare days of the week, use the same time of day. If you want to compare times of day, use the same day of the week. If you also want to know how a Sunday or a Monday performs, you can of course try that as a separate test. What matters, however, is that you test the points in time that will actually be comparable with each other later on.

Step 9: Select a template and check the content
With Next, you get to the selection of the newsletter design. Mailchimp offers you ready-made templates. Choose one you like, and then enter your content and information. Make sure that both versions of the newsletter have identical content so that the result remains meaningful.

Step 10: Confirm and schedule
Click on Confirm before sending and check all the details once more. After that, you will arrive at the Schedule button. This label is deliberately chosen, because both newsletters will be sent in the future. The term Send would therefore not be correct here. With a click on Schedule, your A/B test is scheduled.

Summary – Mailchimp A/B test for the Send Time: Send newsletters at the best time
With the A/B test for the Send Time, you find out when your recipients prefer to read your newsletters. You start the test via Audience, Create and Email, select the Send Time as the test variable and specify two send times. Make sure that when comparing days of the week you choose the same time of day, and when comparing times of day you choose the same day of the week. Schedule appointments that have already passed today for the following day, and in the end choose the Schedule button.
FAQ
Why can't the percentage value be changed in the Send Time test?In this test, the newsletter reaches all selected recipients. Only the time is varied, so the value is fixed at 100%.
Can I schedule a send for a time that has already passed today?No, Mailchimp only accepts times in the future. In this case, schedule the send for the next day.
Why shouldn't I compare Sunday and Monday directly with each other?Reading behavior on weekends differs significantly from the start of the work week on Monday. Tuesday and Wednesday, on the other hand, are better suited for a fair comparison.
Why is the button at the end called Schedule and not Send?Both newsletters will be sent in the future. The term Schedule describes this planned sending more accurately than Send.


