
Do you offer coaching, consulting, or trade services and want customers to be able to book their appointments online themselves? With MailChimp's Appointments feature, you can set up your own booking page for this, without programming skills or additional tools. In this tutorial, I'll show you step by step how to create a service, set the price and duration, define your availability, and publish the finished page. At the end, you can share your booking link directly with customers.
The video is only loaded from YouTube when you play it – data (including your IP address) is then transmitted to YouTube/Google. More in the privacy policy
Key Takeaways
- MailChimp's Appointments feature creates your own booking page for your services.
- For each service, you define the type (one-on-one or group), name, description, duration, price, and booking URL.
- The delivery method (in person, virtual, or by phone) determines which additional information you need to provide.
- You set your availability via weekdays and time slots, and you can block individual days at any time.
- Only after the preview do you publish the service on your website.
- Customers can book directly via the shared link, and the appointments can be connected to your Google Calendar.
Step-by-Step Guide
Step 1: Open the Appointments website
Log in to your MailChimp account and click on the item "Website" in the left sidebar. Then select the option "Appointments" at the top. This starts the area where you create and manage your booking page. If you already have another website, you can create an additional one at this point.

Step 2: Create a new service
To be able to sell a service, you first have to create a service. To do this, click on "Add Service". This step is the foundation for everything else, because every appointment that customers book later is assigned to exactly one such service.

Step 3: Define the service type
In the first field, you select the service type. Here you determine whether you provide the service to a single person or to a group. For a classic one-on-one coaching session, where one person teaches or advises another, you choose "One on One". A group coaching session or a workshop for several participants, on the other hand, would fit the group option. By the way, the type can still be changed later, so you don't have to commit permanently.
Step 4: Enter name and description
Now you assign a name to your service, for example "Online Coaching". The name should make it clear to customers at first glance what it is about. Below that, you add a description. Here you explain what the customer can expect, for example which topics are covered or what goal the coaching pursues. The more specific the description is, the easier it is for prospects to decide to book.

Step 5: Set duration, price, and booking URL
In the next section, you set the duration of the appointment, for example 60 minutes. Then you enter the price, which in the example is 159. Next, you enter the URL. This address will be displayed later when a customer visits the page where they can book the service. Make sure the URL is correct, since customers get to your offer exactly through it. When all the details are correct, click "Continue".
Step 6: Select the delivery method
Now you determine how the service takes place. You can choose between "In Person", "Virtual", and "Phone". For an on-site meeting, you choose the in-person option. If the coaching takes place via video software such as Zoom or Skype, you choose "Virtual". A pure phone call is accordingly set up as the phone option. In the example, it is a virtual service.

Step 7: Add the video link
For a virtual service, a note appears stating that the service is provided via a video call tool. Here you add a link through which the appointment takes place, such as a Zoom meeting. Alternatively, you can also link to a page where you explain how the process works, which tool is used, and how customers join the appointment. This builds trust and reduces follow-up questions. Then you click "Continue" again.
Step 8: Define Availability
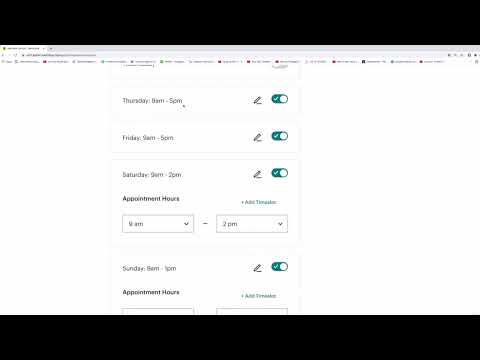
In the "Availability" section, you specify when you have time for appointments. You can select every day of the week or only certain weekdays. Perhaps you work from 9 a.m. to 5 p.m. during the week, but only shorter hours on the weekend, such as Saturdays from 9 a.m. to 12 p.m. and Sundays from 9 a.m. to 1 p.m. You adjust the times for each day individually. This way, you only offer appointments when you are actually available.
Step 9: Block Individual Days
Sometimes you don't have time in a particular week, for example because of vacation or other commitments. In that case, you simply click on the corresponding day to deactivate it, for example the Wednesday of that week. This block can be lifted again at any time. Your other times remain unchanged.
Step 10: Adjust Time Windows and Slots
By default, availability is divided into slots of 60 minutes each, for example 9 to 10 a.m., 10 to 11 a.m., and so on. However, this can become tight if an appointment lasts exactly 60 minutes and the next one follows immediately. Via "Edit Times Slot" you can set the times yourself, for example 9 to 10 a.m. and 10:30 to 11:30 a.m. This creates a half-hour break between two appointments. Note, however, that with this function you only define the individual slots. MailChimp does not currently offer an automatic break setting. Then confirm your settings with "Continue".

Step 11: Check the Preview and Publish the Service
Before your service goes live, you should review all the details in the overview. If everything matches your expectations, click "Publish Service on Website" at the bottom. Afterwards, you can open your website directly and see how customers will see it later.
Step 12: Understand the Booking Process
On your website, the visitor first sees a welcome message with a prompt to book a service. They choose the desired service, such as online coaching, and click "Select". Then they choose a preferred appointment, such as Monday at 10 a.m., and confirm with "Confirm". In the final step, they enter their personal details and check their information via "Review Your Appointment" before finally booking the appointment. You should run through this process yourself once to identify any stumbling blocks.

Step 13: Distribute the Booking Link
You can share the finished page with other people. To do so, copy the link and send it by email, via social media, or on your website. As soon as the first customers book, you can already accept your first appointments.

Step 14: Connect with Google Calendar
Under "What to do next" you will find the option to connect MailChimp with your Google Calendar. After linking, incoming bookings appear directly in your calendar. This way you keep an overview at all times without having to switch between several programs.
Step 15: Add More Services and Design the Page
Below the appointments you will find your services. Using the corresponding button, you add further offerings, for example a 30-minute, 15-minute, or 90-minute appointment. This way your offering can be expanded flexibly. You can adjust the appearance of your page at any time via "Edit Style".


Summary ??? Selling Services with MailChimp: Setting Up Appointment Booking via Website
You have now learned how to create an Appointments website in MailChimp and offer your services on it. You define the service type, name, description, duration, price, and booking URL, choose the type of delivery, and add a video link for virtual appointments. Then you define your availability, adjust time slots, and block individual days if needed. After the preview, you publish the service, share your link, and connect your calendar. With this setup, you can accept bookings without having to coordinate each appointment individually.
FAQ
Can I change the service type afterwards?Yes, the service type can still be adjusted even after saving.
Can I offer multiple services with different durations?Yes, via "Add Service" you can create as many services with different times as you like, such as 15, 30, or 90 minutes.
How can I make a certain day unavailable at short notice?Click on the desired day in the availability section to block it. You can lift the block at any time.
Can I schedule a break between two appointments?This is possible by setting your own time windows via "Edit Times Slot". However, MailChimp does not currently offer an automatic break function.
Can I customize the design of my booking page afterwards?Yes, via "Edit Style" you can edit the design of your page at any time.


