

A glossy sphere looks three-dimensional right away, but only the right shadow makes it believable. This is exactly where it is decided whether your object floats in the document or stands firmly on a surface. In this tutorial, you create a sphere with a lighting effect in Adobe Illustrator and then build a drop shadow that looks natural. All you need is the Ellipse tool, the Gradient panel, and the Transparency panel. All steps are structured so that you can follow them directly.
The video is only loaded from YouTube when you play it – data (including your IP address) is then transmitted to YouTube/Google. More in the privacy policy
Key Takeaways
A sphere is created from a circle with a radial gradient, whose highlight you control with the Gradient tool. The drop shadow is a copy of the sphere with an inverted black-and-white gradient, placed in the background. If your shadow becomes invisible on a background surface, set the opacity of the gradient to 0%. Alternatively, you can help yourself with a suitable blending mode such as Multiply.
Step 1: Draw the Circle
First, create a new file. Select the Ellipse tool and drag out a perfect circle while holding the Shift key. The Shift key ensures that width and height remain identical. This circle is the basic shape of your sphere.

Step 2: Create the Gradient
Open the Gradient panel and choose the gradient you want as a starting point. One click on it immediately applies it to the circle. You don't need a stroke for this sphere, so set it to "None". The circle still looks flat afterwards, which changes in the next step.

Step 3: Switch the Gradient Type to Circular
In the Gradient panel you will find the option for the gradient type. Switch it to "Circular" or "Radial". Only now does the surface look like a sphere, because the color changes from the center outward.

Step 4: Align the Light with the Gradient Tool
Activate the Gradient tool to change the position of the light. You can move the gradient, rotate it, and adjust its extent. Drag the highlight slightly upward so that the upper area of the sphere glows brighter. This makes the light source look believable, and the sphere gains depth.
Step 5: Define the Colors
Pure black and white quickly looks monotonous. Therefore, adjust the color stops. Color the stop in the center with a light blue, the middle area with a darker blue, and the outermost edge with black. To do this, click on the respective color stop in the Gradient panel and select the desired color. Make sure the transition stays smooth, because hard edges destroy the impression of a sphere.
Step 6: Position the Sphere
Shrink or enlarge the sphere until it fits your design, and then move it to the desired location. The size can be chosen freely. Drag the sphere proportionally by the corner with the Selection tool so that the proportions stay the same.
Step 7: Prepare the Drop Shadow
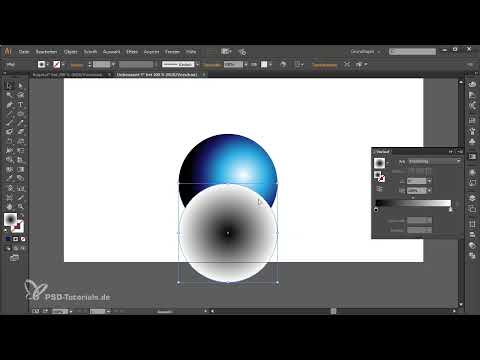
For the shadow, you need a copy of the sphere. Select the sphere and duplicate it with Ctrl+C and Ctrl+V. The copy now gets a simple black-and-white gradient. To do this, select the corresponding preset in the Gradient panel and set the gradient type to Circular again. So that the shadow becomes dark toward the outside and stays lighter toward the center, reverse the gradient with the "Reverse" function. Then move the copy beneath the original sphere.

Step 8: Arrange and Shape the Shadow
Send the copy to the background. To do this, right-click the object and choose "Arrange", then "Send to Back". Select both objects to check the result. The shadow usually still looks too round. Therefore, stretch it slightly in width so that it looks like a shadow on a surface, and move it a little downward and to the side. Once the shape fits, the sphere looks significantly more realistic.

Step 9: Solving the Problem with the Background Surface
As soon as you place a surface behind the sphere, such as a gray rectangle, the shadow is often hidden because the gradient lies over the surface. In that case, opacity helps you. Select the shadow, open the Gradient panel or the Transparency panel, and set the opacity of the black color stop to 0%. This makes the gradient invisible, but the shadow stays in the right place, and you only see the soft transition.

Step 10: Using Alternative Blend Modes
If you don't want to change the opacity, you can adjust the blend mode in the Appearance panel. Click on Opacity there and choose a blend mode such as Multiply. The result is similar, but doesn't look quite as clean as with transparency. So also try out Darken if you're looking for a different look. For most cases, however, I recommend the opacity solution, because you can readjust it precisely at any time.

Step 11: Fine-Tuning the Shadow
Finally, you adjust the shadow to your background. If it is too light for you, you gradually darken the black portion via the opacity. If you want to make the shadow larger, drag on a corner while holding down the Alt key. The shadow then grows from the center on both sides and stays symmetrical. This gives you a sphere with a coherent drop shadow, without needing complicated tricks.
Summary – Creating a Sphere in Illustrator: Realistic Drop Shadow
You have seen that a convincing sphere consists of a circle, a radial gradient, and suitable color stops. With a reversed copy in the background, a shadow is created that anchors the sphere on the surface. Make sure that you adjust the opacity of the shadow for background surfaces, and use the Alt key for symmetrical scaling. With these steps, you can transfer the technique to any objects.
FAQ
Why is my shadow not visible on a gray background surface?The gradient lies over the surface if the order is wrong, or it is covered by the background. Set the opacity of the black color stop to 0% or use a blend mode such as Multiply.
How do I create a perfectly round circle in Illustrator?Select the Ellipse tool and drag out the circle while holding down the Shift key. This keeps width and height identical.
How do I reverse a gradient?In the Gradient panel you will find the "Reverse" function. This swaps the direction of the gradient so that light and dark are exchanged.
How do I enlarge an object from the center?Drag on a corner of the object while holding down the Alt key. The object then grows evenly on both sides.

