
A good design alone does not determine whether a shirt sells. What matters is that the file meets Spreadshirt's technical requirements and is uploaded cleanly. This guide takes you exactly there: from the print template to the vector file to the product in the shop and on the marketplace.
The video is only loaded from YouTube when you play it – data (including your IP address) is then transmitted to YouTube/Google. More in the privacy policy
Introduction
Many designs fail not because of the idea, but because of small details such as lines that are too thin, unintended colors, or a forgotten text. Spreadshirt automatically checks every uploaded design and evaluates colors, line thicknesses, and paths. If you follow the requirements from the start, you save yourself correction loops and waiting times. The following steps show you how to prepare your design, check it, upload it, and then use it on products and the marketplace.
Key Takeaways
The Spreadshirt print template is the most reliable starting point for your vector graphic. The minimum thickness for lines in flex and flock printing is 1.5 mm; anything below that becomes problematic. Every color you use should be located in the template exactly where Spreadshirt expects it. Text must be converted to paths before uploading. During the upload, you specify the number of design colors and confirm the rights to the design. Digital direct printing is suitable for finer lines and color gradients, while flex printing is more robust but limited to simple areas.
Step-by-Step Guide
Step 1: Download the Print Template
Go to the website spreadshirt.de and click "Hilfe" (Help) at the top. In the left navigation, select "Design erstellen" (Create design) and then "Druckbare Vektorgrafiken" (Printable vector graphics). Scroll down until you find the print template for CorelDRAW or Adobe Illustrator. If you click on it, you will receive an Illustrator file in which all print areas and notes are already set up.

Step 2: Understand the Template
Open the template and zoom in on the circles. Spreadshirt has placed two reference points there: a circle with a 1.5 mm diameter for the minimum line thickness and one with 1 mm for the gaps. These measurements are not a recommendation, but the limit that your design must meet in print. You will also see the print areas for products such as baseball caps, key chains, and chest logos on shirts and sweaters. The template thus shows you which areas you can use for your design at all.

Step 3: Insert the Design into the Print Area
In the template, select the placeholder text and remove it. Then open your own file, select the entire design, and drag it into the template while holding down the mouse button. It is important that you move it over an empty area and not directly on the edge of a path, as otherwise you can easily move objects that you do not want to move at all. By holding down the Shift key, you can scale the design proportionally. Make sure to use the print area as optimally as possible, since a design that is too small quickly looks lost on the shirt.


Step 4: Check the Line Thicknesses
Now take the 1.5 mm circle and place it on the thinnest areas of your design. This way you can immediately see whether individual lines fall below the minimum thickness. In the example from the video, all lines were slightly thicker than required, so the design could be uploaded without adjustment. With highly detailed designs with many thin lines, however, Spreadshirt may reject the file. In that case, it helps to simplify details or thicken lines.

Step 5: Remove the Template and Isolate the Design
Once your design is correctly placed and checked, you can delete the template elements such as the logo, text, and circles. The template serves only for checking. Only your design should be uploaded. You can use the template as an aid, but you cannot submit it together with the design.

Step 6: Define colors and check them with the eyedropper
With flex and flock printing, only certain colors are available to you. The color palette for this is visible in the template, and you should use it as a guide when choosing colors. If you choose a color that does not appear there, Spreadshirt has to guess during the automatic check which green you meant. This can result in your design suddenly appearing in neon green after the upload. To avoid this, use the eyedropper tool and pick up the color directly from the palette.


Step 7: Convert text to paths and separate colors
Before you save the file, check whether there is still any text in it. Spreadshirt requires paths exclusively. If a text is still stored as text, you should convert it to paths so that the font is rendered exactly in print. If you want the text in a different color than the design, create it as a separate area with its own color. When uploading, you then specify that two colors are present. This is more flexible, but costs more in print because two colors are used. Later, during product creation, you can still determine which color should apply to which area.

Step 8: Save the file as an Illustrator file
Save the file via "File" and "Save As". Spreadshirt suggests a file name during upload, which you can change at any time. The choice of version is important: older Spreadshirt systems did not always cope well with newer Illustrator versions. Since simple vector graphics do not need any special features of newer versions, choose an older version such as CS4 or CS3 to be safe. Then confirm with "OK".


Step 9: Upload the design to Spreadshirt
Log in to your Spreadshirt account and click "Upload design" on the left side. In the input form, select your Illustrator file via "Choose file". Then specify how many design colors the image contains. If you have, for example, a red text, you must select "two colors" here so that Spreadshirt checks both colors. In the example, there is only one color.

Also be sure to tick the box for the rights declaration. With this, you confirm that you are the author of the design or hold the usage rights, for example through written permission from the author or trademark owner. If you use copyrighted images or brand logos without permission, you face legal consequences, and the design will be deleted. Therefore, only upload designs that you created yourself or for which you have permission.
Step 10: Wait for Spreadshirt's review
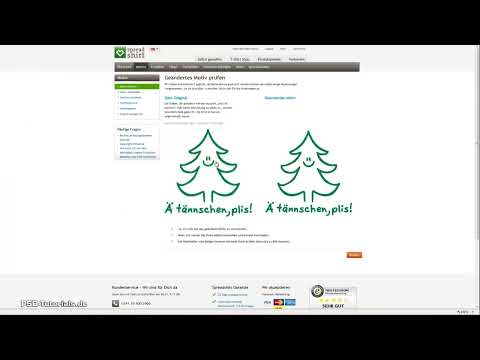
After clicking "Upload", a placeholder first appears in the design overview. Spreadshirt checks the design automatically, which usually takes only a few minutes, but sometimes takes several hours. You will then receive an email with a link. There you can see your original design and the version slightly adjusted by Spreadshirt, if applicable, side by side. If you like the adjustment, you confirm it. If you want to improve the design yourself, for example because too many path points have been set, you upload a revised file. Faulty areas are marked in red for you. Alternatively, you can ask a Spreadshirt designer for help, who will optimize the design for printing.


Step 11: Set the design commission
For each design, you set a commission that you receive per product sold. You can, for example, specify one euro, and then you receive one euro for every shirt sold with this design. The amount can be adjusted at any time later. Note that the prices of the products may then change as well, which is why Spreadshirt asks when saving whether you really want the change.

Step 12: Approving the design and adding it to the Designer Shop
Once the review is complete, you confirm the design with "Yes, I want to use the design like this". The placeholder disappears, and the design can be used freely. It is then immediately available in your shop. If you run a Designer Shop in which customers can place their own designs, you also click "Add design to Designer Shop". After a few hours, the design will then appear in your customers' design overview.

Step 13: Creating products before the design goes to the marketplace
Before you publish your design on the marketplace, you should create a few products. This way, customers can see right away how the design looks on a shirt, and your design gets better chances in the ranking of the design search. You select the product type, such as shirts with digital direct printing, flex printing, or flock printing. Place the design and use the "Center" button if it sits too far to the left or right. When scaling, make sure the display does not turn red, because then the design cannot be printed at this size. Reduce its size until the color appears normal again.


Step 14: Publishing the design on the marketplace
In the "Designs" section, go to your uploaded design and select "Publish on the marketplace". Spreadshirt then includes all products linked to this design directly in the publication. So you don't have to approve each individual product separately. A maximum of the 100 most recently modified products are taken into account.

Next, you choose a design category, such as "Occasion", and assign a title as well as a description of a maximum of 200 characters. Use the description to present the design appealingly to customers. A maximum of ten keywords is allowed. If possible, use specific terms such as "Christmas tree" or "Smiley" instead of terms that are too general such as "Christmas", as these would return too many results in the design search. If you accept the terms and conditions and submit the form, the design will be approved after one to two days, and you will receive an email.

Step 15: Understanding the difference between flex printing and digital direct printing
The choice of printing method significantly affects the result. With flex printing, a foil is applied to the shirt. This is durable, but creates a noticeable layer that can wear out over time. In addition, lines are at least 1.5 mm thick, and color gradients are not possible. Digital direct printing applies the ink directly into the fibers. It feels more pleasant, looks higher quality, and is suitable for fine lines, photos, and color gradients. A small disadvantage is that on dark shirts, a white layer is applied first. As a result, transitions into black often look less smooth than in the original.


Step 16: Integrating other designers' designs into your own shop
You can also add designs by other designers to your shop. To do so, you open the designer's profile, select the desired design, and click "Add to my designs". You can then place and color it like your own designs. The designer automatically receives their commission with every sale, without any cost to you. You also earn from every sale.

Summary ??? Creating a Spreadshirt design: From draft to finished shirt print
You have now learned all the steps that lead from the design to the published product. Use the print template as a control tool, keep to the minimum thickness of 1.5 mm for lines, choose colors from the palette, and convert text to paths. When uploading, pay attention to the correct number of colors and the rights declaration. Then create products and publish the design on the marketplace. With this approach, you avoid the most common mistakes and get your designs on sale faster.
FAQ
Do I have to use the Spreadshirt print template?The template is not strictly required, but it helps you correctly observe the print areas and minimum thicknesses. Without it, you risk having to make corrections.
What minimum thickness must lines have?For flex and flock printing, lines should be at least 1.5 mm thick. With digital direct printing, finer lines are also possible.
What happens if I choose a color that is not in the palette?Spreadshirt then has to guess which color you mean. As a result, the design may appear in an unexpected color, such as neon green.
Why should I convert text to paths?Spreadshirt only processes paths reliably. Text left as text may be displayed incorrectly in print or may hinder the review.
Which Illustrator version should I choose when saving?Older versions such as CS4 or CS3 are a safe choice for simple vector graphics, since Spreadshirt has sometimes had problems with newer versions.
What do I need to keep in mind regarding the rights checkbox?By ticking the checkbox, you confirm that you own all rights to the design. If you use protected images or brand logos without permission, you face legal consequences and deletion of the design.
How long does the review of a design take?The review usually takes a few minutes, but can also take several hours. You will be notified by email.
Can I change the commission later?Yes, the commission can be adjusted at any time. Note, however, that this may also change the selling prices of the products.
How many keywords can I specify for the marketplace?You can use a maximum of ten keywords. Choose terms that are as specific as possible and that customers actually search for.
Do I have to approve each product individually on the marketplace?No. When you publish the design, the products linked to it are automatically included, up to a maximum of the 100 most recently modified.


