
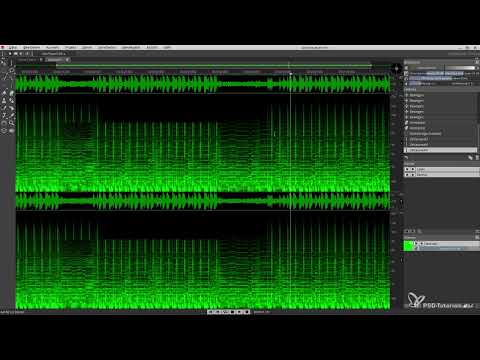
A sound you have so far only heard can be viewed as an image with SpectraLayers Pro 6. You see which frequencies sound when, and you can specifically cut out, move, boost or repair individual areas. The program is an add-on product that you receive when you purchase a suite. It runs as a standalone application alongside Vegas Pro 17. This guide takes you through the most important functions, from exporting your audio file to returning to your project.
The video is only loaded from YouTube when you play it – data (including your IP address) is then transmitted to YouTube/Google. More in the privacy policy
Key Takeaways
- SpectraLayers Pro 6 works as a standalone program. You first export your audio track from Vegas Pro 17 as a WAVE or MP3 file.
- The spectral view makes individual frequencies visible and allows edits that are not possible in Vegas itself.
- You can copy, move and clip selected areas, and use them elsewhere as a stylistic effect.
- The amplifier, clone and noise tools help you modify frequencies in a targeted way, repair errors or generate noise.
- The 3D view shows which areas are louder than others.
- You can save your project at any time and bring the result back into Vegas Pro 17.
Step-by-Step Guide
Step 1: Export and Load the Audio File
Before you can work with SpectraLayers Pro 6, you need to render the audio track out of Vegas Pro 17. Export it as a WAVE or MP3 file. Then start SpectraLayers Pro 6 and drag and drop the file into the program window. The file loads immediately, and you see the program's typical display.

Step 2: Understanding the Waveform and Zoom
After loading, you see the waveform at the top, which you know from Vegas. Below it lies the spectral area, in which the individual frequencies show up as patterns. With the mouse wheel you zoom into and out of the waveform. This way you switch effortlessly between the big picture of a song and individual details.

Step 3: Select and Analyze Areas
Use the selection tool to drag a rectangle over the spot you want to examine. Within this area you can look closely at the individual spectra. Louder passages or disturbances such as a baseline appear as overlaid spectra. This is exactly how you recognize where you should intervene.

Step 4: Copy and Move a Selection
If you select an area, you can copy it with Ctrl + C and paste it elsewhere with Ctrl + V. Afterwards it can be moved, enlarged and layered on top of other material. In doing so, the spectra in the upper waveform change, while the original spectrum in the lower area is preserved. This lets you see very clearly how the sound structure changes.

Step 5: Clip Areas and Undo Changes
With the clip tool you remove frequency ranges from a selection. The result is a lower spectrum in exactly that zone. If you want to take a step back, press Ctrl + Z, and the change is undone. This workflow gives you the confidence to work experimentally as well.
Step 6: Using the Amplifier Tool
The amplifier tool raises specific frequencies in a targeted way. Before you use it, confirm your selection with the Enter key and then deselect it. Next, choose the amplifier and navigate to the spectral area you want to change. The change is displayed directly in the upper waveform.

Step 7: Boosting Frequencies by Painting
With the amplifier you simply paint over the desired area, similar to Photoshop. This way you can raise individual areas or even individual frequencies. It feels very organic and is well suited for experimenting with sound. In Vegas itself, this kind of editing would not be possible with this precision.

Step 8: Fix Errors with the Clone Tool
The Clone Tool copies areas within the file. Hold down the Alt key to set the source. Then, while holding down the left mouse button, paint over the spot you want to correct. In this way, you smooth out noise, interference, or small errors that you created while recording or editing.

Step 9: Adjust Brush Size, Hardness, and Gain
A right-click opens the brush settings. There you choose the shape of the brush, its size, and its hardness. You also use the gain to determine how strongly the area is processed. A large, soft brush is suitable for corrections over large areas, a small, hard one for precise interventions.
Step 10: Generate Noise with the "Spray Noise" Tool
With the "Spray Noise" tool, you generate noise in a targeted way. Here too, you set the hardness and the size. The noise then appears in the upper waveform. You can edit it further afterwards and reduce the hardness step by step until the result matches your vision.
Step 11: Set and Name Markers
You set markers for important spots. You can rename them later, so that when you return to a saved project you can see right away which frequencies you still want to edit. This way you keep track even in extensive projects.

Step 12: Navigate with the Hand Tool, Magnifier, and Scrubbing
With the Hand Tool, you move the view once you have zoomed in. This way you browse through the entire file. The Magnifier helps you zoom in on individual frequencies in a targeted way. If you drag the mouse up and to the right, you enlarge the spectral range; down and to the left, you shrink it again. In addition, you can scrub at any spot, that is, move the mouse over it and listen to the area directly.

Step 13: View Results in the 3D View
With a click on the spectral layer, you open the 3D view. There your spectra are displayed in three-dimensional space. Loud areas appear higher than quiet ones. By zooming out, you get an overview of the entire sound image. If you want to return to the initial situation, you simply reset the 3D view.

Step 14: Manage the Interface, History, Channels, and Layers
You can close the sidebars to gain more space. On the right you will find the History, through which you can call up earlier steps again. Via the channels, you can mute individual tracks or set them to solo, so that you only edit the desired channel. In addition, further layers can be created, which you mark with colors. Folders and groups help you sort layers and merge them with one another later.

Step 15: Save the Project and Bring It Back to Vegas Pro 17
Once you are satisfied with the result, you save your project. Then you output the file again as a WAVE file. You place this file in Vegas Pro 17 and make it usable there within your project. This way you combine the precise interventions from SpectraLayers Pro 6 with your familiar editing process.

Summary ??? Making Audio Visible: Editing with SpectraLayers Pro 6 in Vegas Pro 17
With SpectraLayers Pro 6, you extend your audio editing in Vegas Pro 17 with a visual layer. You export your audio track, load it via drag and drop, and then work with spectra, amplifier, Clone Tool, and noise function. The 3D view and the management of layers and markers help you keep even complex projects organized. At the end, you save the result and bring it back into your Vegas project.
FAQ
Which file formats can I edit in SpectraLayers Pro 6?You can load WAVE and MP3 files that you have previously exported from Vegas Pro 17.
Do I have to open SpectraLayers Pro 6 inside Vegas Pro 17?No, the program works independently. You have to render the file out of Vegas beforehand and then insert it again afterwards.
How do I undo an editing step?With Ctrl + Z you undo the last step. In addition, the History shows you all previous steps.
How do I generate noise?With the "Spray Noise" tool you generate noise, whose hardness and size you can adjust.
What is the 3D view for?It shows you in three dimensions which areas are louder, because loud spectra appear higher than quiet ones.
Can I continue editing my project later?Yes, you can save your project, set markers, and open it again later to continue working at the marked spots.


