
A shoutout is quickly arranged: a brief yes in a direct chat, and the collaboration is set. But as soon as several agreements are running in parallel, things become confusing. Anyone who forgets which post is supposed to go live and when risks the trust of their partners and their own credibility. This guide shows you how to plan shoutouts in a structured way, from the first request to publication. All you need for that is a simple spreadsheet and a calendar.
The video is only loaded from YouTube when you play it – data (including your IP address) is then transmitted to YouTube/Google. More in the privacy policy
Key Takeaways
- Record every request, every follow-up message, and every confirmation in a spreadsheet.
- Distinguish between post and story, because they have different durations.
- Enter all publications in a calendar or planning tool and set yourself reminders.
- A rejection is rarely final. Make a note of a date when you will ask again.
Step-by-Step Guide
Step 1: Create a spreadsheet and define columns
The easiest way to get started is a list. You can use the template available for download in the video, or create your own spreadsheet in Excel, Google Sheets, or OpenOffice. Each row represents one account. Useful columns include account name, reach, follow-up sent, reply received, agreement (post or story), publication date, duration, and reminder. With this structure, you keep an eye on all partners at the same time.

Step 2: Select accounts and check reach
Before you message anyone, check whether the account fits your offer. Reach is an important factor here. Enter it directly in the spreadsheet. That way, you can see at a glance later who is a candidate, and you don't have to research again.

Step 3: Document the request and follow-up
Message the account and record in your spreadsheet whether you have already sent a message. When you follow up, enter that as a follow-up. Also note whether and when the other person replied. Especially with accounts that don't respond right away, you otherwise quickly lose track of who was contacted and when.
Step 4: Record the confirmation in a binding way
If an agreement is reached, mark it in the spreadsheet with a clear entry, for example "Yes". Immediately add what exactly was agreed: only a post, only a story, or both. Without this note, you won't remember later what you agreed on. Such misunderstandings quickly seem unprofessional.
Step 5: Distinguish between post and story
A post stays visible permanently until you delete it. A story, on the other hand, disappears automatically after 24 hours. Therefore, plan the duration already when making the agreement. For posts, you can additionally set a reminder so that you remove the post again on time, provided that has been agreed. For stories, this step takes care of itself.
Step 6: Enter publications in the planning tool
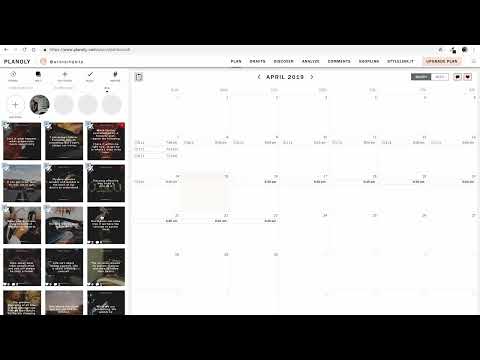
Enter the agreed posts in your planning tool, for example Planoly, or in your calendar or spreadsheet. Make sure that the shoutout posts of the other accounts also appear with date and time. Schedule the dates at least one week in advance if possible. That way, you have time for follow-up questions if a partner hasn't delivered the material yet. As soon as the post has been published or the material is available, you can update or delete the entry.

Step 7: Schedule stories at the right time
Stories also need a fixed time. In the example from the video, stories usually appear at 6 a.m., because the own account also posts actively at that time. The advantage: the story is visible throughout the day and the following night. Base your planning on your own rhythm and on the times when your community is online.
Step 8: Treat rejections as an interim status
Not every rejection means a permanent no. Many accounts grow, change their plans, or are ready for a collaboration at a later point. Therefore, enter a date in the spreadsheet on which you will ask again. After a few weeks, you can then check how the account has developed and decide whether a new request is worthwhile.
Step 9: Filter the spreadsheet and keep the overview
When your list grows, use the filter function of your spreadsheet program. For example, you can show only the posts for the current week or filter out all open follow-ups. Sort by date so that you always know which publication is coming up next. With this routine, you avoid mix-ups and plan your content calmly and in a structured way.

Summary – Planning Instagram Shoutouts: Keeping Your Spreadsheet, Follow-ups, and Deadlines Under Control
Shoutouts can be organized reliably if you document every step. The spreadsheet records requests, follow-ups, and confirmations. The calendar makes sure that posts and stories appear at the right time. In addition, filters and reminders help you keep track, even when many partners are involved at the same time. Repeat this process regularly so that your collaborations remain reliable.
FAQ
Do I have to document every follow-up message?Not necessarily, but it helps you keep track of the status of each request. Especially with many accounts, it prevents duplicate messages.
How long does a story stay online?A story is usually visible for 24 hours and then disappears automatically.
How long does a post stay visible?A post stays online permanently until it is deleted. That's why a reminder is worthwhile if a post is supposed to be removed after a certain time.
Do I need a special planning tool?No. A simple spreadsheet or calendar is enough. A planning tool like Planoly merely offers additional convenience.
What do I do if an account has declined?Note down a date for a renewed request. Many rejections are only a snapshot in time.
Which spreadsheet program is suitable for the overview?Excel, Google Sheets, or OpenOffice all work equally well. The only important thing is that you can use the filter function.


