
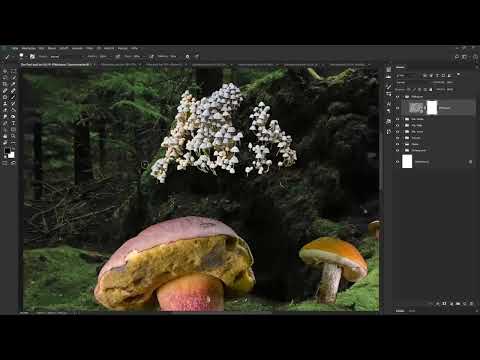
Your background is prepared, and the mushrooms, lanterns, shoes and tracks have been cut out. Now it's about distributing all the elements across the image so that they form a cohesive village. In this tutorial, I'll show you how to match the colors of the elements to the background, prepare them as Smart Objects, organize them in groups, and scale, rotate and distort them to fit using Transform.
The video is only loaded from YouTube when you play it – data (including your IP address) is then transmitted to YouTube/Google. More in the privacy policy
Make sure you follow the work steps in Photoshop. Many steps are repeated for the individual objects, so it's worth understanding the logic behind them.
Key Takeaways
Color corrections via clipping masks and the Hue layer mode remain flexible because you can adjust them at any time later. Smart Objects don't lose image quality when scaling and can be edited again at any time. With copy and paste, you transfer layers directly into your background image, and groups keep your document organized. Distortions and masks finally give the village its depth and a natural transition to the surroundings.
Step-by-Step Guide
Step 1: Remove green areas with a color correction layer
First, open the file of the first mushroom. On the right side you see the temporary black background and above it the image with its mask. You don't remove the distracting green areas at the bottom edge directly in the image, but via a new, empty layer above the mushroom layer. Name it, for example, "Color Correction" so that you keep track of it later.
To make this layer affect only the mushroom, hold down the Alt key and click between the new layer and the mushroom layer below it. The mouse pointer changes, and you have created a clipping mask. Everything you paint now appears only within the cutout.

Step 2: Set a soft brush and pick up the hue
Switch to the Brush tool and set the hardness to very soft. Then hold down the Alt key until the eyedropper icon appears, and pick up a red hue from the mushroom. You want to transfer this tone to the green spots.
Then set the layer mode of the empty layer to "Hue". This way you actually transfer only the hue and not the brightness. Now paint over the green with the soft brush, and the spots are touched up without visible edges.

Step 3: Combine layers into a Smart Object
Once the correction looks right, select the color correction layer, hold down the Shift key and additionally click on the mushroom layer below it. A right-click on one of the selected layers takes you to "Convert to Smart Object". Name the new Smart Object "Mushroom".
If you double-click the thumbnail to jump into the Smart Object, you see both the image with its mask and your color correction above it. This structure is preserved even if you later place the object in the village.

Step 4: Correct the second mushroom with softer transitions
You proceed in the same way with the second mushroom. Create a new empty layer, create a clipping mask and set the mode to "Hue". Repeatedly pick up new hues from the mushroom with the eyedropper and paint over the green areas until the result looks cohesive.
To make the transition soft, reduce the opacity of the brush and increase the brush tip size. With a few passes at low opacity, a natural gradient emerges. Then you also convert this mushroom into a Smart Object and name it "Mushroom" again.

Step 5: Touch up the edge of the third mushroom
The third mushroom shows green areas at the bottom edge. Here, too, you work with an empty layer that you set up as a clipping mask and operate in "Hue" mode. Choose a suitable color and paint specifically over the problem areas, this time with a smaller brush.
Afterwards, you convert the layers into a Smart Object again. The three mushrooms are now corrected and ready for placement.

Step 6: Transfer the mushrooms to the background via copy and paste
Switch to the mushroom file with the Move tool and activate the Smart Object. Press Ctrl+C to copy it. Then switch to your background, select the top layer, and press Ctrl+V. Thanks to the feature in Photoshop CC 2018, the Smart Object lands directly in the right document.

Step 7: Create groups and organize objects
To keep the document organized, create a separate group for each element. To do this, click the folder icon and name the group, for example "Mushroom front". Drag and drop the Smart Object into this group. In this way, you gradually create groups for middle mushroom, back mushroom, mushroom houses, tracks, and shoes.
The order of the groups determines what is in front and what is in back. So drag the "Tracks" group all the way down, directly above the background.

Step 8: Scale the mushroom proportionally, rotate it, and confirm
Activate the Smart Object and press Ctrl+T. Hold down the Shift key while dragging a corner anchor point so that the object scales proportionally. Place the mushroom at the desired spot.
When you move the mouse pointer outside the frame, it turns into a curved double arrow. With this you can rotate the object slightly. Confirm the transformation with Enter. Since this is a Smart Object, you can change the size again at any time later without losing image quality.

Step 9: Place and flip the second mushroom
Create a new group for the middle mushroom and copy the Smart Object from the mushroom file into this group. With Ctrl+T, you shrink it again, once more while holding the Shift key. For more variety, you can flip the mushroom via Edit, Transform, Flip Horizontal. Then drag it to the appropriate position and confirm with Enter.

Step 10: Place the mushroom in the background and create depth
A group "Mushroom back" is suitable for the background. Here you shrink the mushroom significantly to enhance the depth in the village. The farther an object is toward the front or the back, the smaller it appears. Take your time with this and keep checking the effect in the overall picture.

Step 11: Place the shoes in the foreground
Open the shoe file and convert the shoes into a Smart Object. Copy it and paste it into the "Shoes" group that you created in the foreground. With Ctrl+T, you scale the shoes to a suitable size so that they don't look too small in the foreground. A slight rotation additionally gives the scene liveliness. You can retouch a bright area at the bottom edge later.

Step 12: Insert the mushroom houses and cut them out with a layer mask
Also convert the mushroom houses into a Smart Object, copy it, and paste it into the "Mushroom houses" group. Shrink it while holding the Shift key. In the background the whole thing often looks too big, so you should rather make it a bit smaller.
Now create a layer mask. With a black foreground color and full opacity, paint out the areas at the bottom edge where excess mushrooms are disruptive. Zoom in closer for precise contours and adjust the brush size. This way you remove disruptive elements without altering the Smart Object.

Step 13: Add a clothesline and lanterns
You also create the clothesline as a Smart Object, copy it into a new group within the shoe group, and adjust it with Ctrl+T. Then you rotate it slightly and confirm with Enter.
For the lanterns, you create a separate subgroup named "Lantern" in each mushroom group. For the front mushroom, you flip the lantern horizontally and place it on the side of the mushroom. For the middle mushroom and the back mushroom, you scale it down accordingly so that the size proportions match the depth.

Step 14: Leading the tracks into the tunnel
Create a Smart Object for the tracks, copy it into the "Tracks" group, and scale it down with Ctrl+T. If you compress the object slightly, it looks like a track leading into the tunnel. Confirm the transformation with Enter.
Then you add a layer mask. With a texture brush and black as the foreground color, you roughly paint the transition to the background. The color adjustment comes later, so you don't have to work perfectly yet.

Step 15: Creating soft transitions in the tunnel
Now switch to a very soft brush and reduce the opacity. Paint several times over the areas where the tracks should disappear in the tunnel. With the X key, you swap between foreground and background color in case you want to correct semi-transparent areas again. Make sure the transition to the dark tunnel areas looks even.

Step 16: Distorting the window and adapting it to the mushroom shape
Select the window file and convert it into a Smart Object. Copy it into the "Mushroom front" group, create a subgroup "Window" there, and scale down the object. A rectangular window rarely fits the round shape of a mushroom. Therefore, you use the grid under Edit, Transform, Warp to adjust the corners to the contour.
Since it is a Smart Object, you can continue working with the grid at any time. Confirm the distortion with Enter once you are satisfied with the result.

Step 17: Placing and distorting the door
You proceed in the same way for the door. Create a new subgroup "Door" in the "Mushroom middle" group, convert the door file into a Smart Object, and copy it in. Scale the door with Ctrl+T, rotate it slightly, and adjust it to the edge of the mushroom using Warp. To do this, drag the handles at the top and bottom until the door fits snugly and roundly against the mushroom.

Step 18: Finishing with moss and grass
Finally, you can add a few tufts of grass or moss at the bottom of the mushroom so that the transition between mushroom and ground looks more natural. When moving them, pay attention to the groups so that the elements are on the correct layer.

Summary ??? Photoshop Compositing: Placing and fitting mushroom village elements correctly
In this tutorial, you learned how to adjust the colors of cut-out elements to a background, correct them using clipping masks and the Hue layer mode, and process them further as Smart Objects. With copy and paste, you transfer them directly into the village and organize them in groups. With transforming, flipping, rotating, and warping, you bring size, depth, and shape into harmony. Masking ensures soft transitions in the end and a coherent overall picture.
FAQ
Why should I convert layers into Smart Objects?Smart Objects retain their image quality even with repeated scaling and can be edited at any time with a double-click.
What does the Hue layer mode do in color correction?It transfers only the hue to the layer beneath, while the brightness is preserved.
How do I create a clipping mask in Photoshop?Hold down the Alt key and click between the upper layer and the layer beneath it.
How do I move an object to another document without loss of quality?Copy the Smart Object with Ctrl+C and paste it into the target document with Ctrl+V.
How do I scale an element proportionally?Activate Ctrl+T and hold down the Shift key while dragging a corner anchor point.
What are groups used for in this document?Groups organize the elements by depth levels and make the file clear and easier to edit.


