
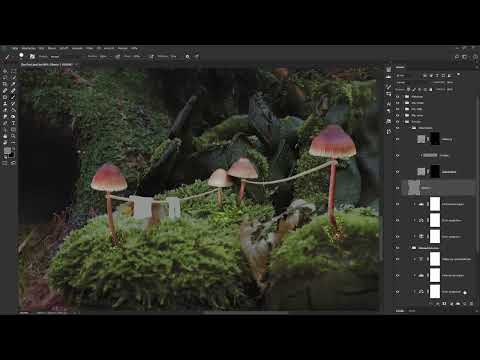
A blurred foreground only looks believable if it contains details that you can make out vaguely in the background. This is exactly where this tutorial comes in. You will learn how to paint a small clothesline with garments in Photoshop using simple brush strokes, color it, and integrate it into your image with soft shadows. You don't need any drawing talent. What matters is that you work with layer groups, color fills, and clipping masks, because that way everything stays editable.
The video is only loaded from YouTube when you play it – data (including your IP address) is then transmitted to YouTube/Google. More in the privacy policy
This tutorial is aimed at anyone who is already familiar with layers, masks, and a graphics tablet. The steps follow the video, but you can also apply them to your own image.
Key Takeaways
- A color fill layer with an inverted mask can be recolored at any time, and you paint the shape visible only where you want it.
- With a clipping mask, every shadow stays exactly within the shape beneath it.
- The pen pressure on the graphics tablet controls the stroke thickness. A hard brush is suitable for shapes, a soft one for shadows.
- The foreground will be blurred later anyway, so rough, quick shapes are enough.
Step-by-Step Tutorial
Step 1: Create a layer group for the clothesline
First, create a new group so that all elements of the line stay together. You will find the folder icon at the bottom of the Layers panel. Make sure the group is at the very top of the stack so that you can easily switch between the foreground elements and the rest of the image later. Give the group a clear name, for example "Clothesline". A clear name will save you a lot of searching time later, especially when the document grows to dozens of layers.

Step 2: Create a color fill and invert the mask
Inside the group, now add a "Solid Color" adjustment layer. Choose a light beige or a light brown that suits the line. You can change the color at any time later by double-clicking the layer thumbnail. Name this layer "Clothesline" as well. The layer mask is white by default, so you see the fill everywhere. Invert the mask with Ctrl+I so that it turns black and the color disappears. From now on, you paint with white to reveal the areas where the line should be visible.

Step 3: Paint the line with the hard brush
Make sure you have the mask selected, and set the foreground color to white. Use a hard brush with a diameter of about 21 pixels. Place the strokes along the desired path of the line, which the mushrooms in the foreground are supposed to appear to hold. Pay attention to the pressure of your pen. Pressing harder makes the stroke thicker, pressing lighter makes it thinner. Work quickly and without aiming for perfection. For the mushrooms in the front area, you may increase the pressure a little, since they are closer to the camera and therefore look thicker.

Step 4: Set the knots and make the line darker
At the attachment points, that is, at the knots on the mushroom, add somewhat thicker accents. On the right side of the line, a subtle stroke is enough, since the attachment there is very close in the foreground. You don't need to work in detail here, because this area will be heavily blurred later. If you want the line to look darker, drag the opacity slider down in the layer options. Then confirm with OK. The color is retained, and you can change the setting again at any time.

Step 5: Create shadows as a clipping mask
So that the line doesn't look pasted on, it needs a shadow. To do this, create a new empty layer and hold down the Alt key while clicking between the "Clothesline" layer and the shadow layer. This turns the new layer into a clipping mask. Name it "Shadow". Now choose a brown tone that is slightly darker than the line. Paint with it within the area of the line. The color appears only where the line actually is, so you don't have to be precise at the edges when painting.

Step 6: Add Shadow to the Line
Place the shadow mainly on the underside of the line, because the light comes from above. Paint unevenly, since a rope does not cast an even shadow. Then add a bit more shadow on the left side. Because you are working with the clipping mask, everything stays within the line. This method is implemented with a color fill layer, but you can also paint the shadows on a transparent layer. The only important thing is that the clipping mask stays active.

Step 7: Prepare the Clothing Items
For the clothing, you create a "Solid Color" adjustment layer again, this time with a neutral gray tone. Confirm with OK and name the layer "Clothing". Here too, you invert the mask with Ctrl+I so that nothing is visible at first. With white as the foreground color, you then paint the shape of a T-shirt or a pair of pants, for example directly below the line. Focus only on the silhouette. You determine the final color later via the color fill or via clipping masks.

Step 8: Bring More Clothing Items into Shape
Now paint the outlines of more clothing items, such as a T-shirt with short sleeves or a small pair of pants. The process is the same: you set the shape with a white brush, and you correct mistakes with black or an eraser. Since the foreground will be blurred, a rough shape is enough. If you want to recolor the shapes later, you can do this on the same layer or create individual color fills. What matters is that the shapes have the right proportions to one another.

Step 9: Paint the Back Side of the Clothing on a Separate Layer
Behind the clothesline there are more parts of the clothing, such as the back sides of the sleeves. To do this, create a transparent layer above or below the "Clothing" layer and name it "Clothing back". Choose a darker gray or, for a blue T-shirt, a darker blue. Paint the rear areas of the sleeves and the pants. This creates depth, because the clothing does not appear as a flat shape. Since this area will be blurred, a few strokes are enough here too.

Step 10: Paint Motifs on the T-Shirt
For motifs, you create a new empty layer above the clothing layer and name it "Motifs". Choose a strong color, such as a shade of red, and a hard brush. Zoom into the image a little so you can work more precisely. Then paint a simple motif on the T-shirt, for example a small heart. The color can be a little lighter than in the first version, otherwise the motif looks too dark. You can also paint several motifs on one layer or put each motif on its own layer.

Step 11: Apply Shadow to the Motifs and the Clothing
To make the motifs and the clothing look three-dimensional, you need a shadow that lies only on the fabric. To do this, create a new empty layer above the "Motifs" layer, name it "Shadow" and activate the clipping mask. Choose a darker tone than the T-shirt. Set the brush to soft, a bit larger, and reduce the opacity to about 25 percent. Carefully paint the shaded areas, for example on the sides and at the bottom. Painting over repeatedly adds up the shadow. This creates a soft, realistic gradation.

Step 12: Color Individual Clothing Items Differently
With an additional color fill layer, you can specifically color entire clothing items. Place the color fill above the clothing and set the clipping mask so that only the desired shape is affected. If you decide on red, the color affects all elements that are on the layer below. If you want several clothing items in different colors, simply use several color fill layers. This way each color remains independently controllable, and you can adjust it at any time afterward.

Summary ??? Painting a Clothesline in Photoshop: Compositing Guide for the Foreground
With layer groups, inverted masks and clipping masks, you paint a clothesline including clothing without getting lost in details. The line is created with a hard brush, the shadow with a soft brush and low opacity. You separate the clothing into front and back, and you define motifs or colors via color fills and clipping masks. Since the foreground will be blurred later, a rough but clean execution is enough. In the video, the design of the lights follows next, such as the glow of the lanterns.
FAQ
Do I need a graphics tablet for this technique?A graphics tablet is helpful because you can control the stroke thickness with pen pressure. It also works with a mouse, but the stroke dynamics are missing.
Why should I invert the mask?With an inverted mask, the color fill is initially invisible. You paint with white to reveal only the areas where the color should appear.
What is the advantage of a clipping mask for the shadow?The shadow only takes effect within the shape underneath. You don't have to paint exactly up to the edge, and mistakes outside the shape remain invisible.
Can I change the color of a color fill layer afterwards?Yes, by double-clicking the layer thumbnail you open the color picker and can adjust the color at any time.
Do I have to paint the clothing in detail?No, since the foreground becomes blurred in the final image, rough shapes are enough. What matters is that you can tell there is a clothesline with clothes on it.
Why do I use several color fill layers for the clothing?This way you can color each piece of clothing individually. A single color fill would recolor all the shapes underneath at the same time.


