

Stell dir vor, ein Geschäftspartner öffnet deine Weihnachtskarte und findet ein schlichtes, hochwertiges Motiv ohne ein einziges Foto. Genau dieses Ergebnis erreichst du mit Farbe, einfachen Formen und einer gut gewählten Schrift. In diesem Workshop begleitest du den Designer Stefan Riedel beim Erstellen einer modernen Klappkarte im DIN A5 Hochformat. Du lernst, wie du das Format richtig festlegst, mit Hilfslinien und Ebenen arbeitest, Farbverläufe und Schlagschatten einsetzt und am Ende ein druckfertiges PDF exportierst. Zusätzlich zeigt dir die Anleitung, wie du deine Karte im 3D-Showroom betrachtest, den Datencheck nutzt und Projekte mit Auftraggebern teilst.
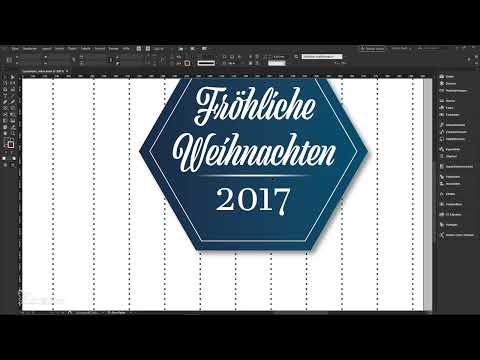
The video is only loaded from YouTube when you play it – data (including your IP address) is then transmitted to YouTube/Google. More in the privacy policy
Key Takeaways
- Define the medium and the format first, before you begin designing.
- Plan for a 3 mm bleed and a 4 mm safety margin from the fold edge from the very start.
- Limit yourself to two colors and no more than two fonts. This makes the reduced flat design look calmer and more high-quality.
- Use icons sparingly and with enough white space so that the design does not look cluttered.
- Export the PDF with your print shop's settings and check the file in the data check before ordering.
Step-by-Step Guide
Defining the Format and Medium
Before you draw the first line, you should know what is going to be printed in the end. At the start, always think of the medium first, just like with pizza dough, where you wouldn't begin by peeling potatoes either. In the print shop's online store, you select the folded card under greeting cards and postcards and set the format to DIN A5 portrait. You can also download a ready-made blank template there. You should also take a look at the PDF with the technical specifications, because it describes the format, bleed, and safety margin in detail.

Understanding Bleed and Safety Margin
The technical specifications are the key to a clean card. The 3 mm bleed is the gray area at the edge that you must fill with your design. The machine cuts at this point, and without bleed, small white slivers would appear at the edge later. In addition, you maintain a safety margin of 4 mm from the fold edge and from the cut edges. Important texts and motifs belong within this boundary, otherwise they may be cut off when trimming or folding.

Creating a New Document in InDesign
In InDesign, open a new document with the keyboard shortcut Ctrl + N. Enter 296 mm as the width and 210 mm as the height. Choose a single page instead of facing pages, because you will create the front and back on two pages later. For the margins, enter 4 mm each. With the chain symbol, you automatically apply the value to all fields. For the bleed, set 3 mm. When you click Create, you have your open format, that is, the sheet before folding.

Setting Guides for the Fold and Safety Margin
Drag a guide out from the ruler and set it to 148 mm, that is, exactly in the middle of the open format. This line marks the fold. Then you create additional guides: one at 144 mm and one at 152 mm. This corresponds to the safety margin of 4 mm to the left and right of the fold. Make sure that your design elements on the inside do not extend beyond these lines, so that the text later sits cleanly at the fold.

Setting Up Layers Sensibly
For many designs, it is worthwhile to work on two layers. Create a layer named Background, which is intended for background elements such as icons and lines. You name a second layer Design; the hexagon, text, and logo go there. You arrange the layers so that you always know what you are currently working on. Especially with the icons later on, this separation helps enormously, because you can lock the background layer when you only want to edit the foreground elements.

Defining a Color Palette with Two Colors
In flat design, color determines the character of the card. Instead of the typical Santa red, Stefan decided on a Christmassy blue. In the Swatches panel, create two new swatches: a dark blue and a slightly lighter blue. You can take the CMYK values entered in the video as a starting point. However, you are free to choose. If you have a corporate design, you adopt its colors. Remove all unnecessary swatches so that only the two shades of blue remain. You don't need more colors in reduced flat design.

Creating Dotted Lines with the Line Tool
Select the Line tool, hold down the Shift key, and drag a vertical line downward at the top bleed. In the stroke settings, set 2 pt, the color is the light blue, and as the line type you choose dotted. Place the line at the edge, about 4 mm from the trim edge. By holding down the Alt and Shift keys, you create copies and place them next to each other at a distance of 15 mm. Select all lines, group them with Ctrl + G, and drag a copy to the other side with Alt and Shift.
Creating a Hexagon as the Main Motif
The hexagon forms the core of the design. Select the Polygon tool, click once in the document, and enter six as the number of sides. Set the width to 97 mm and the height to 84 mm. Make sure the object is centered, and use the displayed guides for this. Then fill the hexagon with the dark blue.

Adding a Linear Gradient
A little trick gives the hexagon more depth: a linear gradient between the two shades of blue. To do this, create a new gradient swatch, choose the linear gradient, and set the darker blue as the start color and the lighter blue as the end color. You can leave the midpoint of the gradient at about 45 percent. Of course, you are free to adjust the position of the color stops until you like the transition.

Duplicating the Hexagon and Adding a Stroke
Copy the hexagon with Ctrl + C and paste it in place via Edit. Hold down Shift and Alt and scale the copy down so that it sits centered on the large hexagon. You give the front hexagon a stroke with a weight of one point. This creates two stacked hexagons that stand out clearly from each other.

Using a Subtle Drop Shadow
To create even more spatial depth, you add a drop shadow to the back hexagon. To do this, open the Effects panel and select Drop Shadow there. The preset values are usually too strong, so Stefan recommends about 50 percent opacity and a distance of 2 mm. A subtle shadow looks more elegant than a dramatic one.

Not Cutting Off Dotted Lines
A design principle you should pay particular attention to: the dots of the dotted lines must not be cut off halfway. Position the hexagon so that the top and bottom edges each show whole dots. If in doubt, move the motif up or down a little until the spacing is right. This small detail makes a noticeable difference in the overall picture.

Decorative Script Font for the Main Message
Draw a text frame and choose a decorative script font. In the video, the font Victor Script is used, which is available via Typekit. However, there are many other script fonts online. Set the color to white and write the text Fröhliche Weihnachten in it. Align the text frame and the hexagon while holding down the Shift key, and then choose center alignment.

Combining the Year and a Serif Font
You can initially set the year in the script font as well. At the latest for the body text, however, a serif font should take over, because script fonts are too playful for that. In the video, the font Javanese Text is used for this. This combination of a decorative and a classic font looks harmonious. However, you should not use more than two fonts.
Designing a Soft Divider as a Line
A fine divider helps between the text and the motif. To do this, draw a line with a two-point stroke and a solid line type. Then you apply the Gradient Feather effect with the Radial option. This makes the edges of the line fade out smoothly. With the middle point on the axis, you can control how much of the white area should be visible.

Designing the back with a web address
Some companies want to place their web address on the back. This is not strictly necessary, but it is easy to do. Draw a rectangle 70 mm wide and 19 mm high, fill it with white, and give it a blue stroke with a weight of 0.3 pt. You can find the center of the rectangle using the guides. Again, make sure the dotted lines are not cut off. Then, in the Effects panel, lower only the opacity of the fill to about 95 percent. This way, the dots in the background shine through subtly.

Building icons with the Polygon tool and a shortcut
To make the background look lively, you use small icons. You can download them for free from the internet or build them yourself. The trick with the Polygon tool: drag out a triangle and hold down the space bar while working with the arrow keys. Up and down change the number of sides, for example up to a five-pointed star. With the left and right arrow keys you adjust the angle. Hold down the Shift key so the star stays upright, and then make it smaller.
Placing a white circle behind the icon
So that the icon doesn't get lost among the dots, you place a white circle behind it. Drag out a circle with the Ellipse tool while holding down the Shift key, fill it with white, and set it to about 15 mm. Then you shrink the star slightly and bring it to the front. The white circle creates space around the dots so that the icon can breathe.

Distributing icons sparingly and precisely
Use icons only in homeopathic quantities. There are no prizes for having as many motifs as possible on the card. Vary the size a little, but don't overdo it. The motto is: less is more. Pay attention to precise placement so that the icons look deliberate. If you copy an icon together with its circle, make sure the dotted lines in the background are not copied along with it. To do this, lock the line layer in the Layers panel before you drag out objects.
Finishing the back with a flap and drop shadow
Copy the design layer and paste it in place on a new page. Set guides at 148 mm and 105 mm so that you have some orientation. For the flap, you draw an element at the bleed with the Rectangle Frame tool and give it the appropriate color. Then, using the Add Anchor Point tool, you insert a point in the middle of the edge and pull it downward with the Convert Direction Point tool. By holding down the space bar, you shape a point this way. Copy the triangle, move the upper layer slightly to the right, and give it a stroke. Make sure to define the stroke on the outer sides so that no problems arise when trimming.

Transferring the drop shadow via the FX icon
You don't have to set up the drop shadow again, because you can copy it from another object. Select the hexagon, open the Effects panel, and drag the FX icon onto the new object. So that the shadow is visible, you shift it to the angle that matches the direction of the light.

Designing the inside with text and logo
Drag out a text frame from center to center, color the text white, and align it centered. In the script font, you write, for example, "Ein Weihnachtsgruß von Herzen" at 50 pt. Then you copy the text as a text frame, set it in the body text in the serif font Javanese Text at 12 pt, and adjust the width of the text frame. While dragging, hold down the Alt key to change both sides evenly. This also gets the hyphenation right. Finally, you add the web address, which you place at the end of the line.

Placing the logo and distributing stars
A logo belongs on the card so that the sender is recognizable. Good logos work on both white and dark backgrounds. Place your logo file using Ctrl + D, for example an AI file, and center it. Adjust the size so that it looks subtle. Finally, you can distribute small white stars. Choose a star, color it white, and copy it to several places while holding down the Alt key. Rotate individual stars slightly so that the distribution looks lively.

Export a print-ready PDF
Before you export, check the document. Since no images are used, there is nothing to check in the Links panel except one AI file. Press Ctrl + E to open the export dialog. Make sure the settings match your print shop's specifications. Select all pages, check the compression, and enable the bleed. As the profile, in the video you choose PDF/X with ISOcoated v2 300 percent. Then you export the file.

Using the data check and 3D showroom
Upload your PDF to the print shop and choose the product options. In the video, these are DIN A5 portrait, four-color, 300 g matte picture printing paper. The paper weight is important: the thicker the paper, the higher quality the card looks. Finishes, for example for outdoor use, are also a good option. Drag and drop your file into the professional data check. The check looks for errors such as slip-ups or missing bleeds. A green checkbox shows that your product is reproducible. Afterwards, you can view the front, back, and inside in a preview in the 3D showroom.

Approve the project for clients
If you work as an agency or freelancer on behalf of a client, the approval function is worthwhile. In the My Orders menu, open the relevant item and select Share. You can release the project for viewing or for ordering. With view approval, the client sees the card in the 3D showroom without having to order it. You can send the link directly, and the client can form their own impression of your work.

Summary – Designing a Christmas card in flat design in InDesign
You have seen how to build a modern Christmas card in flat design that is suitable for both business partners and employees. The foundation consists of the right format with bleed and safety margin, a clear structure with guides and layers, and a reduced design with two colors and two fonts. With a hexagon, gradient, drop shadow, dotted lines, and sparingly placed icons, an elegant card is created. Finally, you export a print-ready PDF, check it in the data check, and present the result in the 3D showroom or via the approval function.
FAQ
Question: Which format should I choose for a folded Christmas card?Answer: In the video, a folded card in DIN A5 portrait format is used; the dimensions when opened are 296 mm by 210 mm.
Question: Why do I need a bleed allowance?Answer: The 3 mm bleed allowance prevents white slivers at the edge, because the machine does not cut exactly on the cutting edge.
Question: How many colors and fonts make sense in flat design?Answer: Two colors and at most two fonts are completely sufficient, as more elements quickly make the design look cluttered.
Question: How can I create icons without much effort?Answer: Use the Polygon tool and change the number of corners and the angle with the arrow keys and the space bar; this creates stars, for example.
Question: Which setting do I need for the export?Answer: Export the PDF with your print shop's specifications, in the video with PDF/X, ISOcoated v2 300 percent, and bleed enabled.
Question: What is the data check for?Answer: The professional data check examines your file for errors, and a green checkbox confirms that the product can be reproduced cleanly.
Question: Can I show the card to my client before ordering?Answer: Yes, via Share you can release the project for viewing so that the client can view the card in the 3D showroom.
