

A paper carrier bag is more than a container for give-aways. At a trade fair, it travels through the halls, stays in view, and advertises for you as soon as someone carries it in their hand. Precisely because you are working here not on a flat surface but in three-dimensional space, you have to think about folds, glue flaps, and cut edges from the very beginning.
The video is only loaded from YouTube when you play it – data (including your IP address) is then transmitted to YouTube/Google. More in the privacy policy
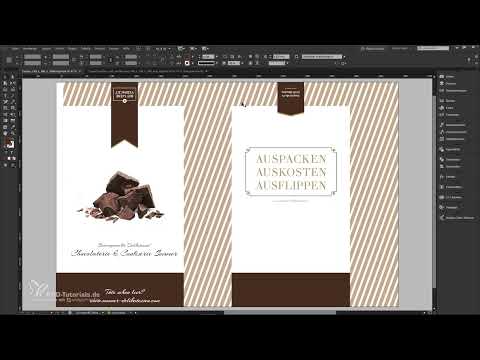
In this tutorial, I will guide you step by step through designing a goodie bag for a chocolaterie & confiserie in Adobe InDesign. A template from the online printing company viaprinto serves as the basis. At the end, you will export a print-ready PDF file and view your result from all sides in the 3D showroom.
Key Takeaways
Key Takeaways
- A template with correct dimensions, bleed, and fold lines saves you a lot of time and sources of error.
- Set guides for the front and back, folds, and bottoms precisely, and deliberately plan for 1 mm of tolerance in fold areas.
- Full-surface motifs must extend 1 mm beyond the fold edges all around so that no white slivers appear when folding.
- The glue flap remains unprinted. Use the Pathfinder to punch this area out of the background.
- Before exporting, check image resolution, ink coverage, crop marks, and cord holes with Preflight and the Separations Preview.
Step-by-Step Guide
Step 1: Choose the Right Template
Open the viaprinto homepage and scroll down a bit. There you will find various product symbols with line icons that already hint at the final result. Select the paper carrier bag. The configurator then asks you what type of bag you want: with a fabric cord or with a die-cut handle hole. For the chocolaterie design, you choose the feminine variant with the handle hole.

Step 2: Define the Format and Product Specifications
The format is the most important decision you make at the start. In the example, you work with 240 × 100 × 340 mm. These proportions look slim in appearance and at the same time tall enough for the design to show to advantage along the full length. You can define the other parameters, such as paper and finishing, later. Then download the InDesign template. It comes as a ZIP file, which you unzip.

Step 3: Open the Template in InDesign
Unzip the downloaded ZIP file. Besides the InDesign file (INDD), you will find a backward-compatible IDML file. Open the INDD file by double-clicking. InDesign may alert you to missing fonts. You can safely ignore this message, because the fonts only come from the template layer and are not needed for your design. You will delete the layer labeled "Information layer" before exporting anyway.

Step 4: Understand the Layer Structure
The template consists of two layers: an information layer with dimensions and notes, and a design layer on which you work. Make sure the design layer is active. The template is already aligned to the millimeter. This advantage is enormous, because you don't have to look for folds and cut edges yourself.

Step 5: Set Guides for Folds and Sides
Drag guides out of the ruler at the edge and place them exactly at the numerical values. Enter the value directly using the position field in the Control panel. You need lines at 10 mm, 250 mm, 350 mm, 380 mm, 40 mm, and 590 mm. They mark the front, back, side fold, bottom, and additional areas of the bag. Make sure you place each line at the desired position before you continue working.

Step 6: Plan Tolerances at the Folds
The guides are the ideal values. However, paper shifts minimally during folding, so you have to build tolerances in at the fold edges. To do this, set a line 1 mm inside the fold line, for example at 39 mm instead of 40 mm, and align your design to it. You repeat this step on all folded sides. This way the finished bag will look clean later.

Step 7: Create Color Swatches for the Chocolate Look
A design with a chocolate theme depends on suitable colors. Create new swatches in the Swatches panel. For the dark brown tones, use CMYK values, such as 28/33/60/13 for a medium brown. Add a light gold tone and a dark chocolate brown. Make sure to create only the colors you actually need. A clean color palette will make the print check easier for you later.

Step 8: Create Diagonal Lines as a Background Pattern
For the striking background pattern, draw a rectangle from top to bottom across the bleed and reduce the width to 7 mm. Fill it with the latte macchiato brown. Then tilt the rectangle using the Shear tool with 20 degrees on the X axis. This creates the slanted effect that gives the background movement.

Step 9: Move and Duplicate Stripes
Move the slanted stripe by 12 mm so that an elegant gap is created between the stripes. With the preview function, you can see live how the spacing looks. To repeat it across the entire document, use the shortcut Ctrl + Alt + 4. It repeats the last transformation. By the way, the key combination Alt + 4 causes problems on Windows, so use Ctrl + Alt + 4.

Step 10: Cut Out the Glue Flap
The white glue flap must not be printed. Therefore, group all the stripes, ungroup them again, select all elements, and merge them into one object using the Pathfinder with the Add function. Place a dark brown rectangle over it up to the edge of the glue flap. Then, holding the Shift key, select the linked path and apply the Pathfinder with Subtract. The area of the glue flap disappears from the background.

Step 11: Design Folds with Tolerance for the Inside
On the inside of the reverse side, the fold is folded inward. It needs some room, so you reduce the area by one millimeter and set an additional guide. Drag the white rectangle to the tolerance line. You repeat this procedure on all fold edges, that is, at the top and bottom edges as well as at the side folds. With Alt + Shift, you can move elements and create a copy at the same time. The Shift key keeps the movement on the axis.

Step 12: Design the Bag Bottom
The bottom of the bag is a separate element that you fill with the same color as the background. Extend the area beyond the bleed so that no gaps appear when cutting. Duplicate the element with Alt + Shift into the desired position so that the bottom ends exactly flush with the sides. Pay particular attention to millimeter precision, because the bottom is visible when the bag is folded.

Step 13: Protect the Design from Shifting
When the background is finished, lock it. Select all elements and use the shortcut Ctrl + L. This way, you won't accidentally move the background in the next steps. This is exactly how the layout stays clean while you design the front side.

Step 14: Place Image, Text, and Bow on the Front Side
The front side needs an eye-catcher. Drag the desired image into the document with Ctrl + D, crop it to fit, and center it. Then insert a text box that extends from the outer to the inner guide. For the title "Sommergemachte Delikatessen," use the font Arizonia at 28 points, centered and in dark brown. For the headline "Chocolaterie & Confiserie," increase the font size to 50 points. You should definitely check the spelling, because a typo looks embarrassing in print.

Step 15: Cut the Bow Using a Template
The bow consists of two parts that you design separately. Create a rectangle 54 mm wide and 114 mm high and fill it with the chocolate brown. Then use the Polygon tool to create a triangle as a template. Set the star inset to zero, fit the triangle to the edges, and subtract it from the bow using the Pathfinder. Copy the finished element with Ctrl + C and paste it using "Paste in Place" from the Edit menu. Place it toward the back in the layer order so that the edge doesn't show through.
Step 16: Place and rotate text on the lapel
On the lapel, you place the lettering "Mit Liebe verpackt" in white type, Theano Didot Regular, 18 pt and in all caps. The orientation is important: text on the inside must be rotated by 180 degrees so that the viewer can read it when opening the bag. Otherwise, they have to twist their head. You apply the same process to the bottom text "Auspacken, auskosten, ausflippen", which you set in 64 pt.

Step 17: Adjust tracking and line spacing
With multi-line lettering, a staircase effect quickly arises. Compensate for this by adjusting the tracking of the individual lines. Set the first line to 10, the last to minus 10 to minus 15. The three words then look like they were made from a single piece. Also add a thin outline of 0.5 to 1 mm and round the corners using the corner options. A rounding of 0.5 mm often looks softer than a large radius.

Step 18: Add the address and web address on the back
On the back, you place the confiserie's address in white Theano Didot, 14 pt and centered. A line with a 1 mm weight adds an elegant finish below it. You set the web address in gray and in 20 pt. Align all elements to the center axes. This makes the bag look balanced on both sides.

Step 19: Check the document in Preflight
Before you export, you check the document. In the Preflight panel, you can see whether there are any errors. If you show the information layer, errors due to missing fonts often appear. Hide the layer again afterward. Also check the image resolution. At least 300 ppi is the rule for print. The separations preview shows you the ink coverage. At 300 percent you are on the safe side; for slightly higher values, it is best to ask your print shop in advance.

Step 20: Check bleed, cord holes, and fold areas
Check whether the bleed allowance has been maintained everywhere. Then hide the design layer and check the template layer. There you can see the punched holes for the cord. Make sure that no important element runs over these holes. Full-surface motifs must extend 1 mm beyond the fold creases on all sides. The bottom flap is only partially visible, so you do not place any important information there. Finally, use the proof setup to simulate the colors of the ISO Coated v2 output profile. CMYK colors often look more brilliant on screen than in print.

Step 21: Export the print-ready PDF file
First delete the information layer. Then open the export dialog with Ctrl + E. Select PDF/X-1a as the format and set the compatibility to Acrobat 4. For compression, set the resolution to 300 and 450 ppi, and for marks and bleed, use the document's bleed settings. The target profile is ISO Coated v2. Then export the file.

Step 22: View the result in the 3D showroom
Upload the exported PDF on the viaprinto website. In the plugin, you select format, color mode, paper, and finishing. For the example, you choose 190 g glossy art paper with gloss film lamination and a white cord. After the upload, you can rotate the bag in full-screen view, flip through the animation, and take a close look at the inside, lapel, and bottom. There you can immediately see whether folds, address, and lettering work together as you planned.

Summary – Designing a paper carrier bag and exporting it print-ready
With the right template, cleanly placed guides, and planned fold tolerances, you create a paper carrier bag that also impresses at trade fairs. You design the front, back, and inside, secure the glue flap, check the document in Preflight, and export a print-ready PDF file. With the 3D showroom, you then see your design as it will later end up in your customers' hands.
FAQ
Which format should I choose for a paper carrier bag?The example works with 240 × 100 × 340 mm. This slim, tall format has a very strong presence. However, the choice depends on your project and the print shop's offering.
Why do I need to plan tolerances at the folds?When folding, the paper shifts slightly. Without tolerance, elements at the edges can look cut off or light slivers can appear.
What does the notice about missing fonts mean?The fonts belong to the template and are only important for the information layer. You can ignore the message and delete the information layer before export.
How do I deal with the glue flap?The glue flap remains unprinted. You punch the area out of the background with the Pathfinder by subtracting a rectangle.
What resolution does my image material need?At least 300 ppi is standard for print. Check the effective resolution of the images used before export.
Why should I rotate text on the lapel by 180 degrees?Otherwise, the viewer reads the inside upside down when opening the bag. The rotation ensures that the text is comfortably readable.
Which PDF format is recommended for print?In the example, you export as PDF/X-1a with the target profile ISO Coated v2. Ask your print shop which settings they expect exactly.
What does the 3D showroom show me?The 3D showroom shows you the finished bag from all perspectives. This way you can spot fold problems and text alignments before you order.

