

A three-dimensional food service or gift box often looks harmless on screen, until you have to fold it for the first time. That is exactly where it is decided whether your design comes together cleanly. This tutorial shows you how to quickly get a print-ready basic layout in InDesign with the "SAXOPRINT pro design" tool, implement a corporate design cleanly, and export your file so that the print shop can work with it without any follow-up questions. At the end, you check the result with a small practical test, namely assembling the finished box.
The video is only loaded from YouTube when you play it – data (including your IP address) is then transmitted to YouTube/Google. More in the privacy policy
Key Takeaways
- You get the template with cut, fold lines, and bleed directly via the Saxoprint plugin. This saves you the tedious work of constructing the cutting pattern.
- A corporate design specifies color values, fonts, and minimum distances. Create the color as a swatch before you start designing so that you can reuse it at any time.
- Guides form your grid. With them, you align areas, logos, and texts symmetrically, which is especially important for a box with multiple sides.
- Keep areas that will be glued free of color. Otherwise, the print shop will have a problem later.
- Export the file as a PDF using the Saxoprint profile and hide all auxiliary layers beforehand. The outlines belong only in the preview version, not in the print file.
Step-by-Step Guide
Step 1: Load the Suitable Template via Saxoprint pro design
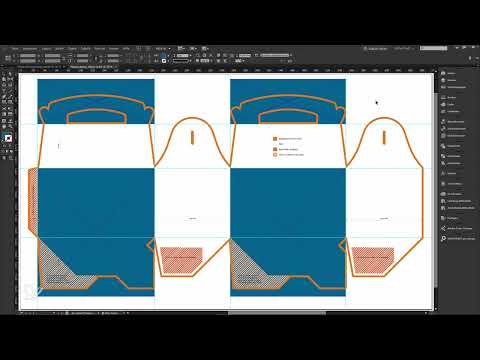
Open InDesign and start the Saxoprint pro design plugin, which you can obtain via the Creative Cloud. In the print templates section, select the product "Food Service" and choose the lunchbox. The design itself is initially secondary, since you will be designing it yourself anyway. With "Create print template", you get a document with exact dimensions, fold lines, and bleed within a few seconds. All you have to do is design, as if you were filling in a coloring picture.

Step 2: Create the Corporate Blue Color as a Swatch
In the client's corporate design manual, you will find the color values on page 7. For print, the relevant color is Corporate Blue with the CMYK values 100, 32, 12, 29. To do this, create a new swatch in the Swatches panel and enter the values exactly. Give the swatch a clear name, for example "Corporate Blue". This way you can apply the color later with one click and avoid typing errors.

Step 3: Understand the Layers and Make the Frame Visible
The template sits on its own layer, which you can show and hide. You should work on your design layer instead. If you draw a graphic frame without a fill, it is barely visible on the white layer color. Therefore, change the layer color to a strong blue. Then you can see the frames clearly, and you can edit them without any problems. You then remove the test frame again.

Step 4: Build a Symmetrical Grid with Guides
A food service box thrives on symmetry. Therefore, drag guides from the ruler and set them precisely via the panel. In the example, the first lines are at 85 mm and 160 mm from the top, at 278 mm from the top edge for the lower edge, and at 29.25 mm from the left. Additional lines divide the segment at 228.5 mm and 375.57 mm. In the end, you have a basic grid with four segments. Also activate the smart guides under "View", "Grids & Guides". Then objects snap automatically to the lines.
Step 5: Keep Areas for Gluing Free of Color
On the template, it is noted in several places that an area must remain free of color. This is due to the gluing of the box. If there is color there, the glue does not adhere reliably, and the print shop runs into problems. When designing, therefore, pay close attention to the red dashed lines and leave the areas there empty. This step is often overlooked by beginners, but it directly affects the function of the finished box.

Step 6: Create and Duplicate the Blue Areas
Draw a rectangle and fill it with your new Corporate Blue. Hold down the Alt and Shift keys to copy it and drag the copy downward. Select both areas and copy them to the opposite side. The frames do not quite fit yet, which you will correct later. You have now already defined the areas where text, logos, and patterns will be placed.

Step 7: Import the logo and align it precisely
The logo is usually available as a vector file. Press Ctrl/Cmd + D to open the Place dialog and insert it. Then move it to the center. The smart guides show you when the object is centered. However, also pay attention to the second axis, because the blue area is wider than the visible area. Therefore, correct the position manually until the logo sits visually in the center of the visible area.

Step 8: Design the slogan with a circle and rectangle
Draw a white circle with a diameter of 49 mm and below it a black rectangle measuring 60 × 10 mm. Set the text "Frische Garantie" in all caps and center it. In the Text Frame Options dialog, select the vertical alignment "Center" so that the text doesn't hang at the top edge. According to the manual, the font may only be the primary font Futura, which you use in the Medium style at 14 points. The logo font Festivo, on the other hand, is reserved for certain elements.

Step 9: Take over icons from Illustrator
The easiest way to get the fish icons is from Illustrator. Select the desired element and drag and drop it into your InDesign document. Align it in the center and adjust the size proportionally by holding down the Shift and Ctrl keys. With icons, you need to take the optical center into account more than the mathematical one. When you have finished designing all the elements, duplicate them to the other side with Alt and Shift. Creating the copy only afterward prevents you from having to create everything twice.

Step 10: Build text fields with uniform spacing
For the text blocks at the bottom edge, you work with a spacing of 5 mm from the frame. To do this, set the spacing values in the Text Frame Options dialog and enable the link option so that all sides are equal. A placeholder rectangle measuring 20 × 20 mm helps you set the spacing on the left and right symmetrically. Drag a guide to the left edge of the text and align the word with it. Then you invert the colors, that is, the area in white and the text in black. Finally, you check whether the spacing at the top and bottom is identical.

Step 11: Correct the error with the wing
In the preview, a disruptive blue wing appears that protrudes beyond the outline. Solve the problem by drawing a rectangle, filling it with white, and adjusting it to the appropriate height with the Anchor Point tool. When moving the anchor point, hold the mouse button down for about a second before you move, because otherwise the triangle won't move along with it. Then copy the element to the opposite side so that both wings are corrected identically.

Step 12: Define the typography for the main lettering
You set the large lettering "#fischzeit" in Festivo at 140 points. Since the font is paid, you can adapt the document if needed. Then convert the text into a graphic and set a copy of "Zeit" at 230 points. Set the opacity of the copy to 50 percent. This technique creates an overlapping effect that makes the box more lively. Align both text elements so that they are visually centered, and make sure the Z doesn't slip too far to the right.

Step 13: Create an ant pattern in Photoshop
The so-called ant effect is a line pattern that you create in Photoshop. To do this, create a new file measuring 500 × 500 pixels, 300 dpi, and the CMYK color mode, and enable transparency in the background. With the Line tool, draw short strokes about 10 pixels thick in your corporate color. Use uniform strokes, leave the edges free, and distribute them randomly. Select everything, save it as a pattern, and store the file as a PSD. For the pattern itself, you create a larger file measuring 8500 × 4800 pixels and fill it with the pattern.

Step 14: Integrate and link the pattern in InDesign
In InDesign, drag in the PSD file with Ctrl/Cmd + D and scale it proportionally until no unsightly gaps or breaks in the pattern are visible. Make sure the little strokes are not cut off at the edge. Copy the frame to the second page. You can open the linked PSD file via the Links panel by holding down the Alt key. There you can define a color overlay and save the change. InDesign updates the file automatically, so you can adjust the color at any time.

Step 15: Placing the fish logo and the info texts
Place the fish logo in the center of the area and align it with the alignment tool. Below it, set an info text in Futura Book at 10 pt, centered: "Holen Sie sich Ihren Fisch nach Hause." In the next line comes the web address in Futura Bold at 12 pt. Emphasis through a different font style is a proven design device. Then move the three elements together to the opposite side and write a different text there, for example "Qualität aus der Möltzer Fischmanufaktur".

Step 16: Preparing the export as a Saxoprint PDF
Open the export dialog with Ctrl/Cmd + E and choose PDF as the format. For Saxoprint, choose the preconfigured profile PDF/X-1a:2003. For compatibility, select Acrobat 4 (PDF 1.3). For compression, set 300 and 450, and take the marks and bleed from the document settings. Whether you export pages or spreads doesn't matter in this case. Then confirm the export with "Export".

Step 17: Hiding the helper layers before export
This step determines whether the print shop receives a clean file. The helper layer with the contours serves only as a viewing aid, for example for the client. Hide it before exporting, otherwise the lines will end up in the print. After exporting, check the file in Acrobat Reader and make sure that only the design is visible. Only this version is print-ready and reproducible.

Step 18: Ordering the box from Saxoprint and uploading the print data
In the shop, you select packaging under Gastronomy and put the lunchbox in the shopping cart with a quantity of 100 and 4-color printing. After the basic data check, you go to the checkout, select the payment method, accept the terms and conditions, and assign a project name. Then upload the print file. Make sure to upload the original version without the helper layer, not the preview file. After the upload, the order is complete.

Step 19: Folding and testing the finished box
After delivery, carefully cut open the packaging and remove the filling material. The box can be assembled without glue if you fold the wings inward and fold over the tabs. The magnetic closures hold everything together. Then test what fits inside. In the example, the box holds about ten Blu-rays, a sack of onions, or a bag of chips. Even a small X-Wing model kit fits inside.

Summary – Designing a gastro box in InDesign: Guide with Saxoprint template
With the Saxoprint template, you don't have to construct the cutting pattern yourself, and the corporate design gives you the framework. When designing, pay attention to guides, free gluing areas, and clean spacing. Export the file as a PDF in the Saxoprint profile after you have hidden the helper layers. Then your box is ready for production.
FAQ
Question: Do I have to buy the Saxoprint plugin to use the template?Answer: You get the plugin if you are a Creative Cloud customer. It is obtained via the Adobe app.
Question: Why can't I see my graphic frame on a white layer color?Answer: A frame without a fill is invisible on a white layer. Change the layer color to a strong blue.
Question: Which font may I use for the design?Answer: According to the corporate design manual, Futura is the primary font. Festivo is intended only for certain logo elements.
Question: Why do I have to leave certain areas free of color?Answer: These areas are glued. Color prevents reliable adhesion of the glue there.
Question: What happens if I don't hide the helper layer?Answer: The contours appear in the print, and the print shop cannot produce the file cleanly.
Question: Can I still change the pattern later?Answer: Yes, if you link the pattern PSD, InDesign updates the change automatically as soon as you save the file.
Question: Which export settings do I need for Saxoprint?Answer: Use the profile PDF/X-1a:2003, Acrobat 4 (PDF 1.3), and compression with 300 and 450. Take the marks and bleed from the document.

