
Crop with Affinity Photo - tools and techniques

- Always needed: Learn how to crop subjects using Affinity Photo
- Make the right choice: Learn pixel, mask and path-based techniques
- Master every motif: cut out objects, people, animals from different backgrounds
- Pay attention to detail: How you crop hair, add strands, insert motifs into other images
- Tips and tricks: sensible presets, replacing the sky, cropping signatures
- Marco Kolditz - concrete examples - 4.5 hours: Everything you need to know about clipping in Affinity Photo
Know how! Opt for this video training and thus for efficient "selection methods" with which you can achieve the finest and most detailed cropping in your images.
17 Videos, 282 minutes
Intro to the video training
This is what you can expect in the video training "Crop in Affinity Photo"
Watch this video to find out what you can expect in the "Crop in Affinity Photo" training course.
Cutting out with Affinity Photo
Crop with Affinity Photo: 01 | Presets and tips
In this video, video trainer Marco Kolditz draws your attention to important and very helpful presets in Affinity Photo, which make working with the image editing program much easier. He also gives general tips on source images, which are sometimes more and sometimes less suitable for cropping.
Crop with Affinity Photo: 02 | General tips for selections
Crops are always created using selections - whether by pixel selection, masks or paths. In this video, Marco Kolditz gives you general tips on how to deal with selections that are necessary for clipping.
Crop with Affinity Photo: 03 | Pen tool
Technical objects with clear edges and curves in particular can be easily cropped using the pen tool. In this video, you will learn how to use this tool optimally and achieve convincing results.
Crop with Affinity Photo: 04 | QuickMask
With the help of the QuickMask, objects with uneven contours can also be selected and cropped perfectly. In this video, you will learn how to use the paint brush tool in combination with the QuickMask to best isolate an object from the background.
Crop with Affinity Photo: 05 | Channels
Channels can also be used to quickly and easily detach certain objects from the background and crop them in this way. In this video, you will learn how to use channels for cropping using the channel mixer in Affinity Photo.
Crop with Affinity Photo: 06 | Crop with the background eraser
Affinity Photo offers the Background Eraser tool, which can be used to completely erase the background of an image and make it transparent. Learn how to use this destructive tool in this video - and find out from video trainer Marco Kolditz how you can still work non-destructively with this tool.
Crop with Affinity Photo: 07 | Crop glass objects
In this video, video trainer Marco Kolditz shows you how to convincingly crop glass objects in Affinity Photo and place them on a different background.
Crop with Affinity Photo: 08 | Crop via blending options
The blending options in Affinity Photo are a very powerful tool that can also be used for cropping image areas - and unfolds its great potential especially in combination with other cropping options.
Crop with Affinity Photo: 09 | Single color background
In this video, video trainer Marco Kolditz will show you how to crop a person in front of a monochrome background in the best possible way and preserve even the finest details of the hair, such as individual strands of hair. You'll also learn how to convincingly correct unwanted colored edges.
Crop with Affinity Photo: 10 | Structured background
A structured background and sharpness gradients make it difficult to crop people and especially hair. In this video, video trainer Marco Kolditz teaches you how to achieve a convincing result despite difficult source material.
Crop with Affinity Photo: 11 | Correct fur
Sometimes, when cropping hair or fur, it is necessary to add individual strands of hair to the image afterwards and blend them perfectly into the rest of the image. Watch this video to find out how to do this.
Crop with Affinity Photo: 12 | Insert image objects harmoniously
Successful cropping is only half the job - because in order to optimally integrate a cropped object into a new environment, other important editing steps are important, which Marco Kolditz demonstrates in this video.
Crop with Affinity Photo: 13 | Crop and replace sky
Watch this video to find out how you can easily remove an unwanted sky, replace it with a different sky and perfectly adjust the rest of the image to the new lighting mood.
Crop with Affinity Photo: 14 | Crop lights, water splashes and smoke
Whether light objects such as sparks or fireworks, water splashes, dust or smoke: particles can add interesting effects to images. In this video, you will learn about various ways to crop such image objects and customize them to your liking.
Clipping with Affinity Photo: 15 | Applying clipping masks
You can also use path objects or text to cut out areas of an image and create interesting effects. In this video, you will learn how to use paths and texts to highlight and crop image areas or even punch out specific areas from an image - in a non-destructive way that can always be adjusted afterwards.
Crop with Affinity Photo: 16 | Crop and export signature
It can be very practical if your own signature is available as a file with a transparent background to quickly sign documents in Word or PDF format or to add your own signature to your email signature. Watch this video to find out how you can easily crop your own signature and optimize it for use.
Examples of use
-
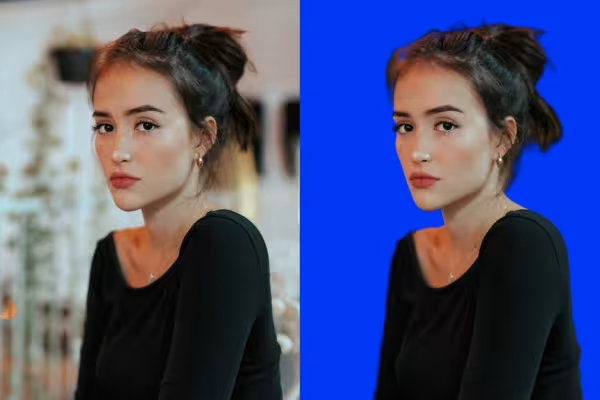 Example: Even with structured backgrounds, you are able to crop portraits.
You might also like

Save time with artificial intelligence

Full power, more inspirations, maximum WOW effect!

More style, more power, more templates!

Photo editing & image composition
Comment now „Crop with Affinity Photo - tools and techniques“