

Glass is one of the most demanding subjects when it comes to cutting out. It is transparent, reflects, refracts light, and takes on the colors of its surroundings. That is exactly why it is considered the supreme discipline among image editors. With the right layer modes and a few targeted steps, however, it is much easier than you might think. In this tutorial, I will show you how to realistically integrate glass and bottles into a scene in Photoshop, against both dark and light backgrounds.
The video is only loaded from YouTube when you play it – data (including your IP address) is then transmitted to YouTube/Google. More in the privacy policy
Key Takeaways
- Against a dark background, the "Screen" layer mode usually makes the glass appear transparent in the image right away.
- Against a light background, "Multiply" and "Luminosity" are suitable. You then remove remaining white areas with the Background Eraser.
- Shadows, slight blur, and distortions of the background make the result believable.
- Consistently naming layers and working with clipping masks keeps your document organized.
Step-by-Step Guide
Step 1: Select the glass and transfer it into the scene
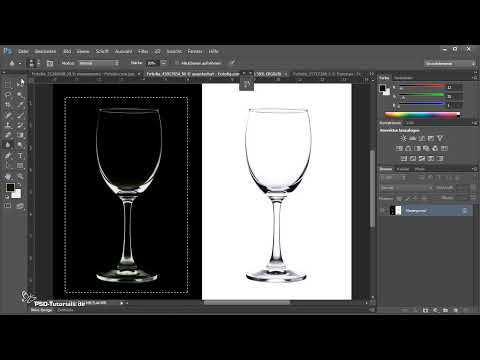
Use the Rectangular Marquee tool to draw a frame around the glass and copy the selection with Ctrl+C. Then switch to your target image and paste it with Ctrl+V. At this stage, the glass still looks unnatural because it lacks a surface to sit on.

Step 2: Build the table with the Rectangle tool
So that the glass doesn't float, you need a tabletop. Create it as a shape with the Rectangle tool. You can then transform the shape with Ctrl+T. While dragging the front edge, hold down Alt, Shift, and Ctrl. This extends the shape by the same distance or angle to the left and right, and the table gets a coherent perspective.

Step 3: Design the tabletop surface with a texture
Pattern overlays in the layer styles quickly look artificial. A real texture from your texture pack looks much more believable. Drag it into your document via drag & drop and confirm with Enter. It lands in the image as a Smart Object. Scale it with Ctrl+T so that it roughly fills the tabletop. An exact fit is not necessary at this point.

Next, apply the texture as a clipping mask to the table shape. To do this, hold down Alt and click between the two layers. The texture now fits exactly into the rectangle.

Step 4: Bevel the table edge and adjust the opacity
Open the layer styles of the table shape and enable the bevel edge. This makes the surface look more three-dimensional. Then reduce the opacity slightly so that the texture doesn't appear too dominant. Name the layers for better clarity, for example "Table Shape", "Table Texture", and "Glass". Then move the glass up so that it stands on the table.

Step 5: Cut out the glass with the layer mode
This is the real trick. For the glass layer, select the "Screen" mode in the Layers panel. The white and light areas of the glass disappear, and the transparency becomes visible. With one click, the glass is usually already perfectly cut out against a dark background. Basically, you don't have to do anything else except move the glass to the right position.

Step 6: Duplicate the glass and add a shadow
Duplicate the glass layer with Ctrl+J if you want to make the glass stronger. For the shadow, you don't need a Drop Shadow layer style, since it often fails at the edge with glass. Instead, create a new layer directly below the glass and name it "Shadow". Think about where the light is coming from. In the example, it falls from the right, so the shadow runs to the left.
Paint the shadow with a soft, rather small brush at greatly reduced opacity. Make sure that it doesn't extend beyond the edge of the table. You remove excess areas with the Eraser or with a layer mask.

Step 7: Distort the background behind the glass
Real light refraction distorts everything that lies behind the glass. To do this, duplicate the background layer with Ctrl+J. Then take the Smudge tool with a strength of about 10 percent and run it over the area where the glass is. The area becomes slightly blurred and distorted, which looks very realistic. With a smaller brush, you can neatly retrace the edges.
If you don't like the result, simply go back to an earlier step via the History panel.

Step 8: Imitate light refraction with the Liquify filter
A second option is the "Liquify" filter. Open it and switch to advanced mode so that you can see the preview. Show the background and reduce the opacity of the preview until you can see exactly where the glass is. With a strength of about 40 percent and a reduced brush pressure, the warping can be subtly dosed. With Ctrl+Alt+Z you can undo steps if needed. Whether you like the slight warping is something you have to decide for yourself for your subject.

Step 9: Incorporate glass in front of a light background with "Multiply"
With a light background, "Screen" (inverse multiply) does not work because the white of the background remains. Instead, place the glass in its own group, for example "Glass white background", and select the "Multiply" mode there. The glass thereby becomes transparent, and the colors of the background shine through.

For an even more realistic look, you can duplicate the layer and use the "Luminosity" mode. This causes the glass to take on the color of the background.

Step 10: Remove white remnants with the Background Eraser
In Luminosity mode, white areas often remain. For this, use the Background Eraser tool. Hold down Alt and click on a dark spot of the glass to protect this color. Then click in the white area that is to be removed. Simply run the tool loosely over it until only the glass remains.

Then add a drop shadow again by copying it from another group while holding down the Alt key and placing it appropriately. With a soft layer mask and a blur, you integrate it cleanly into the scene.

Step 11: Insert a bottle from another image
The same principle works for bottles. Drag and drop the image into your document and name the layer "Bottle". First set the mode to "Multiply". If the bottle looks insufficiently realistic, try the "Luminosity" mode. The bottle then takes on the color of the background.

Step 12: Precisely cut out the bottle
For a clean cutout, use the Quick Selection tool. Roughly mark the bottle and refine the selection via "Refine Edge". Activate Smart Radius there so that Photoshop also checks the nearby pixels. Then use a layer mask to determine what remains visible.

Reduce the opacity of the mask to specifically weaken leftover white. In the example, the opacity was set to 28 percent. With black paint in the mask, you remove further areas that are still too bright for you.

Step 13: Adjust color and mood
So that the bottle fits the scene better, you can fine-tune with adjustment layers. A Curves adjustment, placed as a clipping mask on the bottle, strengthens contrasts and colors. With the Hue/Saturation dialog, you can completely neutralize the color or change it to another color, for example green or red. With a layer mask, you determine in which places the color change should take effect.

Step 14: Blur the Background and Table
A real background looks blurrier in the depth. Use the Smudge tool to selectively blur the background. For high-resolution images, the calculation takes a little longer. To blur the table realistically as well, copy all visible layers with Ctrl+Shift+C and paste them with Ctrl+V. Then apply the desired blur on the new layer.

Step 15: Place a Glass Smart Object on a Beach Image
Finally, you can apply what you've learned to a second image. Drag the bottle onto the beach image and convert it into a Smart Object via the context menu. This way you can enlarge, shrink, and rotate it without losing quality. Remove the background via the Smart Object using the Quick Selection tool and "Refine Edge". A layer mask ensures that the bottle disappears into the sand.

To make the bottle look translucent, the "Hard Light" mode works well. For a stronger effect, you can duplicate the layer and use the "Multiply" mode. A final drop shadow rounds off the scene.

Summary ??? Isolating Glass in Photoshop: Step by Step to a Realistic Result
Glass can be convincingly isolated with just a few steps. Against a dark background, the "Screen" mode is usually enough. Against a light background, you work with "Multiply" or "Luminosity" and remove the white remnants with the Background Eraser. Shadows, distortions, and suitable blur make the result believable. If you consistently work with named layers, clipping masks, and layer masks, you keep control over your project at all times.
FAQ
How do I know which layer mode suits my glass?Simply try out the modes. Hold down the down arrow key to switch through the modes in the Layers panel one after another and see the effect directly.
Can I also isolate glass without a texture on the table?Yes, that's possible. However, the texture adds credibility because it gives the table structure and anchors the glass better.
Why do white areas remain in the glass against a light background?The "Multiply" mode leaves white intact, since white changes nothing when multiplying. Remove these areas with the Background Eraser or a layer mask.
How do I prevent the shadow from looking unnatural?Choose a low opacity, a soft brush, and a light direction that matches your image. Also make sure the shadow does not extend beyond the edge of the table.
Do I always have to work with the Liquify filter?No. The filter is an additional way to imitate light refraction. The Smudge tool on the background often achieves a similar effect and is quicker to implement.
Why should I use Smart Objects?Smart Objects retain their quality when resized and rotated. In addition, you can make changes within the Smart Object at any time afterwards.

