
The background of your composite needs rocks that are cleanly separated from the sky. In this tutorial, you will learn how to create a precise cutout using channel calculations and brushes, which you can then insert into your project as a Smart Object.
The video is only loaded from YouTube when you play it – data (including your IP address) is then transmitted to YouTube/Google. More in the privacy policy
Key Takeaways
- The blue channel is best suited for the cutout because the rock becomes dark and the sky becomes light.
- Not every blend mode suits every image. For this subject, Linear Burn works much better than Overlay.
- With the Dodge tool and the Highlights range, you can specifically remove gray haze in the sky without altering the rocks.
- The mask is created from the finished alpha channel. Black means visible, white means transparent.
- Checking in the RGB channel prevents you from accidentally making rock areas transparent.
Step 1: Open the rock image and fit it to the screen
Start by loading the rock image via "File > Open". In the example, you use the file felsen.jpg. After double-clicking the image, fit it to the workspace with a quick double-click on the Hand icon so you can keep everything in view.

The rocks, together with the little trees, should later stand completely in front of a transparent background. The sky must therefore disappear completely. This is exactly what you need the channels for.
Step 2: Select the right channel
Open the Channels panel and compare the red, green, and blue channels. The sky should appear light in the mask and the rock dark. The blue channel provides the strongest contrast for this, because the blue sky stands out clearly from the rocks there.

Select the blue channel and then call up the "Calculations" option via "Image". There, combine the blue channel with the blue channel. This creates a new alpha channel that you can continue working with.

Step 3: Find the right blend mode
For the person in an earlier tutorial, the "Overlay" mode proved effective. With this rock subject, however, too much of the sky remains too bright, so it is unsuitable here. Instead, choose Linear Burn. It makes the rock very dark, while the sky remains clearly recognizable as a silhouette.

Confirm the calculation with "OK". You now see a clear silhouette, albeit with a slight gray haze in the sky. You will remove this haze in the next step.

Step 4: Remove gray haze with the Dodge tool
The Burn tool makes dark areas even darker. For the sky, however, you need the opposite, namely the Dodge tool. Select it and set the range to "Highlights". This way, only the lighter pixels are brightened, while dark rock areas remain untouched.

Set the exposure to about 23 percent. Then paint over the gray haze in the sky with the Dodge tool. The gray areas turn white in the process. Run the brush along the edge of the trees without painting too heavily. Black areas stay black, and individual shades of gray only become slightly lighter. This makes hardly any difference, but ensures clean transitions.
Work your way through the image bit by bit. After a short time, the background is already cut out surprisingly well.

Step 5: Paint the rocks black
Now it's time for the fine work. Choose a brush with black as the foreground color. If other colors are currently active, simply press the D key to set black as the foreground and white as the background. With the X key, you switch between the two colors.

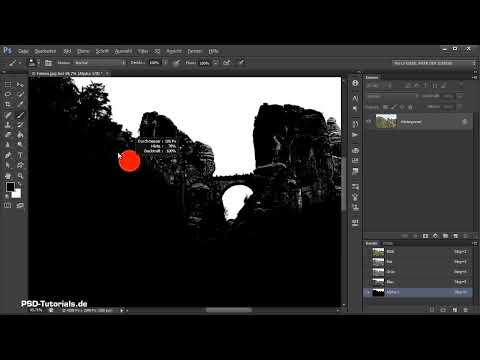
Make sure you are working on the alpha channel. Paint all rock areas black, because black stays opaque in the mask later. Work right up to the edge and feel free to zoom into the image to work in detail. Even if the result won't be viewed that closely later, a clean way of working pays off significantly in the end.

Step 6: Checking in the RGB Channel
Switch to the RGB channel regularly to check where the rock ends and where the sky may show through. Some spots, such as small holes between the branches, are actually sky and may stay white. Other spots look like holes but belong to the rock. Paint over those so they stay opaque.

Go through the image section by section. What matters is that you keep checking where it's fine for it to be black and where the background should still show through.

Step 7: Darkening Gray Areas with the Burn Tool
Some rock edges are still slightly grayish. For this, use the Burn tool and set the range to "Shadows". This way only the already dark pixels are darkened, while the bright ones remain untouched. Painting beyond the edge therefore does no harm, because bright pixels are not changed.

With a small brush you can darken delicate edge areas very precisely. If you accidentally affect too much, correct the mistake with a white brush that lightens the areas again.

In this way, you paint the entire rock formation black and the sky white. The channel is now prepared and ready for the mask.

Step 8: Creating the Mask
Load the selection of the alpha channel by holding down the Ctrl key (Windows) or Cmd (Mac) and clicking on the channel's thumbnail. Then, with the layer active, click on the mask icon. You now get a mask that is still upside down.
Press Ctrl + I to invert the mask. Alternatively, you can click on the alpha channel, hold down the Alt key and click on the mask icon at the same time. The inverted mask is then created directly. Both ways lead to the same result.

Step 9: Checking the Cutout
To check the cutout, create a new color fill layer. Choose a shade of blue, since the sky will look bluish later anyway. Drag this layer below the rock layer. If the trees, the bridge and the rock edges look clean, your work was successful.

Afterwards, hide the auxiliary layer again.

Step 10: Preparing as a Smart Object
Right-click on the rock layer and select "Convert to Smart Object". The Smart Object keeps its mask and can later be scaled and moved without loss of quality.

Then drag the Smart Object into your composite. There you can already adjust the color mood and place the rocks in the desired position. This step follows in the next part of the tutorial.

Summary ??? Cutting Out Rocks in Photoshop: Channel Calculation Step by Step
You have seen how to cut out rocks using channel calculations. The starting point is the blue channel, which you blend with itself. With Linear Burn, a strong silhouette emerges, which you free from gray haze using the Dodge tool in the highlights range. In the alpha channel, you paint the rock black and the sky white, regularly checking in the RGB channel where the sky may show through. Then you create an inverted mask and convert the layer into a Smart Object so that you can use it flexibly in your composite.
FAQ
Which channel is best suited for isolating rocks against the sky?The blue channel usually provides the best contrast, because the sky appears bright and the rock appears dark.
Why doesn't Blend Into (Ineinanderkopieren) work here?In this image, too much of the sky remains bright, so linear burn (lineare Nachbelichtung) is better suited.
How do I remove gray haze in the sky?Use the Dodge tool with the Highlights range and an exposure of about 23 percent and paint over the gray areas.
What does the Burn tool do in the Shadows range?It only darkens the pixels that are already dark. Bright pixels remain unchanged, so you can paint beyond edges without causing damage.
How do I invert a mask?Press Ctrl + I, or hold down the Alt key while clicking the mask icon as you select the alpha channel.
Why should I switch to the RGB channel regularly?This way you can see where the rock ends and where the sky may actually show through. You paint holes in the rock black, and you leave real sky gaps white.
What is the smart object for?A smart object keeps its mask and can be scaled and moved without loss of quality. This makes later placement in the composite easier.


