
Do you want to isolate the front of a truck so that it later floats freely in the air? Then you need a clean mask, and you can create one even without ready-made paths or masks from the stock photo. In this tutorial, I'll show you how to build a precise cutout mask using a channel calculation and an alpha channel.
The video is only loaded from YouTube when you play it – data (including your IP address) is then transmitted to YouTube/Google. More in the privacy policy
Key Takeaways
- Stock photos such as those from the provider Fotolia often come only as a JPEG without a mask or path. You therefore have to isolate the subject yourself.
- The red channel is a good starting point because it shows the strongest contrast between the subject and the background.
- With the channel calculation and the blending mode "Linear Burn" you create an alpha channel with strong grayscale tones.
- You edit the alpha channel with the brush, the Dodge tool and the Burn tool until contours and details are right.
- Semi-transparent areas, such as windows, can deliberately be left as grayscale tones.
Step-by-Step Guide
Step 1: Open the Source Image and Define the Goal
First, open the photo with the front part of the truck. The gas tank is in a separate photo and will be edited later in its own workflow. So concentrate only on the front. Think now about how the subject should look later in the composite, because that determines how precisely you need to work on the contours.

Step 2: Recognize the Missing Mask
The background of this photo is already white. At first glance, this looks like an existing cutout, but the stock photo contains neither a mask nor a path. You only have a JPEG file in front of you. Therefore, you have to isolate the subject anew yourself.
Step 3: Analyze the Channels
Open the Channels panel. If it is not visible, select the entry "Channels" in the "Window" menu. In the RGB channel you see the image in full color. Now cycle through the individual channels and compare them. The red channel is especially bright in the background and dark on the subject, so it is best suited as the basis for your mask. The green and blue channels, by contrast, provide weaker contrast.

Step 4: Calculate the Red Channel with Itself
Now select the red channel. Then you call up the command "Image" and then "Calculations". Since you selected the red channel beforehand, the dialog window automatically takes it over as the source. Make sure that you set the same channel in both fields, that is, source and layer. This way you calculate the red channel with itself, and that is exactly what you need for the next step.

Step 5: Choose the Right Blending Mode
In the dialog window you will find the field for the blending mode. With the arrow keys you can try out the different modes and watch the result live in the preview. The "Multiply" mode already looks strong, but it still lightens some areas too much. The "Linear Burn" mode darkens the backgrounds significantly more, while the subject areas stay dark. Confirm with "OK". Photoshop then creates a new alpha channel that you can continue working with.

Step 6: Clean Up the Alpha Channel
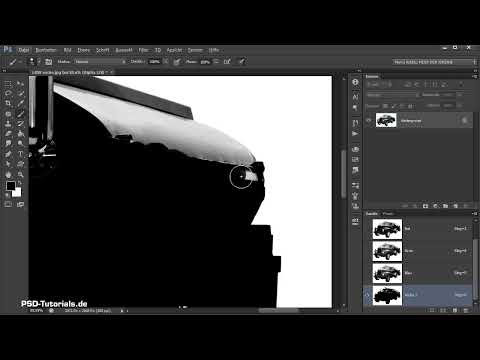
In the new alpha channel you still see isolated white dots and light spots, for example at the headlights. You remove them with a hard brush and a black foreground color. You switch between foreground and background color with the X key so that you can quickly switch to black. Paint with full opacity over the areas that do not belong to the subject. Start with the large areas and then work your way to the details.

Step 7: Trace the Contour Cleanly
Now it's time for the outer line of the truck. Reduce the brush tip size and paint along the contour so that no remnants of the white background remain. Use the zoom function again and again to check the edges precisely. Small lights that blur into the background need particularly much attention. There you have to look closely at how far the mask should extend.

Step 8: Refine with the Dodge and Burn Tools
The Dodge tool and the Burn tool are well suited for fine corrections. The Dodge tool further brightens areas that are already slightly light, while the Burn tool darkens darker pixels. With masks, the Burn tool is especially helpful for darkening gray midtones in the background without changing the highlights. Set the range to "Shadows" if you want to specifically edit the dark tones in the subject. Pay attention to the edges, because working too aggressively quickly makes the contours hard.

Step 9: Deliberately Leave Semi-Transparent Areas
Not every area has to be completely black or white. The truck's windows should let the background show through slightly. Therefore, leave them in a light gray in the alpha channel. This creates a semi-transparent effect that looks realistic later on. Think beforehand about which areas you want to leave like this. The truck's nose, on the other hand, stays sharp and should be cut out particularly precisely, because it is blurred less in the motion effect.

Step 10: Load the Selection from the Alpha Channel
Once the alpha channel is finished, you load it as a selection. To do this, hold down the Ctrl key (Cmd key on a Mac) and click the alpha channel in the Channels panel. A selection appears around all the light areas. This selection contains exactly what you want to keep later. Then switch back to the Layers panel and select the background layer with the truck.

Step 11: Create the Layer Mask and Invert It
Now click the layer mask icon at the bottom of the Layers panel. The mask is initially created the wrong way around, because the background remains visible. You can either create it while holding down the Alt key or invert the mask afterward with the keyboard shortcut Ctrl+I. With this method you simply reverse the mask so that only the truck is visible.

Step 12: Check the Result with an Auxiliary Layer
Place an auxiliary layer with a high-contrast color beneath the cut-out layer. This way you can see right away whether the mask fits cleanly or whether remnants of the background are still visible. Semi-transparent windows should let the background shimmer through. You can initially leave the truck's colors, such as the green or yellow, untouched. You can desaturate and adjust the colors later in the actual composing.

Step 13: Preview of the Gas Tank
The next step concerns the gas tank. It is cut out on a separate photo and then combined with the front part of the truck. Use the method from this tutorial as a template, because channel calculation, alpha channel, and mask work just the same way for similar subjects.

Summary ??? Cutting Out the Front Part of the Truck with Channel Calculation in Photoshop
You have learned how to precisely cut out a stock photo without an existing mask. The red channel forms the basis, the channel calculation with the "Linear Burn" mode delivers a usable alpha channel, and the brush, Dodge tool, and Burn tool take care of the fine work. You round off the semi-transparent windows and the sharp edges of the nose with deliberate decisions. Finally, you convert the selection into a layer mask and check the result on an auxiliary layer. This way the subject is ready for use in composing.
FAQ
Why do you use the red channel for the mask?The red channel shows the contrast between the light background and the dark subject most clearly. This makes it the easiest to convert into a usable mask.
Why is the "Linear Burn" mode better suited than "Multiply"?The "Linear Burn" mode darkens the background areas more strongly. At the same time, the dark areas of the subject are preserved. With "Multiply," some background areas still look too light.
What happens if you don't invert the mask?Then the background remains visible and the truck is hidden. You can correct this with Ctrl+I or by using the Alt key when creating the mask.
Why shouldn't windows be cut out completely?Semi-transparent windows let the background show through. This looks more realistic in the composing than if the windows were completely opaque.
Can I remove the truck's colors right away?That's possible, but not strictly necessary. You can deliberately keep using or adjust green and yellow tones in the later composing.


