
The rocks have been cut out, and now it's time to insert them into your composition. In this tutorial, I'll show you how to organize the rocks in their own group, adjust them flexibly with Smart Objects, create a right side by duplicating, and refine them cleanly with layer masks. At the end, you'll set the green base tone with a color fill layer in Soft Light mode, which gives the whole image its characteristic look.
The video is only loaded from YouTube when you play it – data (including your IP address) is then transmitted to YouTube/Google. More in the privacy policy
Key Takeaways
Cut-out rocks are best placed in their own group so that the layer structure stays clear. Smart Objects can be scaled and rotated as much as you like without losing quality. With the Alt key you duplicate layers, and with the Shift key held down you move them exactly as if on rails. Layer masks work with black and white: white reveals, black hides. A color fill layer in Soft Light mode is a quick way to give the entire image a uniform color mood.
Creating the Rocks in Their Own Group
Start in the Background group, specifically in the middle of the background. Create a new group there and name it Rocks. While this group is active, switch to your document with the cut-out rocks and simply drag the layer into your composing. It then lands directly in the rocks group, and everything stays neatly sorted.

After moving it, make sure that the layer is actually inside the group. This will make every further edit easier for you later.

Scaling and Rotating Rocks with a Smart Object
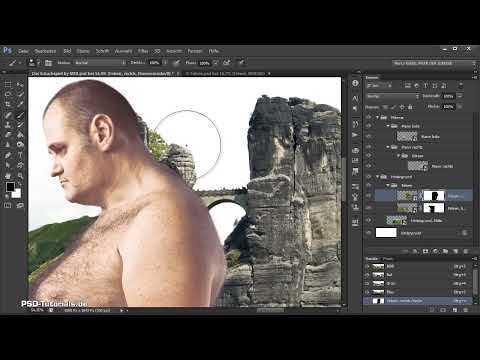
Now zoom into the area where the bridge should extend into the man's back. Since the rock layer is a Smart Object, you can enlarge, shrink, and rotate it as you like with Ctrl+T. You can do this as often as you want without the image quality suffering. First place the bridge roughly at the desired spot and then enlarge it until the transition looks coherent.

Fine-Tuning with Arrow Keys
When you zoom in closer, you can adjust the position very finely with the arrow keys on the keyboard. The bridge should not run straight but lead slightly upward. So you rotate the image a bit until you like the course. Then confirm the transformation with Enter.

Duplicating the Rocks on the Right Side
So that rocks also appear on the right, you use the same image again. This is hardly noticeable in the finished motif. To do this, hold down the Alt key and drag the layer over itself. The mouse pointer changes, and a line appears. The copy is inserted where this line is. Name the copy Rocks right and the original layer Rocks left.
Moving Precisely with the Shift Key
To move the right rock layer, hold down the Shift key. The layer then moves exactly in a straight line, as if it were running on rails. Without this trick, it's easy to end up off the mark with an unsteady hand. Drag the rocks so far to the right that the area that was visible on the left of the image disappears from view. This way you use the same image material without the repetition being noticeable.

Rotating and Enlarging the Right Rocks
The right side should also not run straight but tilt slightly upward. At first, concentrate only on the rocks and rotate them accordingly. Then enlarge them a little until the motif looks balanced, and confirm the transformation.

Creating Layer Masks for the Left Side
First hide the right rock layer so that you concentrate only on the left one. Activate the layer Rocks left and click on the mask icon. A white mask is created, and at first nothing seems to change. This is because white stays visible and black hides.
Next, activate the mask itself, not the image layer. Choose a brush with black as the foreground color and paint away the areas that should not be visible. A somewhat harder brush tip helps you work precisely. By holding down the Alt key and clicking on the mask, you can briefly make the mask visible and check what you have already hidden. Another Alt-click takes you back to the image view. Be careful not to go too far, as otherwise areas could disappear that are still needed later.

Masking the right side
On the right side, you proceed in exactly the same way. Create a mask, activate it, and paint away everything that should not be visible with black as the foreground color. This also includes the area behind the figure's head. By double-clicking the hand icon, you adjust the view and see how the image will look later.

Correcting the bridge
You don't like the bridge in this form yet. Duplicate the right rock layer again, drag the copy above itself, and name it Felsen rechts Brückenkorrektur. Briefly hide the copy and switch back to the Felsen rechts layer. There, you remove the bridge via the mask by painting over the corresponding area in black.

Repainting the bridge
Show the correction layer again. Now you want to reinsert the bridge. To do this, first fill the layer with black. You can do this, for example, with Alt+Backspace if the foreground color is black. Alternatively, you will find the same option under Edit, Fill. The layer is now completely hidden. Then switch to white as the foreground color and paint the bridge in at the right place. Afterwards, you rotate the layer with the bridge slightly until it leads upward, and fine-tune the position with the arrow keys.

Creating soft transitions
If you look closely at the transitions, you may still see hard edges. For this, use a soft brush with somewhat lower opacity and carefully paint over the overlapping areas on the mask. This creates a smooth transition between the rocks. Sometimes the image is also rotated too much in one place. This can also be corrected easily via the Smart Object. Feel free to take plenty of time for this fine work.

Defining the general color look
Now close the two groups and click on the top group so that the new adjustment layer is created above it. Choose an adjustment layer of the type Solid Color. Enter 14 for Red, 81 for Green, and 7 for Blue. This is the green tone that I also use in my image. Name the layer Farbstimmung.

Set the blend mode of this layer to Soft Light. Now the characteristic look of the image appears. Feel free to compare before and after, as the result looks significantly more harmonious. The green tone blends with all the elements underneath, which is why it is best to lock this layer. That way it stays unchanged, even if you move other layers.

Locking the group
Since the color mood is meant to apply to the entire tutorial, you lock the layer. This prevents you from accidentally moving it while working on other parts of the image. You will deal with the distracting bright areas at the bottom of the image in the next step using foreground elements.

Summary – Photoshop Composing: Placing rocks, masking, and defining the color look
You have set up the rocks in their own group and positioned them flexibly with Smart Objects. By duplicating and using the Shift key, you created a coherent right side. With layer masks, you removed superfluous areas, corrected the bridge, and made the transitions soft. Finally, with a Solid Color layer in Soft Light mode, you defined the green color look of the image and locked the layer.
FAQ
Question: Why does a new layer mask initially remain invisible?Answer: White areas of a mask remain visible, and only painting over them with black hides areas.
Question: How can I check what I have already masked out?Answer: Hold down the Alt key and click on the mask to display it. Another Alt-click takes you back to the image view.
Question: What is the Shift key used for when moving?Answer: With the Shift key held down, the layer moves exactly in a straight line, so that it does not accidentally slip out of alignment.
Question: Does a Smart Object lose quality when scaled or rotated multiple times?Answer: No, Smart Objects retain their image quality even if you transform them multiple times.
Question: Why should the color mood layer be locked?Answer: This way the color fill remains unchanged, and you won't accidentally move it when working on other layers.


