
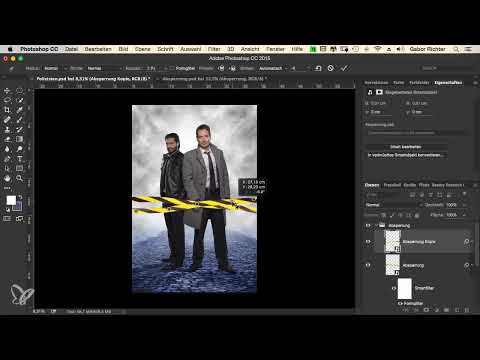
Do you know that feeling when an image looks coherent but doesn't tell a story? This is exactly where Gabor starts in this tutorial. A foggy street scene with two men in a suit and a leather jacket already looks like a crime thriller, but only a barrier tape guides the eye and lets the viewer wonder for themselves what happened here. You'll learn how to isolate the tape, warp it with the Puppet Warp, use it twice, and then integrate it into the scene in terms of color and lighting.
The video is only loaded from YouTube when you play it – data (including your IP address) is then transmitted to YouTube/Google. More in the privacy policy
Key Takeaways
- An element like a barrier tape creates tension because it raises questions without answering them.
- The Puppet Warp deforms layers via pins that you can readjust at any time. For this, the layer must be rasterized; Smart Objects cannot be warped directly.
- A blue color fill as a clipping mask tints the tape to match the atmosphere of the scene.
- A brightness layer with a soft brush in black and white deliberately places light and shadow and brings depth to the image.
Step-by-Step Guide
Step 1: Isolate and insert the barrier tape
Start with a photo of the barrier tape. The original file in the video is a RAW file, but you can also use your own photo. Isolate the tape with a selection tool of your choice. This takes about two to three minutes. Then move the isolated tape into your scene with the Move tool.

Step 2: Place the tape and organize it in a group
Position the tape over the person in the image so that it appears to be in front. To keep your layers organized, put the layer in a group and name it "Absperrung" (barrier). This way you can edit all adjustments together later.

Step 3: Rasterize the layer and apply the mask
Before you can warp the tape, you have to rasterize the layer. Right now it is a Smart Object, and in this form the Puppet Warp doesn't work. So rasterize the layer first. Then apply the layer mask and convert the result back into a Smart Object. This way your tape stays editable without losing the warp.

Step 4: Duplicate the tape
For the look with two tapes, you need a copy. Duplicate the new Smart Object and place the duplicate as a separate layer. This way, the two tapes can each get their own warp later.

Step 5: Activate the Puppet Warp and set pins
For the first tape, choose the command "Edit" and then "Puppet Warp". The mesh lets you pull at individual points. Set one pin at the beginning of the tape and one at the end. With the pins, you can move or rotate the tape at the ends. You don't need the option "Activate Puppet Warp" in the options bar at the top for this; it only adds extra unrest and is switched off here.

Step 6: Add a wave to the tape
A straight tape looks artificial. So set another pin in the middle of the tape and pull it downward. The tape now sags as if it were stretched between two points. Repeat the process with a pin further back, which you pull slightly upward. This creates a natural wave. You can grab the pins again at any time until the shape looks right.
Step 7: Rotate and warp the second tape
So that both tapes don't look identical, first flip the second tape. Then activate the Puppet Warp again. Set a pin at each of the outer corners and pull the middle crosswise in a different direction. How much you move the tape and which shape looks better is up to you. Pull the pins a bit up and down until the course clearly differs from the first tape.

Step 8: Placing the tapes correctly in the scene
The barrier tape should hang behind the person but sit in front of the background. Therefore, move the group in the layer order so that it sits behind the person. You can also place the tape behind the lighting mood. This looks more natural and also takes on part of the scene's color mood.

Step 9: Coloring the tape blue
Create an additional group above your "Absperrung" group and name it "Folie". Add a color fill layer to this group and choose a blue. If you like, you can pick the hue directly from the ground in the scene, which usually fits the mood best. Then set the color fill layer as a clipping mask on the group. Set the blend mode to "Color" and reduce the opacity to about 30 to 40 percent. Without a clipping mask, the color would cover the entire image, which is why this step is important.

Step 10: Subtly adjusting the saturation
The yellow of the tape still looks a bit glaring. Add a "Hue/Saturation" adjustment layer above it and also set it as a clipping mask. Reduce the saturation until the yellow looks calmer and blends into the scene.

Step 11: Placing light and shadow deliberately
For the final finishing touch, create an empty layer and name it "Helligkeit". Also set it as a clipping mask and set the blend mode to "Normal". Choose a soft brush with about 5 percent opacity. With black, paint over the areas that should be in shadow. With white, brighten the spots that receive light. If needed, go over the same spot several times, as this lets you build up the effect slowly and in a controlled way. The result looks more three-dimensional and the depth of the scene becomes clearly noticeable.

Step 12: Readjusting the swing
Finally, you can make the tape a bit more dynamic. If the shape looks too straight, open the Puppet Warp with a double-click and change the swing of the pins. This gives the tape more movement, as if the wind were blowing through the street. At the end, compare the image with and without the barrier tape. The difference shows how much a small detail can change the story of the scene.

Summary – Crime Look in Photoshop: Realistically Warping and Using Barrier Tape
With barrier tape, you tell more in a scene than the image shows. You have learned how to isolate the tape, rasterize it, and warp it with the Puppet Warp. A second tape provides depth, a blue color fill as a clipping mask integrates it in terms of color, and a brightness layer sets light and shadow. Pay particular attention to making sure the layers are in the correct order. Then you get a crime look that prompts the viewer to keep thinking.
FAQ
Do I absolutely have to photograph the barrier tape myself?No, you can also use a suitable image from a stock image database, as long as the license permits the use. What matters is that the tape is clearly visible and as evenly lit as possible.
Why do I have to rasterize the layer before using the Puppet Warp?The Puppet Warp cannot be applied directly to smart objects. Only a rasterized layer can be warped. Afterwards, you can convert it back into a smart object if needed.
What does the clipping mask do for the color fill?The clipping mask restricts the color to the barrier tape. Without it, the blue would color the entire image.
Can I change the warp later?Yes, you can return to the Puppet Warp at any time with a double-click and move the pins. This also applies if you have already set up the layer as a smart object.
Which color is best suited for the coloring?A blue taken from the ground of the scene usually fits the atmosphere well. However, you can choose the color freely, as long as it suits the overall look.
Why do I work with black and white on the brightness layer?Black paints shadows, white brightens areas. With a brush at low opacity, you build up the effect step by step until the depth is right.


