
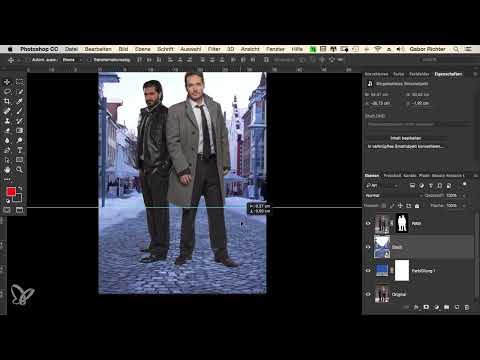
Imagine your characters seemingly standing in mid-air. You solve exactly this problem with a cleanly fitted background. In this tutorial from the series "Der Krimilook", Gabor shows how to insert a city backdrop into your image so that the ground, perspective and color mood match. You'll learn how to place and scale the background and align it with guides, and how to adapt it to your people in Camera Raw.
The video is only loaded from YouTube when you play it – data (including your IP address) is then transmitted to YouTube/Google. More in the privacy policy
Key Takeaways
- A new background only looks credible when the ground is right. The people need solid ground under their feet.
- With Ctrl+T or Command+T you transform the background. Hold down Alt and Shift while doing so to preserve the proportions.
- Guides from the ruler (Ctrl+R or Command+R) help you match the depth and the horizon of the ground line.
- A reference object such as a manhole cover gives you a point of orientation for the correct size of the ground elements.
- In Camera Raw you adjust color temperature, highlights, shadows, clarity, saturation and sharpness so that the background matches the mood of the person.
- A clean layer structure with groups makes later corrections easier.
Step-by-Step Guide
Step 1: Recognize the Problem
Before you get started, look at your image critically. The two people look as if they were floating because they lack ground. This is because they were originally photographed in the studio, without any ground in the scene. Your goal is to give them solid ground to stand on. Absolute precision matters less here than a credible overall impression.

Step 2: Place the Background in Photoshop
Open the background file in Explorer or Finder. In the example, it is a city shot in DNG format. For your composite you don't need the passersby or the buildings, only the ground. Simply drag the file into your Photoshop file via drag & drop. Photoshop then first opens Camera Raw. Since you don't want to develop the background yet, confirm with OK. The image then ends up as a layer in your document.

Step 3: Correct the Size
After placing it, the background is often at the wrong scale. Activate the transformation with Command+T or Ctrl+T. If you simply drag now, you will distort the image. So hold down the Alt and Shift keys while scaling. This preserves the proportions, and the image doesn't look artificially stretched. Make sure that after enlarging, the background still sits sensibly beneath the people.

Step 4: Find the Rough Position
Move the background down until it sits roughly where the people's ground should begin. You don't need to work with mathematical exactness. Gabor relies on his instinct, because for the effect that is often more important than a technically perfect position. Take enough time for this step and keep nudging the background a bit further until the overall picture looks coherent.

Step 5: Separate the People from the Background
So that the people are not covered by the background, reveal the people's layer again via its layer mask. Also hide the background in the places where it would overlap the figures. For a clean separation, you can edit the mask so that only the ground remains visible.

Step 6: Check the Perspective with Guides
The background has its own perspective, which may differ from your image. To check it, show the ruler with Ctrl+R or Command+R. Then drag a guide from the ruler to the height of the topmost point of the ground slope in the background, that is, where the line of the street or sidewalk recedes into the distance. You are not measuring real dimensions, but using the line as a visual aid.

Step 7: Matching the Depth and the Horizon
Now adjust the position of the ground so that the guide line matches the ground line in the background. To do this, show the mask of the people again to see whether the feet of the figures are standing in the right place on the ground. Perfection is not crucial here. What matters is that the impression is right.

Step 8: Checking the Size with a Reference Object
A good aid for judging scale is an object whose dimensions you roughly know. In the example, a manhole cover serves as the reference. Move it under the people so that it matches their body height. If the cover looks realistic, that is, as if the person could stand on it, the scale is fine. A perfect perspective cannot be achieved with this method, but for a photo composite it is sufficient in most cases.

Step 9: Assessing the Lower Area in a Targeted Way
To evaluate the ground independently of the rest, you can view the lower area of the background in isolation. To do this, deliberately hide the other areas. If the stones in the ground seem too small to you, enlarge the background slightly with Ctrl+T or Command+T. While doing so, continue to make sure that the ground line meets the horizon cleanly.

Step 10: Removing the Guide Lines
Once the ground fits, you no longer need the guide lines. You hide them with Command+Comma or Ctrl+Comma. Alternatively, under "View" you will find the option to clear guides. Double-clicking the layer then opens the Camera Raw dialog again, where you do the fine-tuning.

Step 11: Adjusting the Colors and the Mood
Now the goal is to match the background to the people. In the example, the scene should get a somewhat cooler mood. Set the color temperature to about 4700 Kelvin. You pull the highlights slightly to the left, to around minus 20, and the shadows to about plus 20. You proceed deliberately with restraint here, because the background should not look stronger than the people. You raise the clarity to about 30 so that the contours become stronger. You reduce the saturation to about minus 30, so that the cool mood is preserved without the colors looking too intense.

Step 12: Sharpness and Corrections in Detail
Since you enlarged the background considerably, sharpness is lost. In the Camera Raw dialog, switch to the Detail tab and set the radius to about 0.5. You increase the amount to roughly 100 so that the image looks crisp again. Also check for chromatic aberrations. In the example, slight color fringes in purple and green appear, which you subtly remove with the corresponding sliders. This correction is only a minor detail, but it contributes to a clean result.

Step 13: Readjusting the Contrast
Finally, you increase the contrast a little so that the background gains depth. Compare the state before and after sharpening to see the difference. It is not a big deal if the image is not yet perfectly sharp. You can refine the details later using layer masks and further adjustments.

Step 14: Tidying Up the Layers
A clear layer structure will save you a lot of time later. Drag the city layer into a group and give this group a clear name, such as "Background". You also put the people in their own group, which you name, for example, "Person". The color fill that you may have created beforehand as preparation can be deleted. Also hide the original layer if you no longer need it. With that, you have finished inserting the ground.

Step 15: Adjusting the Shadow as a Final Finishing Touch
With the ground in place, the composite is almost complete. The next step is about the shadow beneath the people, which has to fall realistically onto the new surface. This anchors the figures firmly in the image. Gabor covers this step in one of the following videos.

Summary ??? Realistically Fitting a Crime-Thriller-Look Background in Photoshop
A believable background does not come about by chance, but through a structured approach. First you place the ground roughly, correct the size with proportional transforming, and check the perspective with guides. A reference object such as the manhole cover helps you with the scale. Finally, in Camera Raw you adjust color temperature, light, clarity, saturation, and sharpness so that the background and the people look like a single unit. With a tidy layer structure, your file remains clear and manageable even when making changes later.
FAQ
Why should I hold down the Alt and Shift keys when scaling?Holding down the Alt and Shift keys preserves the proportions of the background. This way the image is not distorted and looks more natural.
Does the perspective of the background have to be exactly right?No, with image composites it is mainly about the overall impression. A rough adjustment with guides and intuition is often enough, as long as the ground line looks plausible.
How do I find a suitable reference for the size?Use an object whose dimensions you roughly know, such as a manhole cover, a stair step, or a curb. Check whether it fits the person's body height.
How do I remove guides in Photoshop?You hide them with Command+Comma or Ctrl+Comma. You can also delete them via "View".
Why do I adjust the color temperature in the background?A differing color temperature often makes the background look like a separate shot. With an adjusted temperature and mood, it blends better into the subject.
What should I do if the background looks too strong after sharpening?Reduce the sharpening amount or adjust the contrast more subtly. The goal is a harmonious overall image in which the background does not overpower the people.


