
The left giant still looks a bit smooth in the composite so far, and this is exactly where this part comes in. With a texture, you give his skin structure, reinforce individual areas selectively with a second layer, and then add small trees in the foreground. This way, the scene ends up looking significantly more lively and believable. In the process, you learn how to limit textures to a single figure using clipping masks, use blend modes, and work with masks that you refine with a brush.
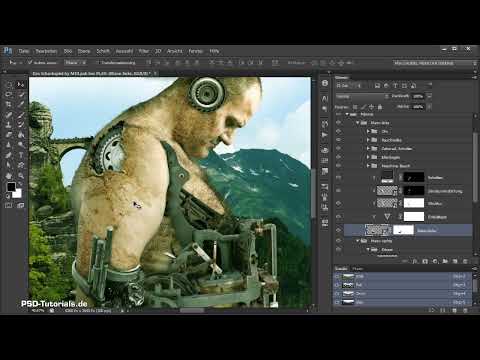
The video is only loaded from YouTube when you play it – data (including your IP address) is then transmitted to YouTube/Google. More in the privacy policy
Key Takeaways
- A clipping mask limits the effect of a texture to exactly one layer beneath it.
- The blend mode "Soft Light" makes the texture visible without destroying the base colors.
- A layer can be duplicated by holding the Alt key, and a black mask hides it completely until you selectively reveal areas with a white brush.
- Trees are placed on their own layer between the background and the figures and painted with a hard or speckled brush.
- A composite is created through many small fine adjustments, in which you repeatedly check masks, opacity, and position.
Step-by-Step Guide
Placing the texture and limiting it to the giant
First, activate the layer of the left giant so that your changes affect only him. Then, via "Place File," choose the structure you want to use. In the video, it is a texture named "Struktur 1," which you confirm with Enter.

Creating a clipping mask
So that the structure affects only the giant and not the entire background, you create a clipping mask. To do this, hold down the Alt key and click between the texture layer and the figure layer. Briefly confirm with Enter, and the clipping mask is active. The texture now appears exclusively on the giant's skin.

Adjusting the blend mode and transforming the texture
In the next step, you switch the blend mode of the texture to "Soft Light." This way, the skin takes on the structure without the colors being strongly distorted. With Ctrl+T, you can then scale down and rotate the texture until the structure fits the shape well on the visible skin surface.

Selecting the section of the texture
Now move the texture so that an area with an interesting structure lies exactly where the viewer looks. Pay particular attention to the places where the skin has wrinkles or contours, because that is where the texture looks most natural. Try out different positions until you are satisfied with the result.

Adjusting size and position to the hand
Adjust the size once more so that the structure is convincing in the lower area and on the hand as well. At the top, on the head, you can move the texture up a little. In the video, the layer is moved and scaled down minimally several times until everything looks coherent. Take your time, because this fine work determines the realistic impression. Confirm with Enter at the end.

Structure reinforcement with a black mask
To emphasize individual areas more strongly, you duplicate the texture layer by holding the Alt key and dragging the layer over itself. Name the new layer, for example, "Struktur Verstärkung." Then create a black mask by holding the Alt key and clicking the mask icon. This hides the layer completely.

Selectively revealing areas
With a white brush on the activated mask, you now paint only where the reinforced structure should be visible. In the video, these are mainly the shoulder area and a few spots on the head. Work with a low opacity so that the transition stays soft. Regularly compare the before and after states so that you don't overdo it.

Reducing color with a Vibrance layer
Since the texture still seems too strong in some places, you add a Vibrance layer and also attach it as a clipping mask to the texture layer. Then drag the saturation slider down significantly, to about 57 in the example. This takes out some color, and the skin looks more authentic.

Fine-tuning the texture
Fine-tune the texture once more so that it fits better, especially in the areas where body shapes are visible. Make sure that the shadow layer and the enhancement also match. Only when the interplay is coherent is this step considered complete.

Placing trees as a separate layer in front of the figures
For the trees, you drag the background layer upward while holding the Alt key, directly below the figure layers. Name it, for example, "Area in front of men". This way, the trees will later appear in front of the giants. Then hide the mask of this layer so that you can edit the entire area freely.

Choosing a brush and painting trees
For the trees, you use a relatively hard, small brush with white foreground color. Feel free to zoom in close to the image for this. If you want more variety, use a speckled brush. You can find such brushes online, free or paid, or you can create them yourself.

Placing trees realistically in front of the figures
Place the trees so that they stand partly in front of the giants, for example in the area of the hand. This looks much more realistic than if the trees were all just in the background. If the texture doesn't yet reach the edge, you can extend it or overlay it at that spot so that this area also gets structure.

Checking the opacity and shape of the trees
Not every tree will look coherent right away. If a spot is too conspicuous, you lower the opacity of the layer or use the clone stamp to correct mistakes. Also pay attention to the shape of the trees: orient yourself on real outlines so that the trees don't look like blocks. You remove areas with too much black by hiding them again with the mask.

Masking out the trousers and adding shadows
On the right giant, you hide the trousers with a mask. For this, use a normal brush with a soft tip and full opacity, and paint close along the arm. In the lower area of the image, you should also work with a smaller brush and a speckled tip so that natural transitions are created there as well. The hand then looks as if it had been lost in the thicket.

Adding shadows near the hand
In the last section of this part, you add some shadow to the hand. At the moment, it is still sharply set off from the background. With soft shadows, this transition can be softened so that the figure is better embedded in the surroundings. The result of this interim stage already looks convincing.

Preview of the next part
The left giant is thus largely finished. In the next part, you turn to the right giant and transform him into a nature giant as well. The techniques from this part, namely textures, masks and trees, will be used again and again.

Summary – Photoshop Composing: Placing Skin Texture and Trees Realistically
You have learned how to apply a texture to the skin of the left giant in a targeted way using a clipping mask and make it visible with the "Soft Light" blend mode. With a duplicated layer and a black mask, you strengthen individual areas, while a Vibrance layer subtly reduces the color. Then you place trees on their own layer in front of the figures and refine them with brushes, opacity, and a mask. The key principle here is that every change is controlled through masks and that you repeatedly check the before-and-after comparison.
FAQ
What is a clipping mask used for?A clipping mask ensures that the layer above only affects the layer below. This way the texture stays on the giant's skin and is not spread across the whole image.
Why is the blend mode set to Soft Light?Soft Light transfers the lighter and darker structures of the texture without strongly changing the base colors. This gives the skin depth without looking artificial.
What does the black mask do when enhancing the structure?The black mask completely hides the duplicated layer. Only when you paint with a white brush does the enhanced structure become visible in the desired places.
How can I place the trees in front of the giants?Drag the layer with the trees below the figure layers so that it sits lower in the stack. With a mask you can then determine where the trees are visible in front of the figures.
Which brushes are suitable for trees?Hard, small brushes or speckled brushes are suitable for trees. Such brushes are available online both free and paid, or you can create them yourself.
Why is fine-tuning so important?Small adjustments to position, size, and opacity determine whether a composite looks realistic. So take your time and compare the result regularly.


