
Smoke is supposed to rise from the head of the giant in the image. For that you need a smoke cloud that is cleanly separated from the blue background, placed convincingly, and color-matched to the scene. That is exactly what this part of the chess game composing shows you, which belongs to the series as part 13 of 21.
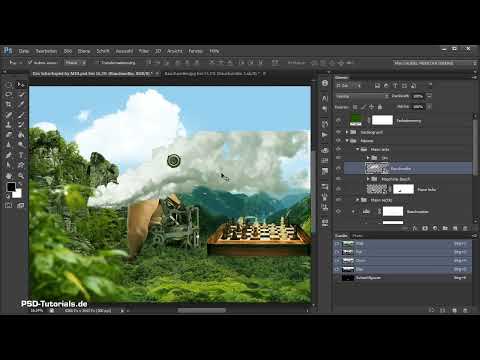
The video is only loaded from YouTube when you play it – data (including your IP address) is then transmitted to YouTube/Google. More in the privacy policy
The method uses the LAB color mode, with which you isolate the smoke without a elaborate selection. Then you insert it into your composing using masks, tonal corrections, and color balances.
Key Takeaways
The LAB color mode separates lightness (L) from the color channels A and B. The B channel controls blue and yellow and is therefore suited to hiding the blue background.
With split sliders in the Layer Style dialog, you create soft transitions instead of hard edges, so that the smoke looks transparent.
A helper layer and a layer mask help you cleanly remove the remaining areas such as the chimney.
The smoke only looks realistic once you flip it, reduce its opacity to around 5 percent, and adjust its brightness and the shadows to the scene using clipping masks.
Step 1: Open and Prepare the Smoke Cloud
Open the file with the smoke cloud via "File" and "Open". The smoke cloud is available as a standalone image that you can edit directly in Photoshop. It is important that you don't confuse the background with the smoke source: the blue background has to disappear later, while the smoke remains.

Step 2: Switch to the LAB Color Mode
The key to isolating the smoke lies in the color mode. Go to "Image", then "Mode", and switch from RGB to LAB color mode. Afterwards, pay attention to the channels in the Channels panel, because they change accordingly.
The L channel stands for luminance, that is, the brightness in the image. It shows you what is light and what is dark. The A and B channels carry the color information: A controls green and red, B controls blue and yellow. The B channel is exactly the one that is crucial for you.

Step 3: Convert the Background Layer into a Floating Layer
The background layer is locked and displayed in italics. Double-click it and confirm the prompt with "OK" so that it becomes a normal, freely movable layer.
To open the layer styles, double-click on an empty area to the right of the layer name. If you click directly on the name, you rename the layer. If you click on the icon, something else happens. The layer styles contain the sliders you need now.

Step 4: Hide Blue Tones via the B Channel
In the Layer Style dialog, you will find two blending sliders at the bottom. In the dropdown, select the "B" channel instead of "Lightness". You are now working with blue and yellow. As a memory aid: B as in Blue and Yellow.
Drag the left slider of the color to the right and watch the image as you do so. The blue parts of the background gradually disappear. The further right you go, the more the smoke dissolves as well. If you drag all the way to the right, the entire image is gone. So you have to find the point at which the background disappears but the smoke is still preserved.

Step 5: Split the Slider for Soft Transitions
Isolating the smoke initially produces hard edges. To smooth them, hold down the Alt key and drag the slider apart into two halves. This creates a soft transition in which the colors blend into each other and become only partially transparent.
Make sure you don't dissolve the white of the smoke. Drag the sliders until the smoke looks natural. Confirm the setting with "OK". After that, you have already largely isolated the smoke.

Step 6: Helper Layer and Layer Mask for Fine-Tuning
Now create a new empty auxiliary layer by pressing Ctrl and E. You then merge this layer with the smoke layer, which only works with at least two layers. Hide the auxiliary layer afterwards.
Switch back to the RGB color mode via "Image" and "Mode". In the dialog, choose "Don't Merge" so that you keep the layer floating. This gives you a smoke layer to which you can apply a layer mask.
With a mask, you remove the areas you don't want. In the mask, use a hard brush at full opacity and paint over the area that should disappear. An additional auxiliary layer in a light blue, on which you place the smoke, is helpful so that you can see the edges better. For the last remainder of the chimney, switch to a softer brush and work patiently.

Step 7: Desaturate the layer
Click on the image layer, not the mask, and press Ctrl, Shift and U. The layer is desaturated, that is, displayed without color. This gives you a neutral base that you can selectively recolor later.

Step 8: Adjust tonal values with a Levels adjustment
The shadows look too strong. Therefore, create a Levels adjustment layer. Pull the black point back slightly to soften the shadows. You may also help a little in the white to increase the contrast minimally.
Pay particular attention to the bright areas. If you pull the white too far, the smoke loses its detail and becomes completely white. You can correct the final finer points later in the composing.

Step 9: Save as a Smart Object and place it
Show the auxiliary layer again and press Ctrl, Alt, Shift and E. This creates a visible layer from all contents as a new layer. Convert this into a Smart Object and name it "Smoke Cloud". Then drag it into your composing.
Lock the color mood layer so that you don't accidentally move the wrong layer when moving the smoke cloud. Remove any still visible artifacts via a mask, since you can easily correct this mask later.

Step 10: Flip, group and position
The smoke cloud must match the posture of the giant. Therefore, flip it via "Edit", "Transform" and "Flip Horizontal". Then put the layer into a group, which you name "Smoke Cloud", for example. This keeps your document organized.
Then place the smoke the way it should appear at the giant's head. If necessary, make it smaller with the transform function and move it toward the head. Look at the result in the overall picture again and again, because only there does it become apparent whether the position is right.


Step 11: Reduce opacity
Smoke that lies opaque on the image quickly looks unrealistic. Therefore, first reduce the opacity of the layer to about 95 percent and finally to around 5 percent. The point is that the background shines through slightly. Don't overdo it, because smoke that is reduced too much looks artificial.

Step 12: Darken the brightness of the smoke with a clipping mask
So that the brightness affects only the smoke, create a Levels adjustment layer as a clipping mask. On it, play with the sliders until the brightness fits the scene. Take your time experimenting, because in this step you may readjust several times.
At the end, reduce the effect to about 30 percent. This only darkens slightly. If only the back area should look darker, invert the layer mask and paint manually with low opacity in the area that should be made denser.

Step 13: Adjust the shadow color with a Color Balance
Finally, adjust the color of the shadows to the greenish overall mood. To do this, create a Color Balance as a clipping mask and work only with the shadows. Leave red and yellow untouched. Pull the shadows slightly toward green and, if needed, slightly toward blue.
At the end, compare the result with and without your corrections. Only this direct comparison shows you whether the smoke fits harmoniously into the scene.


Summary ??? Isolating and Adjusting a Smoke Cloud: Photoshop Composing Tutorial
In this tutorial, you have learned how to separate a smoke cloud from the blue background using the LAB color mode. Via the B channel, you hide the colors, smooth the transitions with split sliders, and remove disturbances using masks. Afterwards, you desaturate the smoke, adjust the tonal values, and insert it as a smart object into your composing.
In the composing, you flip and place the smoke at the giant's head, reduce the opacity, and adjust brightness and shadows with clipping masks. This makes the smoke look realistic and blend into the scene. The next part continues with preparing a shoulder gear.
FAQ
Why do you switch to the LAB color mode for the isolation?In the LAB color mode, the lightness channel separates the luminance from the colors. Via the color channels A and B, you can selectively hide blue and yellow without destroying the smoke itself.
Why do I have to convert the background layer into a floating layer first?The background layer is locked. Only as a normal layer can it be moved, edited with layer styles, and given masks.
What does splitting the sliders with the Alt key do?This lets you pull the sliders apart. Soft transitions are created, so the colors are not cut off sharply but are faded in semi-transparently.
Why shouldn't I reduce the opacity of the smoke too much?With very low opacity, the smoke quickly looks unrealistic and almost completely disappears. An opacity of about 5 percent reduces the effect appropriately and lets the background shine through.
What is the advantage of a clipping mask on the adjustment layers?A clipping mask only affects the layer beneath it. This way, brightness and color adapt exclusively to the smoke and do not affect the rest of the composing.


