
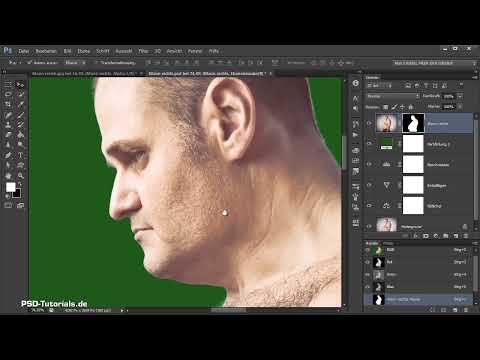
A clean cutout determines whether a person later looks genuinely integrated in a composite or looks like they were pasted on. That is exactly what you work on in this tutorial. You prepare the man on the right for the composite, correct his colors, gently desaturate the image, and separate him from his background using channel calculations and a mask. The video is part 2 of 21 in the series and does not require any prior knowledge of the Channels panel, but you should have a basic understanding of adjustment layers and layer masks.
The video is only loaded from YouTube when you play it – data (including your IP address) is then transmitted to YouTube/Google. More in the privacy policy
Key Takeaways
- Color corrections via adjustment layers (Color Balance, Vibrance, Levels) can be adjusted at any time and remain non-destructive.
- The blue channel works best in this image because the person stands out most strongly from the background there.
- A channel calculation with the blend mode "Overlay" creates a new alpha channel with significantly higher contrast.
- The mask is created by painting with black (person) and white (background), with hair being worked on using soft brushes and midtones.
- The Clone Stamp helps replace light areas of hair with dark hair without repetitions being noticeable.
- A Smart Object prevents quality loss when you later scale or rotate the cut-out person.
Step-by-Step Guide
Step 1: Open the image and zoom in
Simply drag the desired photo from Windows Explorer into Photoshop. With the Hand tool and the mouse scroll wheel, you enlarge the visible area so that you can see the details well. It is immediately noticeable here that the shadows, i.e. the trousers, edge areas and hair, have a distinct blue cast. You will neutralize this color cast in the following steps, because the image should not go into the composite with this look.

Step 2: Create Color Balance as an adjustment layer
The background layer is locked and cannot be moved. That is why you work with adjustment layers. Click the icon for new adjustment layers at the bottom of the Layers panel and choose Color Balance. The advantage: you can still readjust every correction later without changing the original image.
Step 3: Balance the shadows color-wise
Color Balance divides the image into shadows, midtones and highlights. Begin with the shadows, i.e. the dark areas where the blue cast is strongest. Move the Cyan-Red slider slightly toward red, to a value of around +28. Then add a little magenta. Pull the Blue-Yellow slider toward yellow, to a value of around -42 to -43. The key is that the trousers feel more natural and no longer look cool.

Step 4: Adjust midtones and highlights gently
Next, switch to the midtones. These consist of the medium gray values. Move the Cyan-Red slider a bit toward red again, to a value of around +5, and leave Magenta-Green unchanged. Blue may be added in the midtones, because the blue cast is still visible here as well.
After that, it is the highlights' turn, i.e. the brightest areas such as the forehead. Here you proceed much more carefully. A value of around -3 for blue is often enough. If you overdo it, the skin quickly looks unhealthy.


Step 5: Check the result and name the layer
Toggle the adjustment layer on and off using the eye icon to compare before and after. Focus only on the person. The background plays no role at this stage, since it will be removed later anyway. Then give the layer a meaningful name, such as "Adjust color". This makes it easier to keep an overview as the project grows.

Step 6: Desaturate with the Vibrance adjustment layer
The colors still look too intense overall. Therefore, create a new adjustment layer of the type Vibrance. It offers two sliders. Saturation desaturates all colors evenly, while Vibrance mainly tones down colors that are already saturated and leaves the rest untouched. Vibrance is thus the finer option. You work here with a value of around -25 and check the result again using the eye icon. The image then looks more realistic and calmer.

Step 7: Set the black point and white point with the Levels adjustment
Now create a Levels adjustment layer. The black slider determines which tone in the image will count as the deepest black from now on. If you drag it too far to the right, the black becomes gray and flat. A value of around 17, on the other hand, brightens the trousers and hair without washing out the image.
The white slider works the other way around. It determines the brightest point. If you drag it to the left, the image quickly becomes gray and unpleasant. So if the effect isn't convincing, move it back to the right.


Step 8: Merge layers into a single layer
Before you cut out the subject, combine all adjustments into a single layer. Select the top layer and press Ctrl + Shift + Alt + E. Photoshop then creates a new layer containing all the changes. Rename it "Mann rechts" by double-clicking. You can then hide or delete the old layers.

Step 9: Open the Channels panel and compare channels
Open the Channels panel via the Window menu if it isn't visible. There you see the RGB channel as well as the red, green, and blue channels. Each of these channels shows the brightness distribution of one primary color. The combination of all three channels produces the color image, since monitors work with red, green, and blue.
Now compare the individual channels to find the highest contrast between the person and the background. The hair stands out well, while the forehead hardly does. The trousers are especially clearly defined in the blue channel. The blue channel is therefore the best basis in this case.


Step 10: Calculations with the "Overlay" blend mode
Activate the blue channel and choose the Calculations option in the Image menu. The dialog box shows the current file and the blue channel as the source. So you are blending the channel with itself. Using the blend mode, you try out different options. Darken and Multiply darken the image overall, which makes the background too dark. The "Overlay" blend mode, on the other hand, creates a pleasant contrast in which the background stays bright and the person stands out clearly. Confirm with OK. Photoshop then creates a new alpha channel.


Step 11: Sharpen the alpha channel with Levels
Activate the new Alpha 1 channel and open Levels with Ctrl + L. Drag the black slider slightly to the right to make the person darker, and the white slider slightly to the left to make the background brighter. Pay attention to the hair. Over-sharpening eats away fine details and makes the contours hard. So work carefully and confirm once the contrast is right.

Step 12: Set up the brush for mask editing
Now zoom into the image and choose a brush. Important: you continue working on the Alpha 1 channel. Right-clicking on the canvas opens the brush settings. There you adjust size and hardness. It's even faster with a keyboard shortcut. Hold down Alt and the right mouse button at the same time. Dragging the mouse left and right changes the size. Up and down changes the hardness. This shortcut saves a lot of time.


Step 13: Paint the outline of the person with black
Set the foreground color to black. Use it to paint over the entire person, meaning head, body, and clothing. Work especially carefully on the hair. Here it helps to follow the contours with a small brush and not paint over individual strands, since otherwise you carry background into the cutout. With the Dodge tool, which you find via the icon with the letter O, you can additionally darken shadows in Burn mode without changing the white areas.


Step 14: Fill the background with white and refine the midtones
Press the X key to switch between the foreground and background color so that white is in front. Use it to paint the background. In the fine hair areas, work with small brushes again. For difficult spots, switch to the Dodge tool and select the Midtones range. This lightens the gray transitions slightly without affecting the black of the hair. Gray areas on the hair are intentional, by the way, since they will later appear semi-transparent and therefore look more realistic.


Step 15: Create a mask from the alpha channel
Hold down Ctrl and click on the thumbnail of the Alpha 1 channel. This creates a selection. Then activate the "Mann rechts" layer and click the layer mask icon at the bottom of the Layers panel. As long as the old layers are visible, they shimmer through the cutout. Therefore, create an auxiliary layer with a color fill, for example in green, and drag it beneath the person. Now you can see exactly what has been cut out.

Step 16: Invert the mask
Often the mask is initially reversed. Click on the layer mask and press Ctrl + I to invert it. After that, the person is visible and the background has disappeared. You now see the result you have worked out up to this point.

Step 17: Correct light hair with a clipping mask
Light spots are still visible on the hair because the background was light in the original. Create a new layer for this, which you name, for example, "Haare färben". Hold down Alt and click between the "Haare färben" layer and the person. This creates a clipping mask. All changes on this layer now affect only the person below. Paint over the light areas with black to darken them.

Step 18: Retouch hair with the Clone Stamp tool
Select the Clone Stamp tool. Hold down Alt and click on a dark, even section of hair. Then paint over the light spot. Change the source regularly so that no patterns repeat. This takes patience, but rewards you with a clean cutout where later no one will notice that hair was copied here.

Step 19: Convert the layer to a Smart Object
Finally, merge all layers again with Ctrl + Shift + Alt + E and name the layer "Mann rechts um". Right-click it and select Convert to Smart Object. This procedure is important because you can later scale, rotate, or distort the person without losing details. The person is now ready for the composing.

Summary – Photoshop Composing: Cutting out the right person with channel calculations
You first corrected the color of the right person with Color Balance, Vibrance, and Levels. Then you found the best contrast in the blue channel and created an alpha channel with channel calculations. This served as the basis for a layer mask, which you refined with the brush, Dodge tool, and Clone Stamp. Finally, you saved the layer as a Smart Object. The next part covers cutting out the left person.
FAQ
Why can't the background layer be moved?The background layer is locked, so you use adjustment layers or copy the layer.
Why do you work with adjustment layers instead of directly on the image?Adjustment layers remain editable and do not permanently alter the original image.
Why do you choose the blue channel for the cutout?In the blue channel, the person stands out most clearly from the background in this image.
What does the Overlay blend mode do?It increases the contrast so that the background stays light and the person stands out more strongly.
Why shouldn't hair be painted completely black?Gray midtones on the hair look more natural after the cutout because they appear slightly transparent.
Why should the layer be saved as a Smart Object?A Smart Object prevents quality loss when scaling, rotating, or distorting.


