
Good compositing stands or falls with a clean cutout. Especially with portraits that include hair, a roughly cut edge quickly looks fake as soon as a new background is placed behind it. In this tutorial, you will learn how to precisely trace a person with the Pen tool, refine the hair with the "Select and Mask" function, and end up with a clean mask. You don't need any prior knowledge of vector graphics, just a bit of patience when setting the path points.
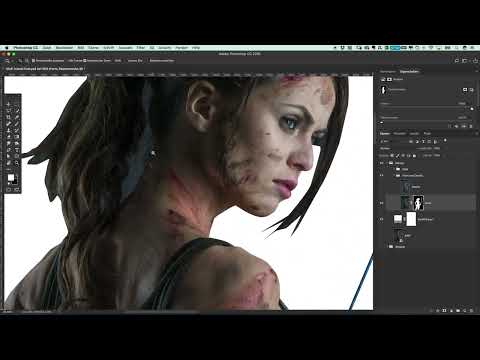
The video is only loaded from YouTube when you play it – data (including your IP address) is then transmitted to YouTube/Google. More in the privacy policy
Key Takeaways
Key Takeaways
- Not every detail needs to be retouched. Small imperfections in the subject can stay if they suit the look of the image.
- The Pen tool delivers sharp, controllable contours. Quick Selection or Magic Wand are usually only a starting point for irregular edges.
- Work with the Rubber Band option and small curves, so you can immediately see where the path is heading.
- You leave out fine hairs in the path. For them, you then use the "Select and Mask" function.
- Save large composites as PSB from the start, so the file doesn't exceed the 2 GB limit.
Step-by-Step Guide
Step 1: Decide What Not to Retouch
Before you get to the cutout, you should assess the subject. The skin has already been edited well, and the shape and details are right. You don't necessarily have to remove small blemishes on the subject. What matters is that you consciously decide what belongs in the image and what doesn't.

Step 2: Justify the Choice of Tool
For the cutout, you choose the Pen tool rather than Quick Selection. The reason is simple: you want sharp contours, and the subject has many small corners and stray bits that an automatic selection only partly detects. With the path, you have full control over every edge, even though the process takes a bit longer.

Step 3: Set the Right Mode
Select the Pen tool and be sure to switch to "Path" in the options bar at the top. If it is set to "Shape" instead, you create a vector shape. You don't need that for this tutorial, and it can cause confusion later. So make sure the mode is really set to Path before you start.

Step 4: Trace the Contour Correctly
Don't follow directly along the outer edge of the contour. Otherwise, light or dark fringes and borders appear that are difficult to remove later. It's better to place your path points a little way inside the person, that is, within the area. A viewer cannot tell that a little of the background is missing, but a dark edge stands out immediately.

Step 5: Work with the Rubber Band and Small Curves
Begin with small curves and set many anchor points instead of a few large ones. In the options, activate the Rubber Band so you can see the line between the last point and your mouse pointer. Without the Rubber Band, you are practically working blind until the first point is set. Don't hold the mouse button down after setting a point if you want to set a corner point. If you drag while clicking, a curve is created, which you can shape precisely by grabbing the handles. If you are still unsure about this, simply set more simple points. That works just as well, only the path becomes longer.

Step 6: Correct Mistakes Instead of Starting Over
If a section goes wrong, you don't have to discard the entire path. You can undo individual steps with the keyboard shortcut Command plus Z. Alternatively, Command plus Option plus Z helps to go back several steps. With the Direct Selection tool, you can grab and move individual anchor points without touching the rest of the path.

Step 7: Deliberately Leave Out Fine Hairs
At the base of the hair, individual little hairs stick up, which became visible with water when the photo was taken. It makes sense to leave these fine hairs out of the path. Do not follow the edge sharply here, but rather roughly alongside the hair. The path does not have to be perfect at this spot, because you will specifically bring the fine structures back into the image in a later step.

Step 8: Subtract inner areas with an additional path
Sometimes background areas lie within the person, for example between the arms or hair. You have to cut these out separately. To do this, draw an additional path around exactly this area. Photoshop will later recognize that this path should be subtracted from the outer selection. Make sure that the outer path stays closed, and pay special attention to the areas on the inside, because that is exactly where it is easy to forget.

Step 9: Load the path as a selection
Open the "Paths" panel. Hold down the Alt key and click on the path. Photoshop then loads the selection of the person. With this step, the vector line becomes an area that you can continue working with. This process is the basis for the mask in the next step.

Step 10: Create an auxiliary layer and the mask
Create a new solid color fill in white. The light area beneath the person helps you to better judge the cutout, because you immediately spot dark edges. Then select the layer with the person and create a layer mask by clicking the mask icon. Make sure that you have the correct layer active, because otherwise the mask ends up on the wrong element.

Step 11: Improve the hair with "Select and Mask"
Right-click on the mask and choose "Select and Mask". Zoom in close to the upper area where the hair is. Use the Refine Edge tool, that is, the second tool in the toolbar, and not the first one, which is intended for selection. Reduce the size of the brush for fine areas. Then trace along the contour and thereby bring the hair back. You will notice that Photoshop sometimes still picks up some background. You can see this immediately in the preview.

Step 12: Touch-ups with the brush
If Photoshop does not capture individual areas cleanly, you have to refine them. Paint in hair that has been lost, and remove background that has remained. The preview helps you check the result before confirming. Don't be disappointed if the solution is not perfect. A few individual strands can also be painted in at the end with a fine brush in the mask.

Step 13: Check the result on the image
Zoom through different areas of the image, especially the sides, hairline, and eyes. Not every spot will be cut out perfectly, and that is normal with this tool. What matters is that the overall picture is convincing. Small blurs are usually hardly noticeable in the finished composition.

Step 14: Soften the edge
An edge that looks too sharp makes the cutout appear unrealistic. Go into the mask, choose "Feather" in the options at the top, and set the value to about one pixel. That is usually enough to make the transition look more natural. Then compare the result with the previous state to see the difference.

Step 15: Apply the mask and unlink the chain
When the mask fits, confirm the selection. Then unlink the chain between the mask and the layer, move the shape up onto the person, and reactivate the remaining layers. This way, the mask is retained as an independent element and you can adjust it again at any time later.

Step 16: Saving the File Correctly
Save your document early, before you continue working on the composition. For large and complex composites, you should choose PSB as the format from the start. A PSD file can no longer be saved once it exceeds 2 GB, and Photoshop will then suggest a PSB file. With PSB, you spare yourself the situation of having to save a second document in the middle of the project.

Summary ??? Cutting Out with the Pen Tool in Photoshop
You have learned how to precisely trace a person with the Pen tool, touch up fine hair with the "Select and Mask" function, and finish the mask cleanly. Place your path points inside the contour, work with small curves and Rubber Band, and use the helper layer to check the cutout. With a soft edge and a PSB file, you are well prepared for further compositing.
FAQ
Why shouldn't I use the Quick Selection tool?The Quick Selection tool only partially detects many small corners and bits, and you often have to correct the results laboriously afterwards.
What happens if I draw in "Shape" mode instead of "Path" mode?Then a vector shape is created. For cutting out via a selection, however, you need a path, so you should switch to "Path".
Why shouldn't I place a path outside the contour?If the path lies outside, bright or dark flashes and fringes appear. If you place it slightly inside the area, the result looks more natural.
Can I move individual path points afterwards?Yes, with the Direct Selection tool you can grab and move individual anchor points without changing the rest of the path.
Do I have to cut out every single hair?No. You can roughly leave out fine hair in the path and bring it back later with "Select and Mask" or a fine brush in the mask.
Why is the edge softened?An edge that is too sharp looks unrealistic. A one-pixel soft edge is sufficient in many cases to create a natural transition.
When should I use a PSB file?If your composite becomes very large and complex, it is best to save as PSB from the start, because PSD files are limited to 2 GB.


